Overview
Programs are distinct units of an agency where clients can be referred, enrolled, and receive program-specific services. You can set up programs with their own screens, services, and eligibility requirements.
Note: We recommend not adding programs within the System Agency since that agency is primarily used by System Administrators for administrative purposes.
Programs in Clarity Human Services correspond with projects in the HUD HMIS Data Standards, and Project Descriptor Data Elements are recorded within a program's setup.
Note: Only users with Manage Agency enabled in their access role may create and edit Programs.
Program creation requires the configuration of several additional system components:
- Screens: data collection for programs occurs through screens. Screens are assigned to Program Templates, which are assigned to programs. Assessment screens can be assigned directly to programs as Program Assessments (described below). Only system administrators can configure screens. Visit the Screens section of our System Administration page for guidance on creating and editing screens.
- Program Template: Screens are assigned to Program Templates, and Program Templates are assigned to programs. Every program must have a Program Template. These templates define the screens assigned to different data collection stages and other elements of the program. Only system administrators can configure Program Templates. Refer to Program Templates for guidance on creating and editing templates.
- Services: to record a service at the program level, you must first create and assign that service to the program. For more information on creating and editing services, see Introduction to Services.
Create or Modify a Program
To create or modify a program, make sure that you are in the correct agency. From the Launchpad, navigate to MANAGE > PROGRAMS.
In addition to the program names, the PROGRAMS tab displays the Project Type, the Program Template currently assigned to the program, the number of services linked to the program, and programs with a Status of "Inactive."
You may filter the list of programs displayed by entering the program's name or alias in the search field, and/or selecting a Project Type from the drop-down menu, then clicking SEARCH.
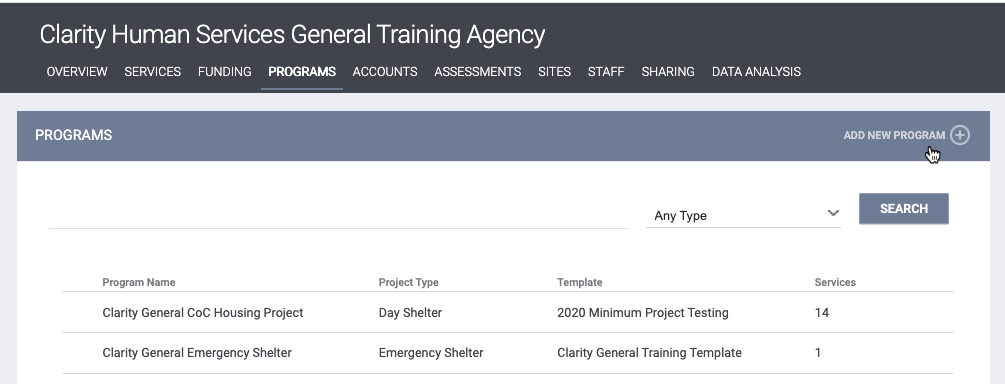
To edit an existing program, click the Edit icon to the left of the program name to open the MODIFY PROGRAM page.
To create a new program, click ADD NEW PROGRAM.
Initial Configuration
Note: After you complete these initial steps and save the program, a Program Resources sidebar will appear with additional configuration options.
Enter a Program Name, Alias (if applicable), and Program Description (if applicable).
Note: Program Name cannot contain the < symbol (e.g., "<Test Program").
- In the SEARCH results under MANAGE > PROGRAMS.

- In the Project drop-down list that appears when Eligible Clients Only is enabled when searching a Community Queue.
- In the program drop-down menu for the Program Merge tool.
Choose a Program Template. See Program Templates for more information.
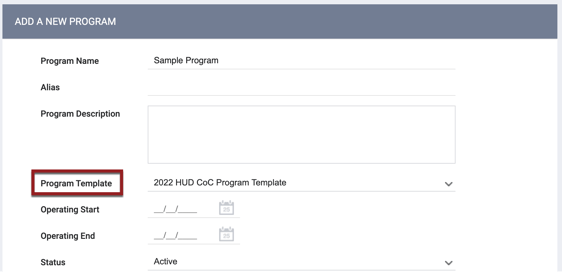
Once you select the Program Template, the configuration options associated with that program will appear on the screen.
Several configuration options are available when creating a program, some of which are associated with the HMIS Data Standards. The options available will depend on whether a custom program screen is associated with the selected Program Template. The options listed here are included in the system's "HUD HMIS Project Setup" program screen, which contains the necessary fields (HMIS Project Descriptor Data Elements) to comply with the HUD HMIS Data Standards.
Operating Start and End Date: the date the program started, and -- if applicable -- the date the program ended (HMIS Data Elements 2.02). Before you can add an Operating End Date to the system, all clients must be exited on or before the Operating End Date.
Bulk Exit Active Clients: this toggle enables the ability to exit all actively enrolled clients from a program on the program’s Operating End Date. Refer to our Bulk Exit Active Clients article for details.
Status: an "Active" program is available to users. An "Inactive" program is unavailable to users, but its information is still available in the system.
Enable on Customer Portal: this setting concerns the Customer Portal's Activity function, which displays program enrollment history in the portal. The Enable on Customer Portal setting must be enabled for each program that should be displayed in the portal.
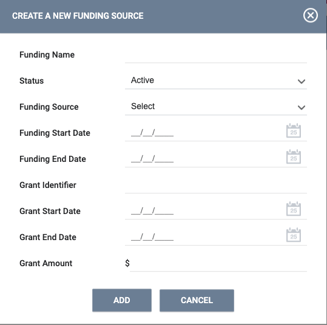
Funding Source: select an initial funding source from the picklist. If none of the existing funding sources in the picklist apply to this program, scroll to the bottom of the picklist and select "Create New Funding Source." The CREATE A NEW FUNDING SOURCE pop-up appears. After completing the fields, click ADD. The system creates a new funding source and applies it to the program.
Cross Agency Services: Refer to our Configuring Cross Agency Services article.
Program Type: Select the project type for the program (HMIS Data Element 2.02).
Notes:
- There is one Program Type ("Encampment") that is not a part of HMIS Data Element 2.02. Refer to our Configuring Encampment Programs article for more information.
- Projects funded with Funding Source (funding_source) HUD: Pay for Success (35) and that do not provide permanent housing should use Project Type = Other (7).
Identify RRH subtype: This field appears when "PH-Rapid Rehousing" is selected for Program Type (HMIS Data Element 2.02).
Program Applicability: This is used for reporting purposes and should match the Program Type.
Continuum Project: This indicates whether the program is in the Continuum of Care (HMIS Data Element 2.02).
Bed & Unit Management: When this setting is enabled for a program, the following INVENTORY functions apply:
- Referrals can be made to Beds/Units associated with the program through the REASSIGN section of the Community Queue.
- The Unit Queue will display Units/Beds associated with the program.
The Bed & Unit Management toggle is only visible for the following residential program types:

Notes:
- When this Bed & Unit Management toggle is enabled for a program, openings for this program cannot be posted in the Availability tab.
- However, in order to enable the ability to refer clients to a specific Unit/Bed from the Unit Queue and the Community Queue, users will still need to click the LIMITED AVAILABILITY option for the program on the Availability tab.
- Refer to the Program Availability Logic section of the Unit Queue article for additional details.
- However, in order to enable the ability to refer clients to a specific Unit/Bed from the Unit Queue and the Community Queue, users will still need to click the LIMITED AVAILABILITY option for the program on the Availability tab.
- The Bed & Unit Management picklist in Referral Settings determines whether this Bed & Unit Management toggle is read-only or editable. Refer to our Referral Settings: Overview article for details.
-
If a system’s subscription does not include the Referral Management component of Clarity Human Services, the Bed & Unit functionality cannot be applied to any programs within the Referral Setting. Bed & Unit Management will be set to OFF and will be read-only.
Bed & Unit Management settings and Program Visibility settings that impact reassigning referrals from the Community Queue and Unit Queue:
-
When Bed & Unit Management = Disabled, referral visibility follows the Program Visibility: Community Queue setting selection logic.
-
When Bed & Unit Management = Enabled, program visibility access rights and Limit Unit/Bed Visibility settings for INVENTORY configuration provide an added layer of granular control over where referrals can be directed.
- For more details on Bed & Unit Management and Program Visibility settings, refer to the Program Setup: Program Visibility article.
Use Inventory Calculated Records: Turn this toggle ON for each program that should use Bed & Unit Inventory information for reporting. There are three options to select from:
- Manual Entry Records Only
- Calculated Records Only
- Both Manual Entry and Calculated Records

For more information, please refer to the Bed & Unit Inventory Information section in this article and our Program Setup: Bed & Unit Inventory Information article.
Manage Units/Beds: Enables display of the Units/Beds tab on the Program Enrollment screen. Refer to our Units/Beds Tab article for more information.
Note: If the Manage Units/Beds setting is enabled, an INITIAL OCCUPANCY INFORMATION section will appear on housing program enrollment screens. Refer to the Initial Occupancy Information article for more information.
Site Primary Location: the location of the program. Refer to Program Setup: Sites for information on adding additional sites or selecting a different Primary location.
Target Population: the program's target population (HMIS Data Elements 2.02).
Housing Type: the type of location where housing is provided (if applicable) (HMIS Data Element 2.02).
Geocode: The geocode for the primary location. Geocodes are updated annually and available on the HUD Exchange. Mobile programs (e.g., street outreach) should record the geocode based on the location of their administrative office. Scattered-site housing programs should record the geocode where most beds are located or where most beds are located as of the last inventory update (HMIS Data Elements 2.03).
HMIS Participation Status, Participation Start Date, and Participation End Date: refer to our HMIS Participation Status article.
Project is a Coordinated Entry Access Point, Provided by CE Project, Project Receives CE Referrals, CE Participation Status Start Date, and CE Participation Status End Date: refer to our CE Participation Status article.
Continuum of Care: select the appropriate Continuum(s) of Care. System Administrators maintain Continuum of Care information in System Variables (HMIS Data Element 2.03).
Program Visibility:
Three independent program visibility fields are available:
- Program Visibility: Community Queue/Unit Queue
- This setting affects program visibility on Community Queue / Unit Queue referral reassignments.
- The following options are available: Public, Limited, Agency, None.
- Program Visibility: Client Referrals Tab
- This setting affects program visibility for referrals that take place on the client’s Referrals tabs.
- The following options are available: Public, Limited, Agency, None.
- Program Visibility: Eligibility Determination Screen
- This setting affects program visibility for referrals that take place from Eligibility Determination.
- The following options are available: Public, Limited, Agency, None.
For new programs, all three of the Program Visibility setting fields default to Public.
Refer to the Program Setup: Program Visibility article for more details on each Program Visibility setting, details on the options available for each of the three settings, and more.
Direct Unit/Bed Referrals: This toggle enables the ability to select an INVENTORY Unit/Bed when making a referral from the client-level REFERRALS tab or from the PROGRAM ELIGIBILITY DETERMINATION page within the client-level ASSESSMENTS tab or the program-level Assessments tab.
Notes:
The selections made for the Program Visibility settings impact the Direct Unit/Bed Referrals setting.
-
When None is selected for Program Visibility: Client Referrals Tab AND Program Visibility: Eligibility Determination Screen, the Direct Unit/Bed Referrals setting field is hidden.
- When None is selected for all three Program Visibility settings, the Direct Unit/Bed Referrals setting field is hidden.
Direct Unit/Bed Referrals setting considerations for program and unit/bed referrals from the client Referrals tab(s):
-
When Direct Unit/Bed Referrals = Disabled, referral visibility follows the Program Visibility: Client Referrals Tab setting selection logic.
-
When Direct Unit/Bed Referrals = Optional or Required, the program visibility access rights and the Limit Unit/Bed Visibility settings in the INVENTORY configuration provide an additional layer of granular control over where referrals can be directed.
Direct Unit/Bed Referrals setting considerations for program referrals from Eligibility Determination screens:
-
When Direct Unit/Bed Referrals = Disabled, referral visibility follows the Program Visibility: Eligibility Determination Screen setting selection logic.
-
When Direct Unit/Bed Referrals = Optional or Required, the program visibility access rights and the Limit Unit/Bed Visibility settings in the INVENTORY configuration provide an added layer of granular control over where referrals can be directed.
For more information about Direct Unit/Bed Referrals and Program Visibility setting impacts, refer to the Program Setup: Program Visibility article.
Coordinated Entry Events: This toggle enables the ability to manage Coordinated Entry Event functionality. This toggle must be enabled for programs that should record Coordinated Entry Events and disabled for programs that should not collect Coordinated Entry Events. Refer to the Program Setup: Goals article for details.
Notes:
- The system records CE Events within the program that initiated a referral, not the program that may receive the referral.
- For programs that use custom program setup screens (any program setup screen that is not the "HUD HMIS Project Setup" system screen):
To manage the program's CE Events functionality, such as the ability to adjust the settings or disable/enable CE Events functionality, add the Coordinated Entry Events toggle to the custom program setup screen as follows: within the program setup screen editor, add the "Coordinated Entry Events" field (field data name: enable_ce_events).
Goals: enabling this setting will allow staff members to track whether a client accomplished a goal within an enrollment based on either demographic, service, or time-based data. Refer to the Program Setup: Goals article for details.
Auto Service Placement: This setting enables the ability to automatically provide specified services to the client upon enrollment. For more information, see Program Setup: Auto Service Placements.
Eligibility: This setting enables the ability to add criteria for program enrollment. Refer to Program Setup: Eligibility for details. Our Inventory and Eligibility article provides additional information on the Housing Inventory functionality.
Link from History: This allows the user to link services listed in the client record HISTORY tab to an enrollment for the program. Refer to Linking Service Items to Program Enrollments for details.
Program Assessments: This setting enables the ability to conduct assessments within a program enrollment. After you save the program, use the Program Assessments section of the Program Resources sidebar to designate the assessments that can be provided within the program.Program Notes: This allows the user to document client notes within the program enrollment and share them according to Sharing Settings and Access Roles.
Program Files: This allows users to upload, view, and manage files within the program enrollment. Refer to our Working with Files in the Client Record article for details.
Program Charts: This function provides a visual tracking system of specified variables over time. Refer to Program Setup: Charts for details.
Aging into Adulthood Notification: Refer to our Adulthood Notifications article for details on this setting.
Auto Exit Due to Inactivity: This setting provides the ability to automatically record a program exit when none of the enrollment's household members have program-related activity within their enrollment records for the specified timeframe. See Program Setup: Auto Exit for more information.
- When Auto Exit Due to Inactivity is enabled for Emergency Shelter – Night-by-Night programs, the Auto Exit Benchmark setting appears. Refer to Program Setup: Auto Exit for details.
Auto Exit to Permanent Destination: This setting, which is available for Coordinated Entry programs and encampment programs, provides the ability to automatically record a program exit when a client is indicated as being housed. See Program Setup: Auto Exit for more information.
Cascade Enrollment Data: This setting allows client data entered in the program's enrollment screen to pre-fill other enrollment screens in the client record, as long as the enrollment start date for the first program is within a designated number of days from the current date. After you toggle on this setting, a Threshold of picklist will appear for you to select the number of days.
Refer to the "Cascading from Enrollment to Enrollment" section of our Data Cascading article for more information.Cascade Assessment Data: This setting allows client data to automatically populate from an assessment to an enrollment or from an enrollment to an assessment within a specified number of days. After you toggle on this setting, a "Threshold of" picklist will appear for you to set that timeframe. After you save the program, use the Cascade Assessment section of the Program Resources sidebar to designate the assessments that will be allowed to cascade to or from an enrollment.
For more information, refer to the "Cascading from Assessment to Enrollment" and "Cascading from Enrollment to Assessment" sections of our Data Cascading article.
Close Services Upon Exit: When this setting is enabled, the system will add an end date to services associated with this program enrollment at exit.
Enrollment Age Warning: This feature aims to reduce the number of individual enrollments for clients under a certain age. When this setting is enabled, a warning will display when a user attempts to save an individual enrollment for a client whose age is lower than the age selected in the Threshold of picklist.
Enable All Client Forms: For details on enabling forms, see Enabling Forms for Agencies and Programs.
Saving the Program
After configuring the options associated with the program, click ADD RECORD to save the program. (The system underlines any required fields that you did not complete in red; you will only be able to save the program if you complete those fields.)
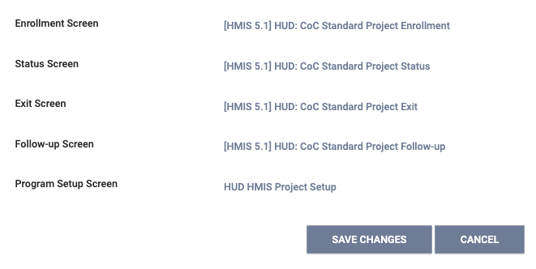
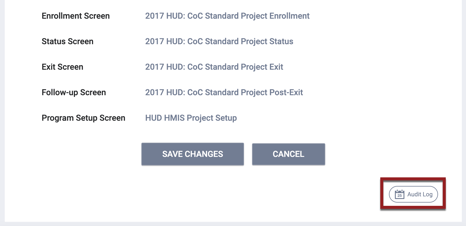
After you save the program, the system displays links at the bottom of the page that are visible only to users with the default System Administrator Access Role. These links provide a quick way to open the Enrollment Screen, Status Screen, Exit Screen, Follow-up Screen, and Program Setup Screen for the current Program Template.
Program Resources Sidebar
Once you save the program, the Program Resources sidebar appears on the right side of the screen to allow you to configure additional options for the program. Some sections of the sidebar appear for every program by default; other sections are displayed only when certain settings are enabled.
Overview
Click Overview in the Program Resources sidebar to display the MODIFY PROGRAM page.
Responsible Staff Members
Click Responsible Staff Members in the Program Resources sidebar to select staff members to receive referral status notifications.
To assign a staff member as a Responsible Staff Member:
- Click ADD STAFF.
- Type the staff member's name, username, or email in the search area. A list of applicable staff members will appear.
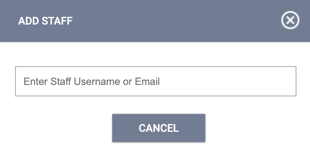
- Choose the appropriate staff member.
- Click ADD.
Assigned Encampment
The Program Resources sidebar for an encampment program will include an Assigned Encampment section. Refer to our Configuring Encampment Programs article for details.
HMIS Participation Status
Refer to our HMIS Participation Status article for details.
CE Participation Status
Refer to our CE Participation Status article for details.
Eligibility
The Eligibility section appears in the Program Resources sidebar when the Eligibility toggle is turned on. Refer to our Program Setup: Eligibility article for details on setting up eligibility requirements for a program.
Funding Sources
Click Funding Sources in the Program Resources sidebar to add existing funding sources to the program:
- Click ADD FUNDING SOURCE.
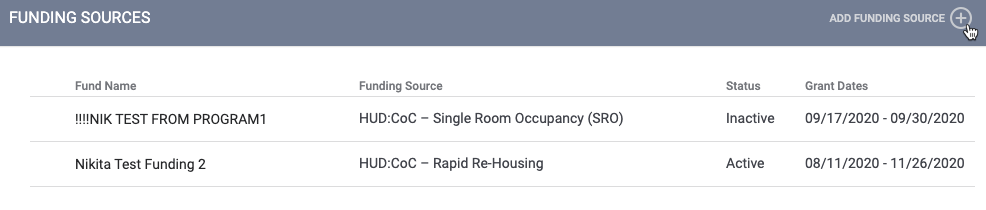
- Toggle on the desired funding source in the list that is displayed.
- Click ADD.
Assigned Services
If services have been assigned to the program, the system will display an Assigned Services section in the Program Resources sidebar that lists those services.
Administrative Sites
Refer to our Program Setup: Sites article for details on the Administrative Sites section of the Program Resources sidebar.
Bed & Unit Inventory Information
For residential programs, a Bed & Unit Inventory Information section appears in the Program Resources sidebar. For details on adding bed and unit information, refer to our Program Setup: Bed & Unit Inventory Information article.
If the Use Inventory Calculated Records option is turned on, all Bed & Unit Inventory records will be included (both manual entry and calculated records). The Bed & Unit Inventory Information section on the Program Resources sidebar includes a HOUSING INVENTORY SITES section and a BED & UNIT INVENTORY INFORMATION section.
The HOUSING INVENTORY SITES section has expandable subsections that display details about the number of Buildings and Units that are connected to each Site.
- For each Site, the system displays the following totals:
- Total number of Buildings associated with the program out of the total number of Buildings connected to the Site.
- Total number of Units associated with the program out of the total number of Units connected to the Site.
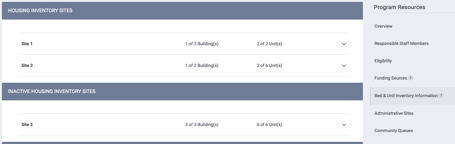
- Inactive sites will be listed in a separate INACTIVE HOUSING INVENTORY SITES section.
- Clicking on a Site displays a list of all the Buildings with either a Unit or a Unit Configuration Type connected to the program.
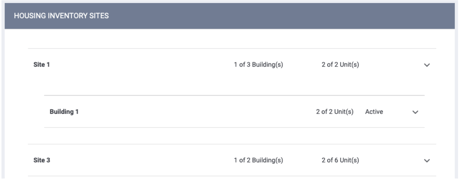
- For each Building, the total number of Units associated with the program out of the total number of Units connected to the Building will be displayed, along with the Building's status (Active or Inactive).
- Only one Site is expandable at a time.
- Clicking on a Building displays a list of Units in that Building, along with each Unit's status (Active or Inactive) and Unit Configuration Type.

The BED & UNIT INVENTORY INFORMATION section has headings that can be filtered by Household Type, CoC Code, Availability, and Inventory Type.

When Both Manual and Calculated Records is selected and there are gaps in dates or overlapping dates, the system will highlight the overlapping dates with red text and show a warning at the top of the Bed & Unit Inventory Information page:
- There are Bed and Unit Inventory date conflicts that must be resolved for accurate reporting. Conflicting dates will be highlighted in red.
- There is a gap in the Bed & Unit Inventory dates for this program. Please update the Bed & Unit Inventory Start or End Dates as appropriate.

Manual Bed & Unit Inventory can still be managed from the Bed & Unit Information page in the Program Resources sidebar.

Calculated Bed & Unit Inventory is managed from the SITES tab, within Housing Inventory Sites, and is generally configured for use with the INVENTORY module.
Calculated Inventory Records for Bed & Unit Inventory Information are re-calculated every 30 minutes. If a change is made to a relevant Housing Inventory Site, and a user views the Bed & Unit Inventory Information for a program before re-calculation, then Inventory Type will be “Pending Recalculation.” After the recalculation, the Inventory Type will return to “Calculated.”
While a Bed & Unit Inventory record is “Pending Recalculation,” reporting will continue to use the latest “Calculated” records until the new “Calculated” records are available.

Attendance
For Night-By-Night Emergency Shelter (Project Type=1) programs only, the Attendance section will appear in the Program Resources sidebar. In this section, you may use the LINK WITH ATTENDANCE function to allow end users to view the program's HOUSING AVAILABILITY data in chart form on the following pages in the client record:
For more information on how to utilize the LINK WITH ATTENDANCE function, please review this article.
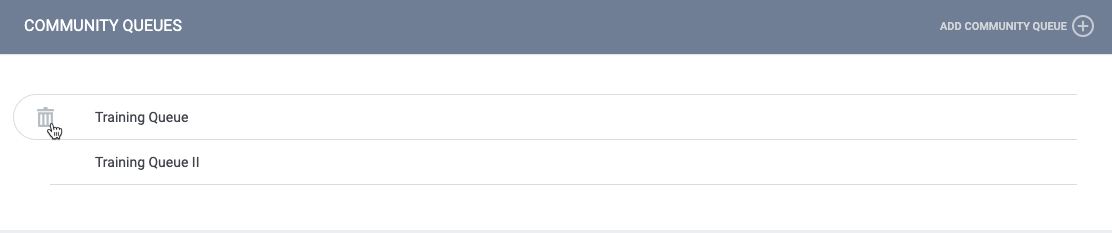
Community Queues
In the Community Queues section of the Program Resources sidebar, you can connect Community Queue(s) to a program so that the program will appear under that Queue on the Availability tab.
- Click ADD COMMUNITY QUEUE.
- Select a Community Queue from the list that appears.
- Click ADD.
- Repeat for additional Queues as needed.
Notes:
- All newly created programs will have a Queue connected; this queue is often named "Default."
- If Coordinated Entry Type is set to "Sharing Groups Based," the only Community Queues that can be added to an agency's programs are those that have been added to the Referral Settings for the agency's Primary Coordinated Entry Group.
- You cannot add an inactive Community Queue to a program.
Note: If a program is connected to all available Queues, the ADD COMMUNITY QUEUE option will not be visible.
To delete a Queue from a program, click the trash can icon next to the Queue you want to delete.
For more information about the Availability tab, refer to Referrals: The Availability Tab.
Default Goals
The Default Goals section, which appears in the Program Resources sidebar when the Goals toggle is turned on, allows you to designate whether any goals that have been created will be automatically added to the enrollment (instead of just being available to be added manually). Refer to our Program Goals article for details.
Auto Service Placement
The Auto Service Placement section appears in the Program Resources sidebar when the Auto Service Placement toggle is turned on. Refer to our Program Setup: Auto Service Placement article for details on configuring Auto Service Placement for the program.
Documentation Requirements
The Documentation Requirements section of the Program Resources sidebar allows you to configure a list of required files that staff members can print out when referring or enrolling a client in the program. Refer to our Program Setup: Documentation Requirements article for details.
Program Assessments
The Program Assessments section, which appears in the Program Resources sidebar when the Program Assessments toggle is turned on, allows you to designate which assessments can be provided within the program:
- Click ADD ASSESSMENT.
- The ADD ASSESSMENT pop-up will display a list of assessments that have been enabled for use at the program level.
- Select an assessment, then click ADD.
- Repeat for additional assessments as needed.
Cascade Assessment
The Cascade Assessment section, which appears in the Program Resources sidebar when the Cascade Assessment Data toggle is turned on, is where you select the assessments that will be allowed to cascade to or from an enrollment. Refer to our Data Cascading article for details.
Chart Fields
The Chart Fields section, which appears in the Program Resources sidebar when the Chart Fields toggle is turned on, is where you select the fields and screens from which data will be taken to build the Program Charts. Refer to our Program Setup: Charts article for details.
Departments
The Departments section appears in the Program Resources sidebar when the Departments function has been enabled for the agency and at least one Department has been created. Refer to our Sharing Departments article for details on how to add a Sharing Department to the program.
Client Forms
The Client Forms section, which appears in the Program Resources sidebar when the Enable All Client Forms toggle is turned OFF, allows you to select individual forms to be made available within the Forms tab of a client's enrollment:
- Click ADD FORM.
- The ADD FORM pop-up will display a list of forms that have been enabled for the agency.
- Select a form, then click ADD.
- Repeat for additional forms as needed.
If no forms are selected in the Client Forms section, the Forms tab will not be visible within the enrollment.
Orphaned Settings
The Orphaned Settings section appears in the Program Resources sidebar when the program is assigned a new template that does not include field(s) that had been included in the previous template. Refer to our Custom Program Setup Screens article for details.
Exit Screen Fields Due To Inactivity
The Exit Screen Fields Due To Inactivity section, which appears in the Program Resources sidebar when the Auto Exit Due to Inactivity toggle is turned on, allows you to define the default values that populate the program's exit screen fields. Refer to our Program Setup: Auto Exit article for details.
Exit Screen Fields When Permanent Destination Exit
The Exit Screen Fields When Permanent Destination Exit section, which appears in the Program Resources sidebar when the Auto Exit to Permanent Destination toggle is turned on, allows you to define the default values that populate the program's exit screen fields. Refer to our Program Setup: Auto Exit article for details.
Exit Fields Due to Bulk Exit
The Exit Screen Fields Due to Bulk Exit section, which appears in the Program Resources sidebar when the Bulk Exit Active Clients toggle is turned on, allows you to define the default values that populate the exit screen fields for a bulk exit. Refer to our Bulk Exit Active Clients article for details.
Coordinated Entry Events
The Coordinated Entry Events section appears in the Program Resources sidebar when the Coordinated Entry Events toggle is turned on. Refer to our Program Setup: Coordinated Entry Events article for details on configuring Coordinated Entry Events for the program.
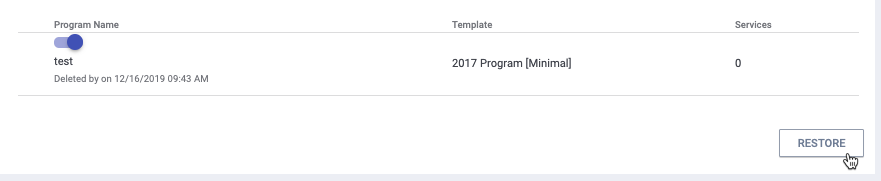
Restoring Deleted Programs
You can restore deleted programs using Recover deleted data.

Toggle on the program (s) you would like to restore and click RESTORE.
Audit Log
Users with the appropriate access can click the Audit Log button at the bottom of the MODIFY PROGRAM page to track changes made to the program setup.
When a user clicks SAVE CHANGES without actually changing anything on the screen, the green "Changes successfully saved" banner will not appear, the action will not be tracked by the Audit Log, and the last_updated and ref_user_updated fields will not be updated.
Updated: 06/16/2026