
This article is for the new Clarity interface. Screenshots and descriptions will be updated as features are released. For the current interface article, see Recording and Editing Coordinated Entry Events in the Client Record.
Table of Contents
Overview
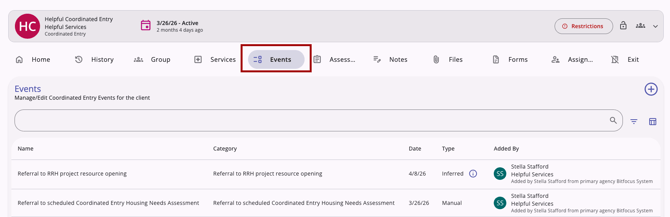
Coordinated Entry (CE) Events are recorded to track a client’s progress through the coordinated entry process. In the new Clarity interface, these events are located within the client’s program enrollment under a dedicated Events tab.
Permissions and Configuration
To view or manage CE Events, the following must be configured:
Program Setup
The Coordinated Entry Events toggle must be enabled on the program setup page for users to see the Events tab.
The Coordinated Entry Events section of the program setup allows system administrators and agency managers to enable and configure CE events. For more information on program setup for CE Events, refer to the Program Setup: Coordinated Entry Events article.
Sharing Settings
Access is determined by the agency in Manage > Sharing. The Service/Programs/Assessments/Events Placed field must be set to Full Shared or Basic Shared for events to be visible to users at other agencies.
If the Service/Programs/Assessments/Events Placed field is set to Not Shared, events will be restricted to only the users at the agency who created the event. For more information, refer to the Introduction to Sharing Client Data article.
Access Rights
Specific access rights are required to create, edit, or delete events. At a minimum, users will need the following access rights to see the Events tab and create manual CE events.
| Access Right | Functionality | Role Type | Contingencies |
|
Create Manual Coordinated Entry Events |
Provides the ability to see the Events tab and submit manual Coordinated Entry Events |
Admin, Manager, Enterprise |
Programs access right must be enabled. |
For details on all of the access rights available for working with events, refer to the Rights Glossary for Access Roles article.
Viewing and Filtering Events
When you access a client’s program enrollment and click the Events tab, you will see a list of all CE Events provided to the client. If no events exist, the system displays:
"No results yet! Results will be displayed here when they are available."

Filtering Results
Filter the event Name list by typing text into the search bar. Use the Filter icon at the top of the list of events to find specific records:- Added By: Filter by a specific user who added the event.
- Category: Select one or more event categories to display.
- This filter will display a list of all Event Categories (1-18), where the user can check boxes for one or more categories.
- Date From and Date To to narrow the list by date range.
- Type: Filter by Inferred or Manual events.
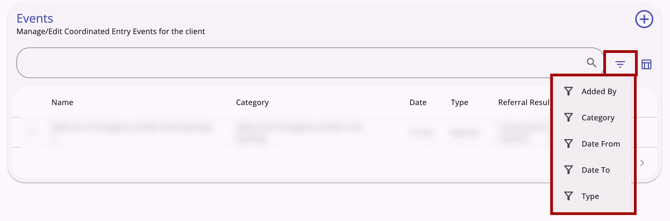
For more information on using filters, refer to the Client Record Overview (New Clarity Interface) article.
Column Selector
The Events tab displays several columns by default. You can customize your view using the Column Selector icon (visible when at least one event is listed) to the right of the search bar.
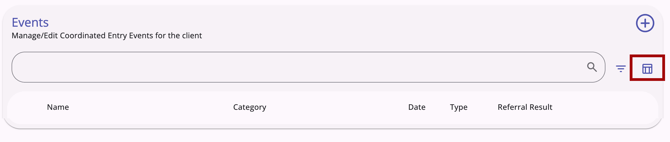
The columns available are:
-
Name: The name of the event (pinned to the left and locked; this column cannot be moved/removed).
-
Category: The HUD-defined category (1-18).
-
Date: The date the event occurred.
-
Type: Indicates if the event is Inferred (system-generated) or Manual.
-
Added By: The user who added the event, along with their associated Agency.
-
Referral Result: The resulting action of a referral.
-
Result Date: The date of the resulting action of a referral.
Note: CE Events are also visible on the client's History tab, featuring a Program icon and tooltip consistent with other program-linked records.
For information on how to use column selectors, refer to the Client Record Overview article.
Recording Coordinated Entry Events
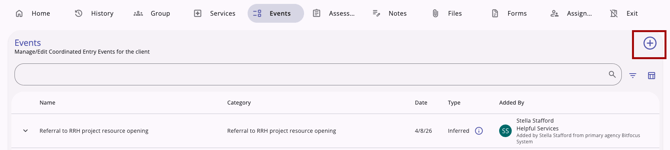
To add a manual event, click the Add icon (+).
The Add icon appears when all of the following are true:
- The client’s program enrollment is active (no Program End Date).
- Your access role has the Create Manual Coordinated Entry Events access right enabled.
- The program has manual CE Events configured.
- You are switched into the agency for the program.
Add an Event
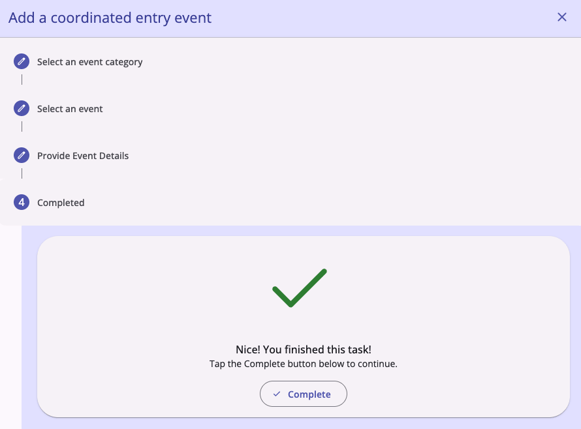
When you click the Add icon, the 4-step Add a Coordinated Entry Event modal opens on the right side of your screen.
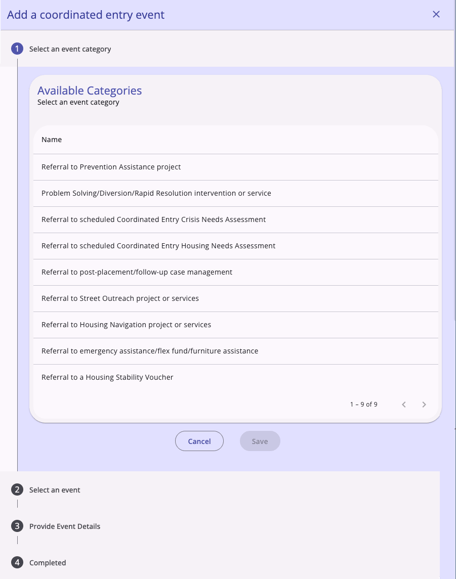
Choose an Event Category from the Available Categories configured for the program. Events configured as Inferred will not be listed.
Click an event to highlight it, then click Save.
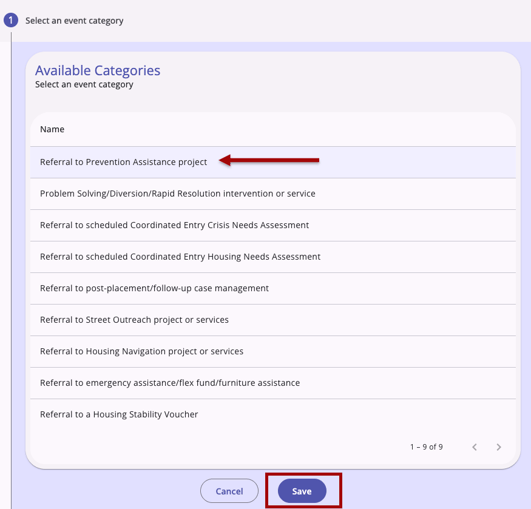
Choose the specific Event from the filtered Available Events list. Click an event to highlight it, then click Save.
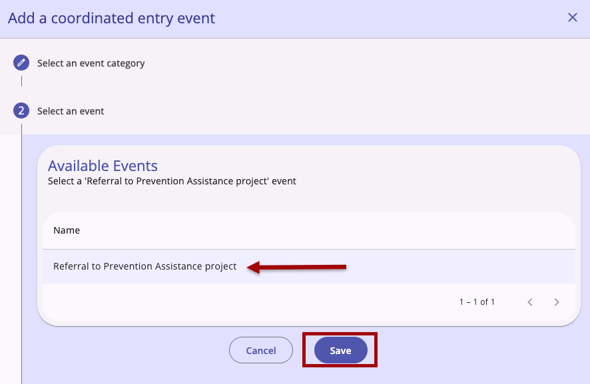
Provide event details. The event chosen determines what appears on the Provide Event Details step. The Event Category and Event fields will auto-populate. The Event Date is required and defaults to today, but is editable.
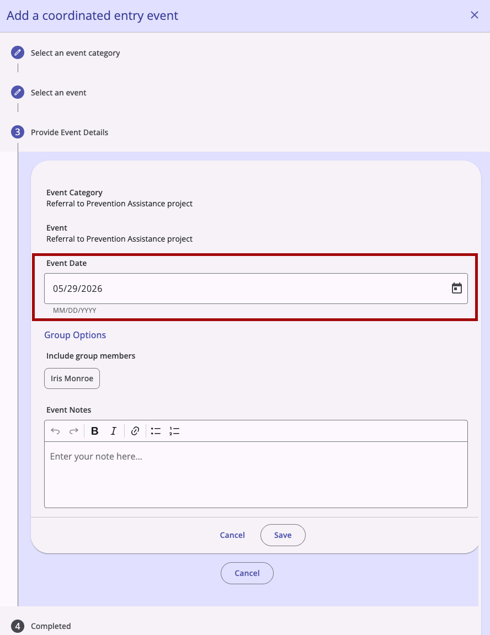
Additional fields may be available:
-
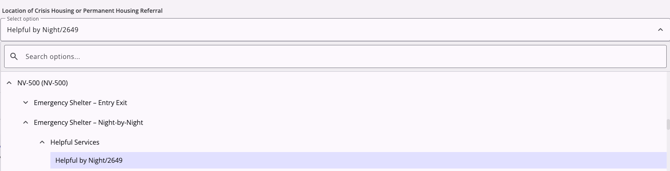
Location Fields: For event categories 10-15, the Location of Crisis Housing or Permanent Housing Referral field will appear.
- Referral Fields: For event categories 10-15 and 17, the Referral Result and Result Date fields will appear.
-
Geolocation: If enabled, you can use a map/address search to add a Geolocation. If Required is toggled on in the Event setup, you must provide this to save.
-
Include Group Members: If enabled, you can toggle on household members to record the event for one or more group members.
-
Event Notes: Users can add notes and @tag other staff members to send them a notification.
Notes:
-
For event categories 10-15, if the dependent Location of Crisis Housing or Permanent Housing Referral field appears, it will only include programs with Project Receives CE Referrals = Yes in the program's setup as of the date of the referral. Refer to the CE Participation Status and Program Setup: Coordinated Events articles for more information.
-
Users with the appropriate access rights to create and edit notes can tag one or more end users in an Event Note. A notification with a link to the tagged note and relevant client record will be sent to the user’s email and/or Staff Inbox. More information about tagging users can be found in the How Do I Create Client Notes? (New Clarity Interface) article.
Once all event details are added, click Save, then click Complete on the last step to finalize the Event placement.
Editing Events
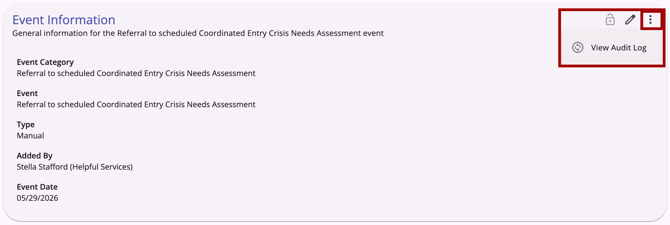
Users with the appropriate access rights can edit CE Events. When the user clicks a manual or inferred CE Event in the program’s Events tab, the Event Information page opens with details.
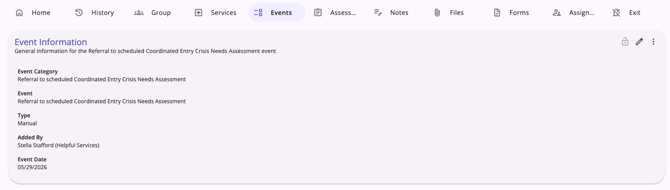
The Event Information page displays general information for the Event, including:
- Event Category
- Event
- Type
- Added By (user with their associated agency
- Event Date
- Location of Crisis Housing or Permanent Housing Referral (if applicable)
- Referral Result (if applicable)
- Result: Client Enrolled in Aftercare Project (if applicable)
- Result: Client housed/re-housed in a safe alternative (if applicable)
- Result Date (if applicable)
- When available to edit, the Result Date cannot be before the Event Date.
- Geolocation (if applicable)
All of the fields in the Event Information section are displayed as read-only.
Depending on the user’s access rights, they will see an Edit icon at the top right of the Event Information section. When the user clicks the Edit icon for a manual or inferred CE Event, the Event Information section goes into edit mode.
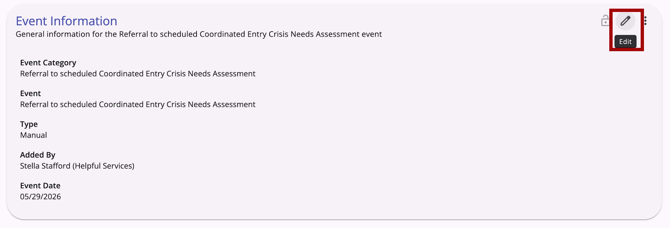
Edit editable fields as needed, then click Save to save changes or Cancel to discard any changes.
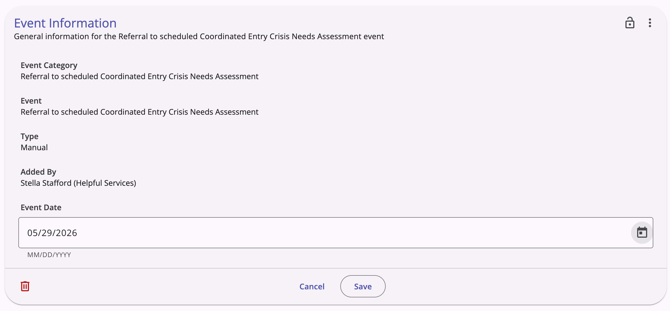
All edits will be recorded in the audit log.
Notes and Programs
Event Notes can be viewed and edited by clicking on the CE Event and opening the Event Information page.
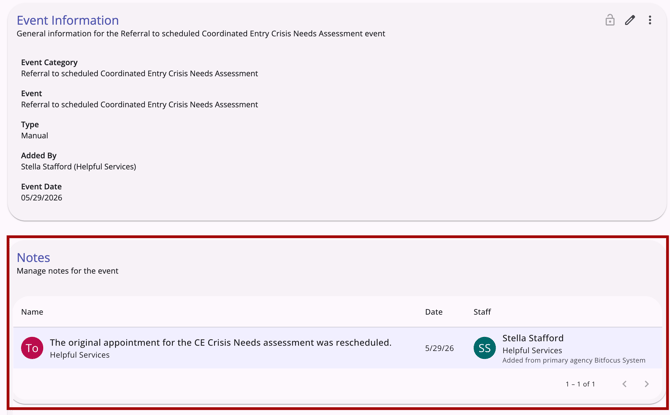
Click on a Note to open the Edit Note modal on the right side of the screen. Make any changes, then click Save to save any changes or Cancel to discard any changes.
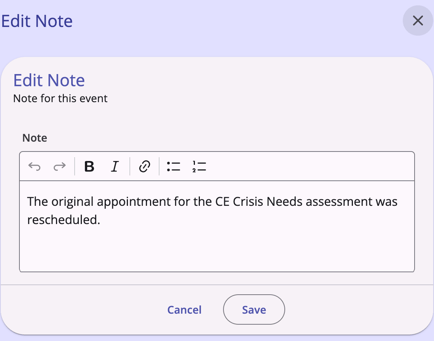
Note: Users can @tag another user with the @ symbol followed by their name or email address in a Note textbox. As you type, a list of suggested users will appear. The list only displays active users who have the appropriate sharing permissions to access the entity (referral, event, etc.) you are currently working on. Finish typing your note and save it to trigger a notification to the user. Refer to the How Do I Create a Client Note? article for more information.
If you did not add a note when originally creating the Event, you can add one in the Note section of the Event Information page.

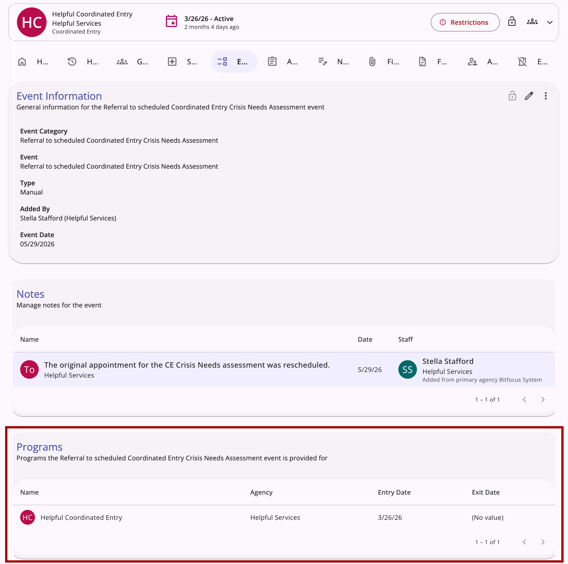
The Programs section displays the programs that the Event is added from. All of the fields in the Programs section are displayed as read-only.
Deleting and Recovering Events
Users with the appropriate access rights can delete or recover CE Events.
Deleting an Event
To delete an event, locate the CE Event, click on the event to open the Event Information page, and click the Edit (pencil) icon on the Event Information section. Scroll to the bottom of the section and click the Delete (trash can) icon.
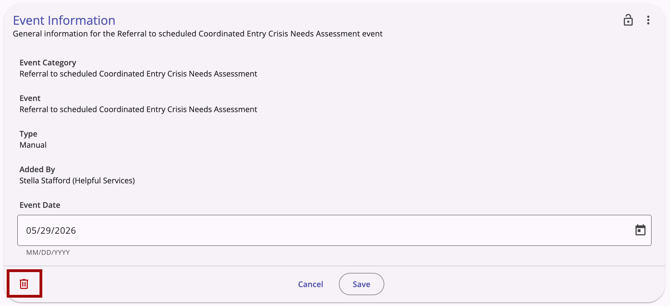
Confirm the deletion in the pop-up warning that reads:
“Are you sure you want to delete?”
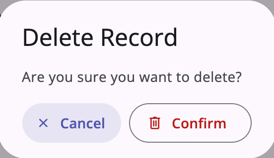
Select Cancel to cancel the deletion or Confirm to delete the event. When an event is deleted, the user is returned to the Events tab.
Recovering Deleted Data
For users with the Restore Deleted Data access right, deleted events can be recovered.
- Click the Action Menu icon next to the Add icon.
- Select Recover Deleted Data.

- In the Recover Deleted Data modal that opens, check the boxes for the events you wish to restore.
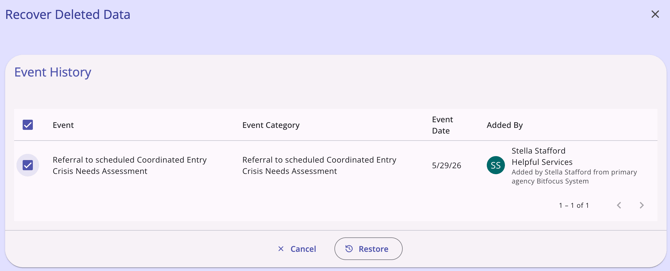
- Check the Select all / Deselect all checkbox at the far left of the header row to choose all deleted Events to restore.
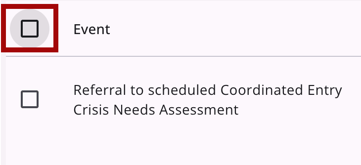
- Check the Select all / Deselect all checkbox at the far left of the header row to choose all deleted Events to restore.
- Click Restore. The events will immediately reappear in the Events list on the Event tab.
- The Restore button won't be active or clickable until at least one item's checkbox has been checked.
Inferred Events
Inferred events are automatically generated by system triggers, such as referrals, based on criteria like Project Type. These events will appear with Referral Result and Result Date fields that will auto-update for the life of that Event when the Event Type = Inferred, unless the values for those have at any point been manually updated.
- This includes when an event is Inferred its whole life cycle, but a user manually updates it due to access role permissions.
Inferred events show an Information (i) icon under the following conditions:
-
Manual Updates: If a user edits an inferred event, the tooltip will read:
"This event information is no longer inferred due to manual updates."
-
Deleted Referrals: If an event was inferred from a referral that is later deleted, the tooltip will read:
"This Event information is no longer inferred due to the associated referral being deleted."
- Program Setup Changes: If an Inferred Event record's program setup changes to Manual or Disabled, the tooltip will read:
"This Event information is no longer inferred due to the program configuration."
Audit Log
The View Audit Log option can be selected by a system administrator with audit log access rights. A log of all changes to the event is displayed.
- Click the event in the list.
- Click the Action Menu icon next to the Edit icon.
- Select View Audit Log to see a log of all changes.
Published: 05/29/2026