This article is for the new Clarity interface. Screenshots and descriptions will be updated as features are released. For the current interface article, see Direct Referrals from the Assessments Tab.
Table of Contents
Overview
Clarity Human Services offers two ways to refer a client directly to a program (i.e., without using the Community Queue or Unit Queue):
- From the client record Referrals tab, where clients can be referred directly to specific programs. Refer to our Client Referrals Tab: Direct Referrals article for details.
- From the client level or program level Assessments tab. This method is the focus of this article.
Direct referrals made from the Assessments tab allow users to refer clients to specific programs based on eligibility criteria. This method will only work if a system administrator has enabled the Eligibility Engine setting when creating the assessment.
Note: Certain configurations must be in place for a program to be listed as a referral option. See Introduction to Making Referrals for more information.
Getting Started
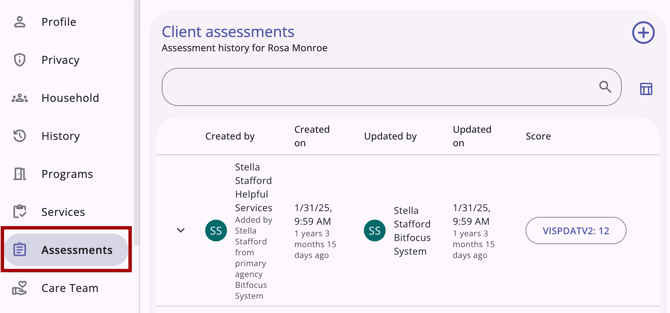
To create a direct referral based on eligibility criteria, navigate to the client record.
At the client level, select the Assessments tab located on the client's primary navigation menu.
At the program level, select the Programs Tab in the client's primary navigation menu, find the appropriate program, then go to that program's Assessments tab.

Here are the initial steps:
- Click the Add icon at the top right of the Client assessments page. The Available Assessments modal will open on the right side of the screen.
- Locate and then click on the appropriate assessment.
- Check with your local system administrator if you need help deciding which assessment to use.
- Click Next.

- Complete the fields in the assessment screen.
- Click Save & Next.
- Click Complete.
The completed assessment will show on the Assessments tab.
Note: If the user's Access Rights do not permit adding or editing assessments, these steps will not be available.
Eligibility Determination
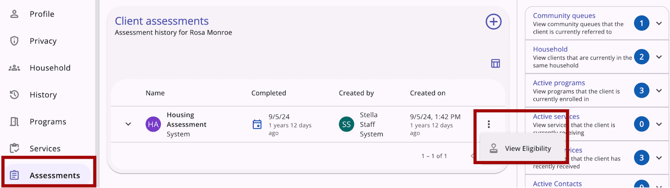
To view eligibility, go to the Assessments tab, click on the Action Menu icon to the right of the appropriate assessment, and then click View Eligibility.
There will be up to 3 sections on the Eligibility Determination page:
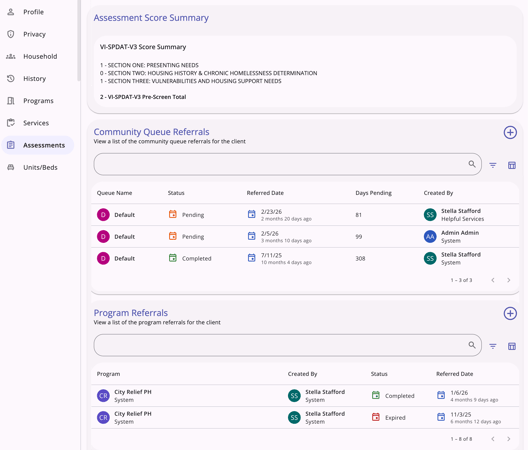
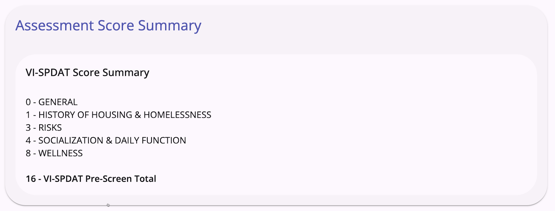
Assessment Score Summary/Information Section
If a system administrator enables the Display Score setting for the assessment, an Assessment Score Summary section will appear.
If the Display Score setting is disabled for the assessment, but a system administrator adds information to the Alternate Text setting, that information will appear instead of the Assessment Score Summary section.
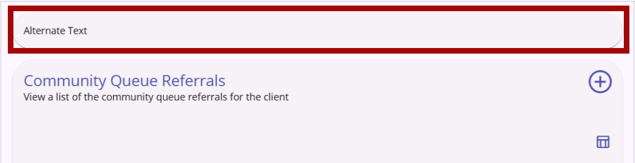
If the Display Score setting is disabled for the assessment and there is NO text in the Alternate Text setting, the Assessment Score Summary section will not appear.

Community Queue Referrals Section
The Community Queue Referrals section will display current and historical Community Queue referrals for the client. There is also an Add icon for adding referrals to a community queue, as well as a column selector so users can customize their view of this section.
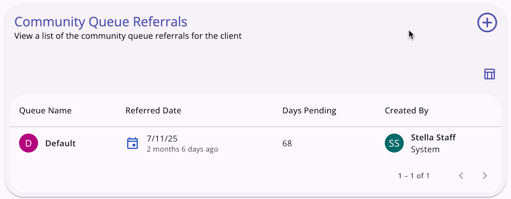
Refer to the Assessments Tab: Community Queue Referrals (New Clarity Interface) article for full details.
Program Referrals Section
The Program Referrals section will display any direct referrals sent to the client, along with their history of direct referrals.
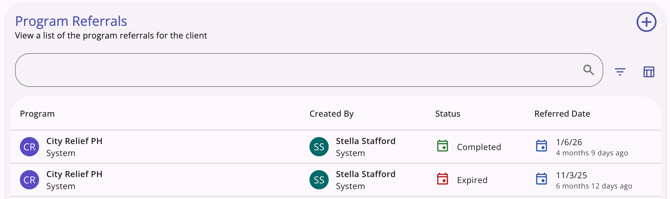
If at least one direct referral is listed, a column selector allows users to customize their view. The default view has Program, Created By, Status, and Referred Date.
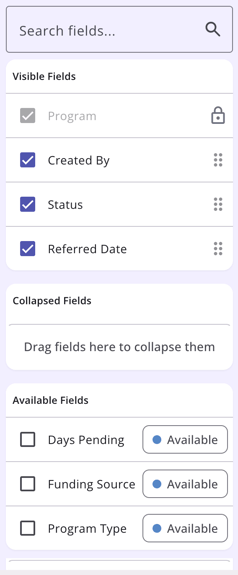
The column selector includes a Search bar to find fields, as well as lists of Visible Fields, Collapsed Fields, and Available Fields. Users can drag and drop the fields to customize their view of the Program Referrals section. Refer to the Client Record Overview article for more details on using column selectors.
Referrals to Community Queue from Eligibility Determination
Users with the appropriate access can see the Community Queue Referrals section on the Eligibility Determination page if community queues are enabled and there is at least one active Community Queue with:
-
The Allow Referral to Community Queue setting is enabled; AND
- The current Assessment is added for use when referring to the community queue.

The Community Queue Referrals section will not display if there are no active Community Queues that allow referrals from the assessment.
Refer to the Assessments Tab: Community Queue Referrals (New Clarity Interface) article for full details on referring to the
Referrals to Programs from Eligibility Determination
Users with the appropriate access can send direct program referrals from the Eligibility Determination screen.

The Add icon in the top-right corner, next to the section title, appears when there is at least one program to which the client can be directly referred.

When the user clicks the Add icon in the top-right corner, the Add program referral modal opens on the right side of the page.

The following items are on the Add program referral modal:
- A Search bar
- A Filter icon that, when clicked, shows filter options for the following:
- Agency
- Availability
- Eligible Programs Only
- Project Type

- A list of programs that the client can be referred to
- There is a drop-down arrow next to each listed program that, when clicked, expands so the user can see additional information about the program, including the following:
- Active Clients
- Availability
- Funding Source
- Service Categories (if any)
- Required Documents (if any).

- There is a drop-down arrow next to each listed program that, when clicked, expands so the user can see additional information about the program, including the following:
Note: The selected program in the drop-down includes a Required Documents section and lists any required documents for that program (if any).

When the user finds the program they would like to refer their client to and clicks on the program, the program is highlighted, and the Next button turns dark purple.

Click Next to see the Refer to program section. This section contains:
- Referred Program name (read-only)
- Referred to Agency name (read-only)
- Referring Agency name (read-only)
- Referral Date (which is an editable date/time picker)
- Note textbox
- Privacy icon (which, when clicked, marks the referral as private).

When you complete the Referral Date/Time and Note fields and click Save, you will see a large green checkmark and the message:
"Nice! You finished this task! Tap the Complete button below to continue."

When you click Complete, you return to the Referrals page, where you can see the referral you just sent included in the list of Program Referrals.
Enroll Instead Option
At the first step of the workflow, the Select program step, users can click Enroll Instead. If the user clicks this option, the system redirects them to the program’s enrollment screen to create an enrollment rather than a referral.

Direct Referrals to Units/Beds
Users can refer a client and their household members directly to specific unit(s)/bed(s) without leaving the client record or assessment.
Unit/Bed Openings Visibility
Unit/Bed openings appear for the user if the Direct Unit/Bed Referrals setting on the Program Setup page is set to Optional or Required.
- Optional: the Available Units / Beds picklist field on the form is optional for the user, and the referral can go directly to the program instead of a specific unit/bed.
- Required: the user must select a specific unit or bed to complete the referral.
Notes:
- Programs with no active units or beds will not appear in the initial program selection list for the user.
- If the Direct Unit/Bed Referrals setting on the Program Setup page is set to Disabled, the Unit/Bed Opening field will not appear on the direct referral.
Adding Direct Referrals to Units/Beds
To add a direct referral to a unit/bed for a client or household, follow the steps listed above in the Referrals to Programs from Eligibility Determination section.
When you complete the Refer to program step by adding the Referral Date and Time and a Note, click Save. You will see the Unit/Bed Opening form and see Referral details, an Eligibility Override toggle, an Available Units/Beds field, and an Include Household Members section.
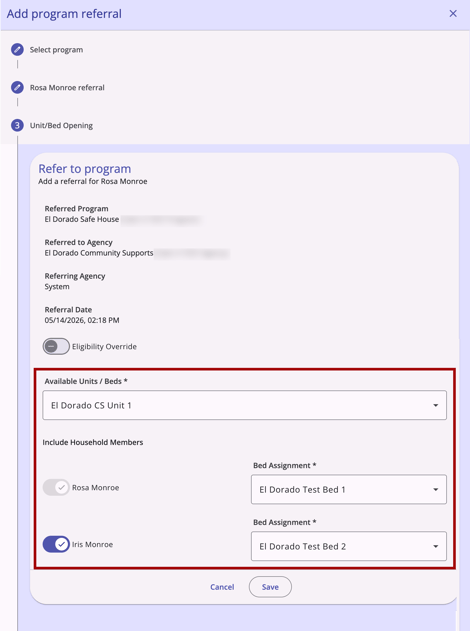
Once an appropriate unit/bed has been selected and any Household Members selected, the user can click Cancel or Save.
- Cancel: Dismisses the modal without saving any information.
- Save: Advances to the final completion page to send the referral.
When you click Save, you will see a large green checkmark and the message:
"Nice! You finished this task! Tap the Complete button below to continue."
When you click Complete, you return to the Referrals page, where you can see the referral you just sent included in the list of Program Referrals.
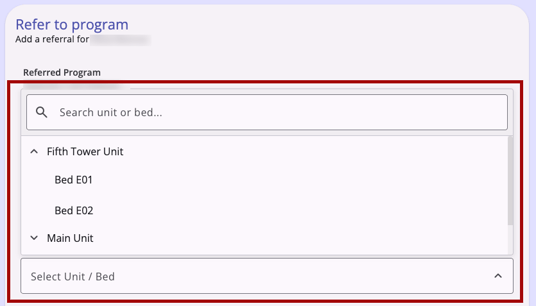
Note: Hierarchy-select fields are available in the Available Unit / Bed and Bed Assignment fields. These fields let users choose from a structured tree of options organized into nested levels that can be expanded and collapsed within the field, making it easier to navigate long lists of related items. A built-in search and filter feature allows users to type ahead and quickly narrow the tree to matching options.
Eligibility Override
By default, the system hides units/beds that do not meet the standard eligibility criteria. However, age and program restrictions are checked upon saving.
Once the user selects the appropriate unit/bed and clicks Save, the system can calculate eligibility based on Age or Program Restriction. If there is a restriction, the system will show a message with an Ok button that reads:
- “This client has an active program restriction and cannot be referred.”
OR - “This client will not meet the age requirements of this placement on <date>, and cannot be referred.”
Eligibility Override Toggle
An Eligibility Override toggle is available on the Unit/Bed Opening form during the referral process. If the system-wide or site-specific Prohibit Eligibility Override setting in Referral Settings is ON:
- The Eligibility Override toggle is still visible.
- The ineligible units where the system-wide or site-specific Prohibit Eligibility Override setting in Referral Settings is enabled would not be listed in the Available Units/Beds dropdown.
- Ineligible units/beds from restricted sites will not appear in the dropdown, even if the Eligibility Override toggle is toggled ON by the user.
- If the unit/bed would otherwise be eligible, it remains listed.
Managing Household Placements
Below the unit selection field, you can manage how other household members are included in the referral.
Include Household Members
- For each household member toggled on, a Bed Assignment field with a hierarchy-select type dropdown will appear.
- This section only appears if there are other members in the client's household.
- If the client is an individual, the Include Group Members toggle does not appear, and you will only see a bed selection for the current client.
Set Remaining [x] Beds Offline
After all units/beds are selected for the group, the Set Remaining [x] Beds Offline toggle allows you to mark any unused beds in a unit unavailable to others. When toggled on, all other beds in the unit will be updated with an Offline status.
- Visibility: This toggle appears under the Include Household Members section.
- It will not show if the unit already has occupied units/beds or a pending occupancy by a different household.
- Dynamic Display: The number displayed (x) updates automatically as you assign beds to household members.
- Household Member Changes:
- If Set Remaining [x] Beds “Offline” was enabled: If a household member leaves the household or a household member’s pending unit/bed assignment is deleted, their unit’s/bed’s status becomes Offline.
- If Set Remaining [x] Beds “Offline” was disabled: If a household member leaves the household or a pending assignment is deleted, their unit/bed becomes Available.
Manage Referrals
When the user clicks a client referral record in the client Referrals tab, it opens the referral's associated screen, whether it is active in the Community Queue, a pending referral to a program, or a completed/expired/denied/snoozed referral. There are options to edit or delete a referral (dependent on sharing and access rights).
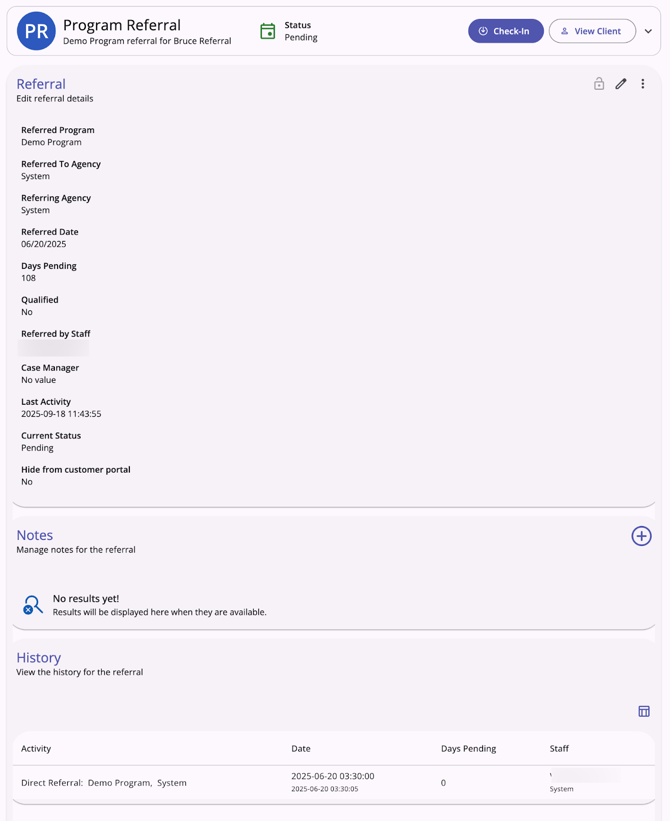
Editing Referrals
Users with the appropriate access can edit or view a referral record from the client’s History tab, the client’s Referrals tab, or from the global Referrals tab in the new Clarity interface.
When the user clicks a client referral record in the client Referrals tab, it opens the referral's associated screen, whether it is active in the Community Queue, a pending referral to a program, or a completed/expired/denied/snoozed referral. The information displayed and/or editable is based on sharing and access role permissions, as well as the referral status.
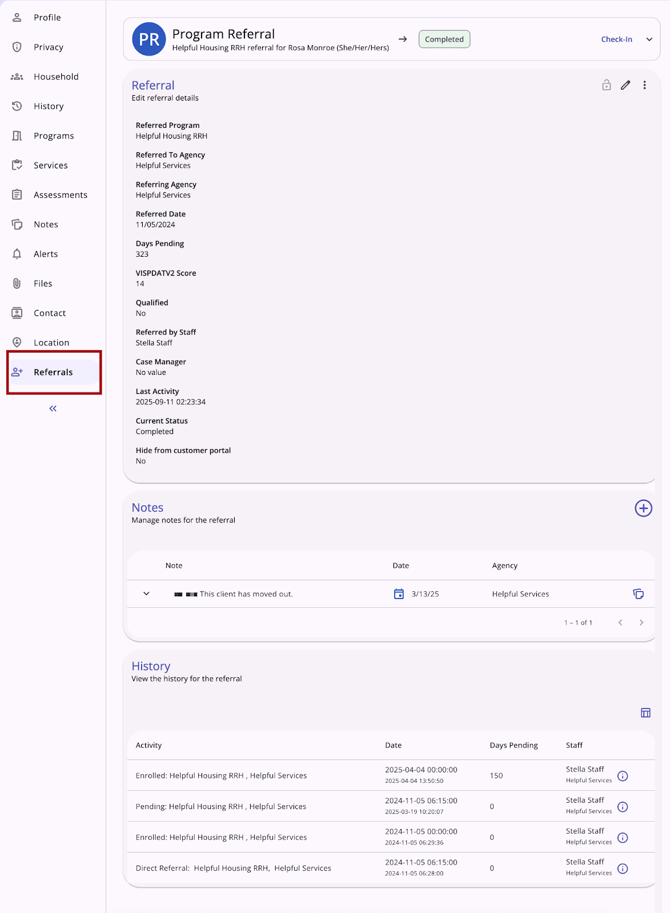
At the top of the referral screen, the referral type, status, and any additional details are displayed in a header. For referrals where the Check-in button applies, it will be located in the header. When a referral is opened from the global Referrals tab, a View Client button to navigate to the client record is also in the header.

When a user clicks the Check-In button, the Last Activity Date will be updated to the check-in date.
Audit Logs
System Administrator users can access referral audit logs in the new Clarity interface.
The Audit log is accessible from the Action Menu icon for each referral, except for future referrals, which do not have one.
Audit logs show:
- From Values
- To Values
- Changed by - interface (Clarity2.0 [current interface] or Clarity3.0 [new interface]): User Name
- Date.
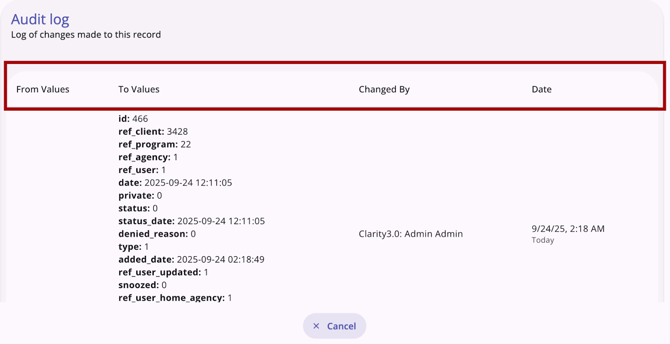
System Administrators can click Cancel or click outside the Audit log box to close the audit log.
Updated: 05/31/2026