Overview
This article explains how to use INVENTORY’s dashboard view for viewing Unit details and locations. For information on configuring the permissions and settings associated with this function, refer to Configuring the INVENTORY Dashboard.
Using the INVENTORY Dashboard
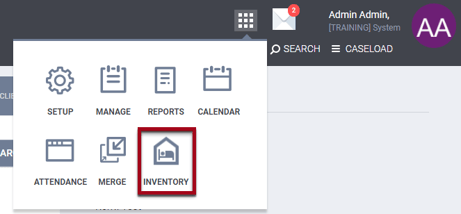
To access this module from the main menu, go to the launchpad and click the INVENTORY icon.
Screen Orientation
Users accessing Inventory will see a default view that does not display the Inventory map.

Users can easily toggle the map on and off by clicking on the Map icon.

The default view includes the following:

- List of Units in alphanumeric order
- Selection boxes for the list of units
- Map Icon
- Search feature for Unit Name or Address
- Items per page: limits the number of Units that will be displayed on the map at one time (for example, if you set Items per page to 5, the system will only display information for the first five Units from the list, even if there are more than five Units that could be displayed)
- Filters for selecting the types of Units that are displayed
- The Settings icon provides three options:
- Refresh Inventory when map position changes: When this setting is enabled, the system updates the aggregate cards and the list of Units to reflect the portion of the map that is currently visible on the screen
- Include data for units from all pages in map: When this setting is enabled (which is the default setting), the system ignores the Items per page setting (described above). To resume limiting the number of Units displayed, un-check the Include data for units from all pages in map box
- Display only units with available beds: When this setting is enabled, the system will remove units with offline or inactive beds from the display and recalculate the units counts.
- Clarity Inbox
- Launchpad
- Icon showing the user’s initials, name, and name of the agency you are currently switched into
- Clicking this icon displays more information. Other agencies that are available to switch into (if any) are displayed in a Switch Agency drop-down menu.
Map View
You can change the view of the Dashboard by toggling on the Map and/or clicking the Filter icon.
- Map:
- The display updates as you apply different filters
- When you hover over a Unit’s listing on the left side of the page, that Unit’s marker on the map increases in size and changes color to reflect the Unit’s status.
- Aggregate Cards: This display indicates Total Units, % Available, % Pending, % Offline, and Total Beds. The display updates as you apply different filters
- Filters: There are both Standard and Custom options to choose from. More information on filtering is below.

Search Unit Name/Address
Users can now enter a Unit Name or Address into a search box to limit the list of units.

The results depend on the user’s Inventory Access setting and will only show units that include the text entered into the search bar with the most relevant at the top. If there are two units with matching names, they will be listed in alphabetical order by Unit Name. If there are exact matches in multiple categories, the list will display in this order by category:
- Unit Name
- Unit Configuration Type Name
- Program Name
- Building Name
- Site Name
- Agency Name
- Funding Source Name
- CoC
Unit Details
The system displays the following details for each Unit in the Unit Card Overview section:

- Name: Unit name
- Type: Unit Configuration Type name
- Address: Address (building address if available; otherwise, the site address)
- Availability: Available, Occupied, Offline, Pending Occupancy
- Agency: Name of the agency under which the Unit is configured
- Site: Site name
- Building: Building name
- Program: Program name
- Beds: Number of Beds in the Unit
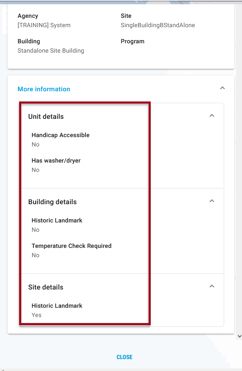
More details about the Unit, Unit Configuration, Building, and Site can be viewed by clicking the down arrow icons in the More information section.

Filtering the INVENTORY Dashboard
Depending on the user’s access settings, all Units available to the user are displayed initially. You can refine the display according to Availability, Agency, Site, and Building by using the filters in the top left corner of the screen. The filters automatically filter out inactive Sites, Buildings, Unit Configuration Types (UCTs), and Programs, displaying only active entities in the filter drop-downs.
Use the search feature to narrow the selections, if needed, and then select as many options as desired from each filter. Next, click on the map to apply the filters.

- Availability
- Select “Available” to display Units that are not currently occupied.
- Select “Occupied” to display Units that are currently occupied.
- Select “Offline” to display Units that are temporarily unavailable but are expected to be available again.
- Select “Pending Occupancy” to display units with an active pending referral or a future-dated Unit occupancy.
- Agency
- To display Units configured under specific Agencies, scroll through the list and select the desired agency/agencies.
- Site
- To display Units associated with specific Sites, scroll through the list and select the desired Site(s). If a housing inventory site is set to "Inactive" in Housing Inventory Sites, the site will not appear in the Site filter.
- Building
- To display Units associated with specific buildings, scroll through the list and select the desired Building(s). If a building is set to "Inactive" in the Buildings & Units tab of the Site Resources, the building will not appear as an option in the Building filter.
Notes:
Additional details for inactive Sites -
- Buildings and Unit Configuration Types (UCTs) set up for an inactive site will not appear as a selection in the Building filter or Configuration filter on the INVENTORY dashboard.
- Units set up for Buildings for an inactive site will not appear in the left sidebar of the INVENTORY dashboard.
- Programs assigned to an inactive site (or to a Building, Unit, or UCT within the inactive site) will not appear as a selection in the Program filter in the INVENTORY dashboard, unless the Program is also assigned to a different Site, Building, Unit, or UCT that is currently active.
- Funding Sources assigned to an inactive site (or to a Building, Unit, or UCT within the inactive Site) will not appear as a selection in the Funding filter in the INVENTORY dashboard, unless the funding source is also assigned to a different Site, Building, Unit, or UCT that is currently active.
Additional details for inactive Buildings -
- Units set up under an inactive Building will not appear in the left sidebar in the INVENTORY dashboard.
- Programs assigned to an inactive Building (or to a Unit or a Unit Configuration Type/UCT within the inactive Building) will not appear as a selection in the Program filter in the INVENTORY dashboard, unless the Program is also assigned to a different Site, Building, Unit, or UCT that is currently active.
- Funding Sources assigned to an inactive Building (or to a Unit or a UCT within the inactive Building) will not appear as a selection in the Funding filter in the INVENTORY Dashboard, unless the funding source is also assigned to a different Site, Building, Unit, or UCT that is currently active.
- Unit Configuration Types (UCTs) that are set up under an inactive Building will not appear as a selection in the Configuration filter in the INVENTORY dashboard.
The filter icon in the upper right corner allows you to access additional filtering options.
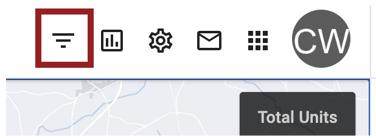
Clicking this icon displays a panel of drop-down options (limited by the selected Sites/Buildings) that will allow you to filter the Unit display according to the following:
- You can filter by the As of date:
- All Units (except the ones that are hidden by other filters) will be displayed with their availability badge indicating the occupancy status for the As of date. Additionally, if the Unit/Bed is currently occupied (regardless of whether the As of date is during or after the occupancy), the system will display the end date of the occupancy.
As an example, consider a Unit that is occupied from October 11 until November 6. If today’s date is October 26:
- If you look at the INVENTORY dashboard today without selecting a date for the As of filter, the system will display an Occupied badge for that Unit, because the Unit is occupied today.

- If you look at the INVENTORY dashboard today and selects an As of date of December 1, the system will display an Available badge for the Unit, because the Unit will be available on December 1. The end date of the current occupation is displayed beneath the badge.

- If you look at the INVENTORY dashboard today without selecting a date for the As of filter, the system will display an Occupied badge for that Unit, because the Unit is occupied today.
- All Units (except the ones that are hidden by other filters) will be displayed with their availability badge indicating the occupancy status for the As of date. Additionally, if the Unit/Bed is currently occupied (regardless of whether the As of date is during or after the occupancy), the system will display the end date of the occupancy.
- You can filter by the Configuration, Funding, Program, Program Type, or CoC associated with the Units.
- You can filter by any custom filters that have been configured (additional details are available in Configuring the INVENTORY Dashboard).
Notes:
If a Unit Configuration Type (UCT) is set to “Inactive" in the Unit Configuration Type tab in Building Resources, the UCT does not appear in the Configuration filter on the INVENTORY dashboard.
If a Program is set to “Inactive,” the Project Status will be “Inactive” in the Programs & Projects tab on the Site Resources section and the Program will not appear in the Program filter on the INVENTORY dashboard.
Additional details -
- If the inactive Program is assigned to a Housing Inventory Site, the site will not appear as a selection in the Site filter in the INVENTORY dashboard.
- If the inactive Program is assigned to a Building, that building will not appear as a selection in the Building filter in the INVENTORY dashboard.
- If the inactive Program is assigned to a Unit ConfigurationType (UCT), that UCT does not appear as a selection in the Configuration filter in the INVENTORY dashboard.
- Units set up with a UCT that has an associated inactive Program will not appear in the left sidebar in the INVENTORY dashboard.
Use the search feature to narrow the selections of each filter, if needed, then make your selections. Next, click on the map to apply the filters.

When any of the filters in the Filters panel are selected, a badge will appear on the filter icon to indicate the number of filters that have been selected. This feature serves as a visual cue for users who have closed the Filters panel and might not remember that the filters are being applied.

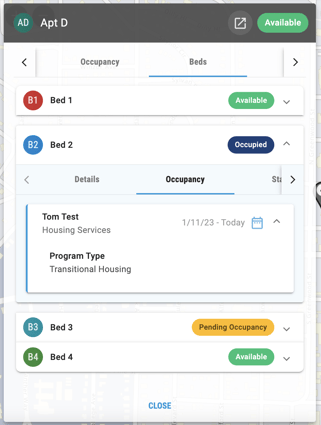
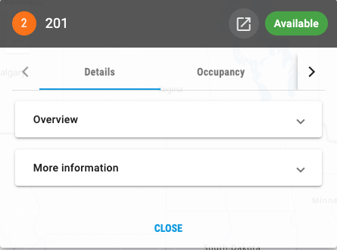
Unit Card
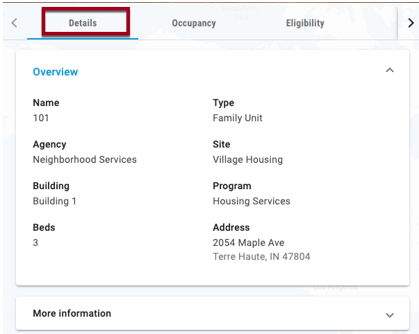
To display a pop-up card with detailed information on a Unit, click on that Unit on the list or click on that Unit’s marker on the map. The Unit Card features tabs for Details, Occupancy, Beds (if applicable), Status, Funding, and Eligibility.
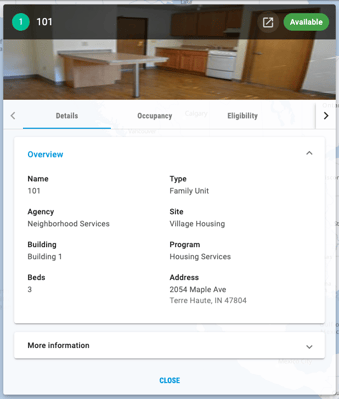
Details Tab
When you open the Unit Card, you will see the Details tab. The Overview section of the tab lists the Name, Agency, Building, Beds, Type, Site, Program, and Address for the Unit.
The More Information section of this tab displays any Housing Inventory Custom fields created by System Administrators.
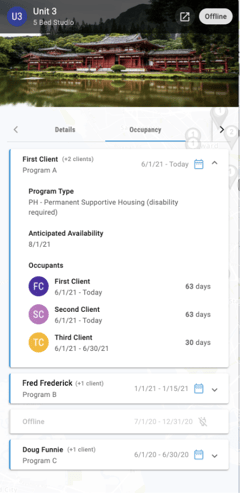
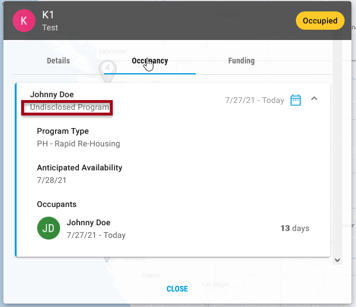
Occupancy Tab
Click the Occupancy tab to view the details for the Unit’s current and previous occupants. Occupancy records appear in descending order from the top, with the most recent occupancy listed first.
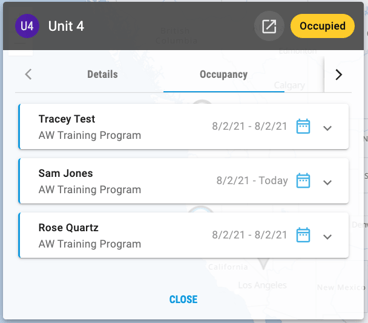
Click the down arrow on an occupant’s listing to display the following details for that occupant, depending on the user’s sharing settings:
- Client name (other household members listed as applicable)
Notes:
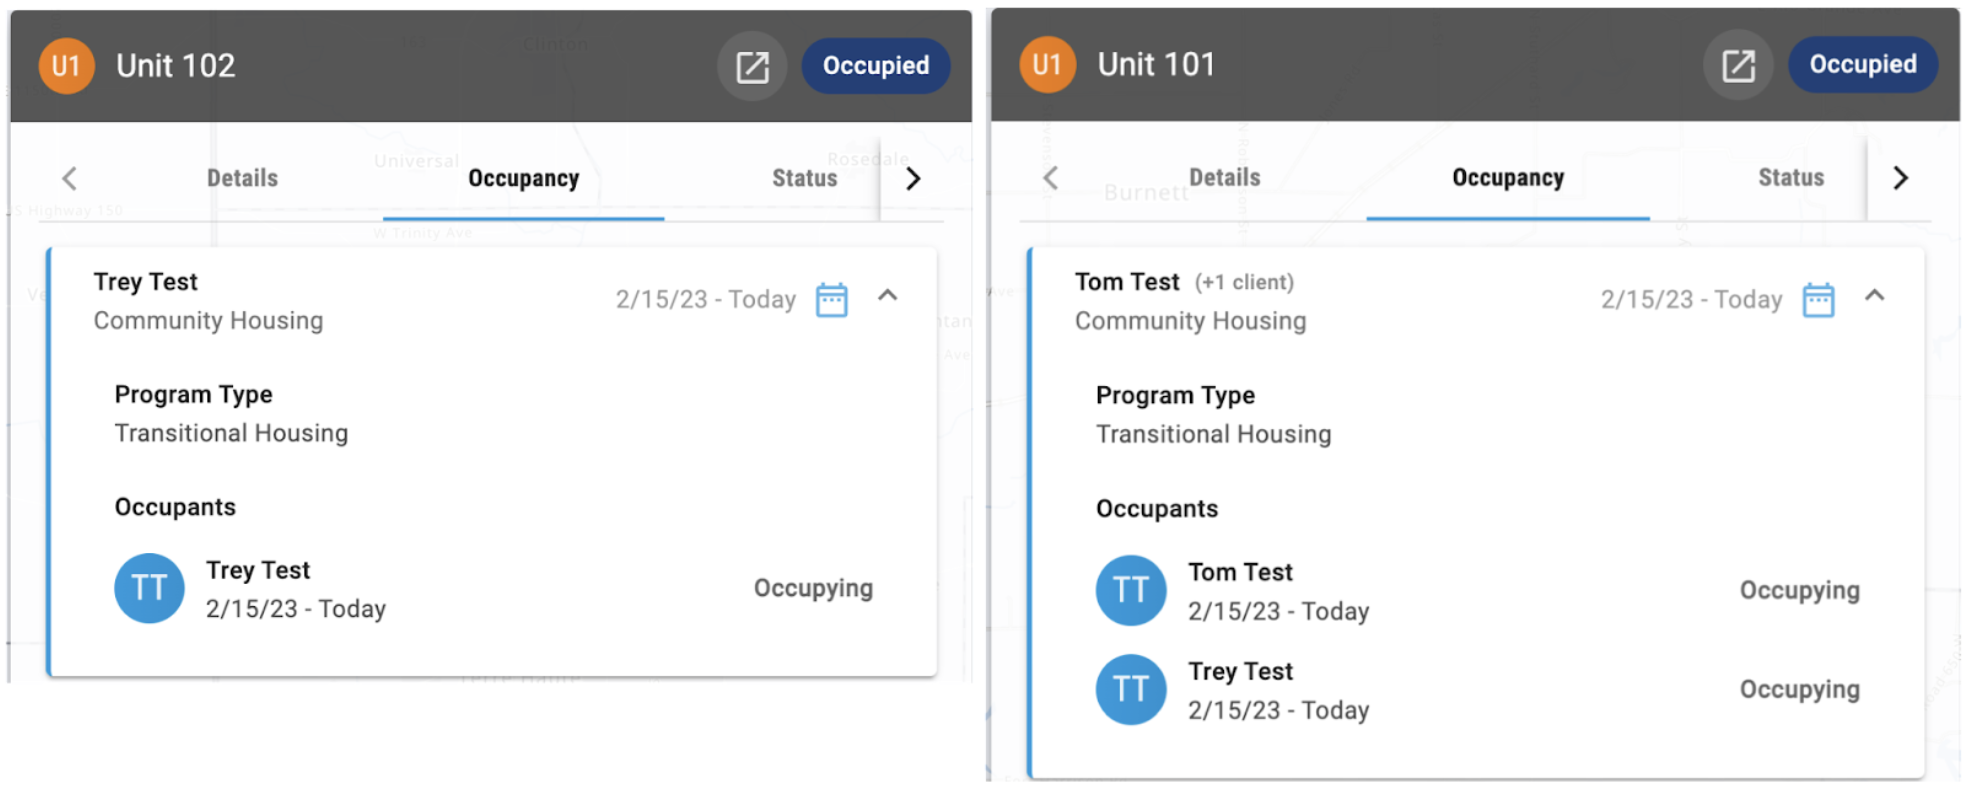
When members of the same program household occupy different Units, the display for the Unit occupied by the client who is not the Head of Household (HoH) will list only that client, while the display for the Unit occupied by the HoH will list all members of the program household. Refer to this example in which Tom Test (the HoH) occupies Unit 101 and Trey Test (a non-HoH member of the program household) occupies Unit 102.
If Sharing Settings allow users to see the client profile (Clients Created = Full Shared), the user sees an arrow button ("Go to this client record" link) regardless of access role/access rights.

If Clients Created = Basic Shared or Not Shared, the button will not appear. If the client is marked Private and the user cannot see the client’s profile, the button will not appear on the Unit Card for the client.
When Sharing and Privacy settings allow it, the button is available for each occupant. Clicking the button opens the client profile screen in a new browser tab.

- Program entry date
- Program type
- Length of time in Unit (starts count when the Unit moves to the Occupied status)
- Future start dates for Unit occupancy are displayed as “Starts on <date>.”

- Future start dates for Unit occupancy are displayed as “Starts on <date>.”
- Anticipated Availability
- The Anticipated Availability date for a currently occupied Unit comes from the Pending Occupancy End Date field on the Units/Beds tab in the PROGRAMS section of the client record for the Unit’s current occupant.
The system will take into account the Sharing Settings for “Clients Created” and “Service/Programs/Assessments Placed”:
- The system uses the phrase “Undisclosed Client” to describe the existence of a client record that a user is not permitted to view.
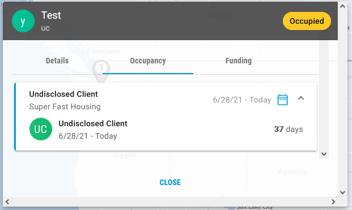
- If a user viewing the Occupancy information cannot see the client according to the “Clients Created” setting, then the system displays “Undisclosed Client” instead of the client name.
- The system also considers the Program and the Assessment connected to the Unit. If the program and assessment are not shared for the user who is viewing the Occupancy Information, the system displays “Undisclosed Client” instead of the client name.
- The system also takes into account if a client, program, or assessment is set to “Private.”
Status Tab
The Status tab lists Unit Status records in chronological order, with the most recent status listed first. Refer to our Unit/Bed Status article for details on adding/editing a status.
Eligibility Tab
Click the Eligibility tab to view all eligibility associated with the Unit, including inherited eligibility.
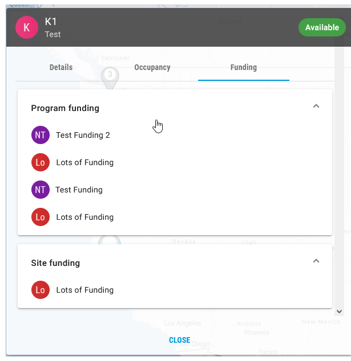
Funding Tab
Click the Funding tab to view all the funding sources connected to the Unit, including those inherited via programs, Site, etc.
Beds Tab
Units with the Beds function enabled will have a Beds tab that displays a list of the Beds in the Unit.
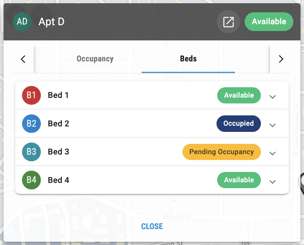
Clicking the down arrow for a Bed displays tabs for viewing Details, Occupancy, Status, and Eligibility information about the Bed.
Click CLOSE at the bottom of the Unit Card when you are done, click the "X" icon, or click anywhere outside the unit card to close them.
Unit Photo
If a photo of the Unit has been uploaded to the system, it will be displayed on the Unit Card.
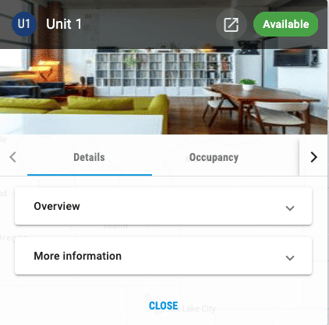
If no photo has been uploaded for a particular Unit, the system will display the photo of the current default Unit Configuration Type. If there is no Unit Configuration Type photo, the system will display the current default Building photo.
If there are no associated default photos, the system will not display a photo for the Unit.
Click CLOSE at the bottom of the Unit Card to close the card.
Note: The unit management link is available when Manage Agency - Sites is enabled for a user’s access role.

If a user is switched into an agency with an access role that does not include Manage Agency - Sites, then they will not be able to see the unit management link.
Editing Units and Bulk Editing
One or more inventory units can be edited directly from the inventory dashboard if a system administrator has enabled Housing Inventory Unit Screen Field Editor Settings and the end user has the appropriate access rights to edit and/or bulk edit units. This feature is available in both the default view and map view.

End Users with the appropriate access rights can select one unit, multiple units, or select “All.” Once one or more units are selected, a pop-up appears with the number of units selected, an option to clear the selection, and a “Modify Selected Units” button.
Note: the select "All" option only applies to the current page.
When the end user clicks on the “Modify Selected Units” button, a window opens to show all Unit Screen fields where a system administrator has enabled Housing Inventory Unit Screen Field Editor Settings and the end user has the appropriate access rights to edit and/or bulk edit units.
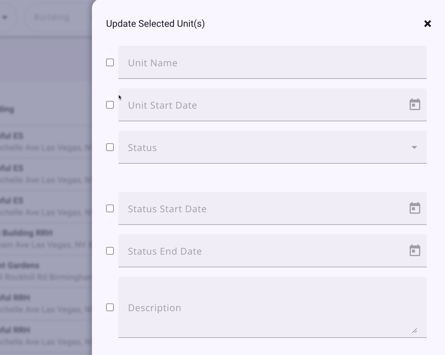
The Update Selected Unit(s) window shows the name of the field when one unit is selected (like the example above) and blank fields when multiple units are selected.
To edit/bulk edit:
- The end user must click the checkbox next to each field they want to modify for the unit(s)
- There is a select all option and an option to clear the selection
- If a field is not selected, it will keep its original value
- The end user selects the option for each field they want to modify for the unit(s)
- The end user can click Cancel or the “X” icon in the top right corner to leave the Modify Unit(s) screen
- The end user will click Save when they have made their selections to update the unit(s).
Notes:
- Data Quality Checks will not apply when fields are edited from the INVENTORY Dashboard
- Display constraints apply when fields are edited from the INVENTORY Dashboard
- If a field is read-only, it will not display on the Update Selected Unit(s) window.
-
If a field is checked and the value is modified, then is unchecked, the field reverts to its original value. The field can be checked again to modify its value.
-
Filter drop-downs allow '(No value)' as an option when a custom housing inventory field:
- Has “Include As Inventory Filter” enabled on the screen field editor.
-
Is a picklist field
AND
- “Select” is a picklist value.
This allows users to filter for Units with no values added to easily find unit details that need to be updated.
'(No value)' will appear at the bottom of the picklist for a custom field. Users can select '(No value)' and other picklist options as filters.

If the ‘(No value)’ option is selected, the system only checks Unit Screens for the field’s value.
The ‘(No value)’ filter hierarchy is not checked in the same way other picklist values are, and returns only units where the relevant field is set to “Select” on the Unit Screen.
![]()
Calculation logic was applied to the unit listing in Inventory. Users see a calculated field as read-only. Users can see the calculation results, but cannot change the field. The system will not show a checkbox for this field on the modify unit details screen.

If there are no fields available to edit, the window shows the following message:
“Nothing to edit. Unit details will be displayed here when they are available for editing.”
Exiting the INVENTORY Dashboard
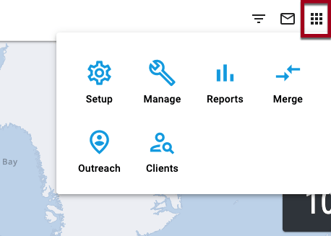
To exit the INVENTORY dashboard, click the Launchpad icon in the upper right corner of the screen and select the desired function.
Updated: 04/06/2026