Refer to our INVENTORY Toolkit for information and materials to help your community successfully adopt INVENTORY.
Table of Contents
Overview
Clarity Human Services offers two methods for communities to collect information about their “housing inventory,” i.e., the beds and units in their system:
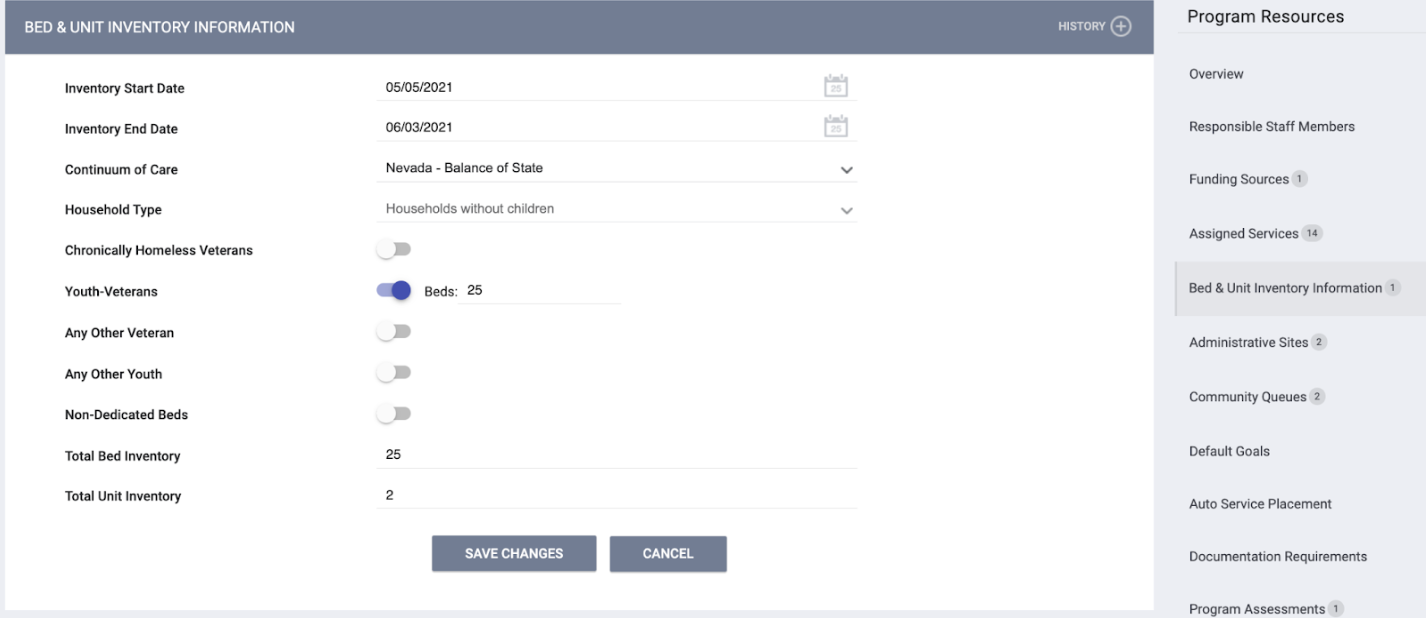
- In a general manner at the program level, through the Bed & Unit Inventory Information section of the Program Resources sidebar for the program.
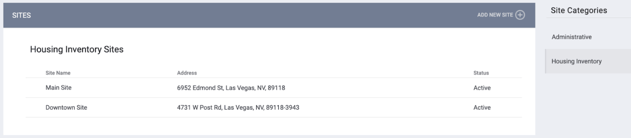
- In a more detailed and dynamic method through a module we call INVENTORY, which is configured through MANAGE > SITES > Housing Inventory.
The table below describes the capabilities of each option. Both methods comply with HUD Data Standards and federal reporting guidelines.
|
Tracking inventory |
Tracking inventory |
|
|
Description |
General count of beds or units per program. |
Detailed tracking of Sites, Buildings, Units, and Beds. |
|
Availability |
General information can be provided. |
Unit/Bed availability is updated in real time and is represented visually in a filterable dashboard. |
|
Referrals |
Can send referrals to a program. |
Clients can be connected directly to a specific Unit/Bed without a referral. |
|
Eligibility |
Can be set up at the program or funding source level. |
Can be set up at the program or funding source level; can also be set up at the Site, Building, Unit, UCT, and Bed levels. Eligibility inherits down to the levels below it. |
You are not required to select a single method for all your housing programs; you may choose a program-by-program approach. Refer to our INVENTORY Setup Best Practices article for more information.
For programs that will not use INVENTORY, refer to our How to Set Up a Program: Detailed Instructions article for details on configuring Bed & Unit Information.
For programs that will use INVENTORY, follow the steps described below.
Configuring INVENTORY
Configuration settings are available at each Inventory level (Sites, Buildings, Unit Configuration Types (UCT), Units, and Beds), for Eligibility at each level (or through programs or funding sources assigned at a level), and through custom Housing fields.
INVENTORY Levels
The first step in the configuration process is to compile a list of the entities that must be configured at each level of INVENTORY: Sites, Buildings, Unit Configuration Types, Units, and Beds.
- A Site is a location consisting of one or more of an agency’s Buildings.
- A Building is a physical structure containing Units.
- A Unit Configuration Type (UCT) is a template that describes the physical attributes of a Unit – for example, a two-bedroom Unit for families or a one-bedroom Unit for single adults.
- You may also configure Beds for the UCTs if you want to be able to refer clients to a specific Bed within a Unit instead of referring them to a Unit as a whole.
The Unit Configuration Type is where HUD bed information, such as household type and dedicated beds, is captured.
- A Unit is the actual living space for a client/household.
Eligibility
The next step is determining which eligibility criteria you would like to tie to each Site, Building, Unit Configuration Type, Unit, and Bed (if applicable). As mentioned above, eligibility criteria can be added to INVENTORY as follows:
- Attached directly to Site, Building, UCT, Unit, and Bed levels
- Inherited through programs and/or funding sources that are assigned to a Site/Building/UCT/Unit
Eligibility that is set at one level will inherit down to all the levels beneath it.
Note: The Eligibility toggle for a Site, Building, UCT, Unit, or Bed will automatically turn on and become grayed out and read-only in these cases:
- The Eligibility toggle is turned on for the level above.
- A program with eligibility (or a program with a funding source that has eligibility) is assigned or inherited to that level.
Each Site, Building, UCT, and Unit can have as many funding sources as needed, but can only have one program. The ability to add a new program isn’t available to the lower levels after a program is added to a level above it.
Additional resources:
- Refer to our INVENTORY Setup Best Practices article for guidance on determining the appropriate levels for applying eligibility criteria.
- Refer to Program Setup: Eligibility and Introduction to Funding Sources for details on adding eligibility to a program or funding source.
Custom Housing Fields
Lastly, compile a list of any specific features you would like your users to consider when searching INVENTORY. For example, do some Buildings allow pets? Do some Units have washers and dryers? You can create Custom Housing Fields to capture this information, allowing users to filter the dashboard by the desired features.
Next Steps
Once you have outlined these items, you are ready to configure the various elements of INVENTORY:
- Configure Housing Inventory Screens, adding Custom Housing Fields to the screens as needed.
- Configure Sites, Buildings, Unit Configuration Types, Units, and (if applicable) Beds.
Note: INVENTORY Sites and Buildings cannot be deleted once a Unit is created within them. Refer to the Site, Building, UCT, or Unit articles for details.
Settings
To ensure that INVENTORY functions as needed for your community, turn on the settings described below.
System-Level Setting
INVENTORY’s Bed & Unit Management functionality enables the Unit Queue and provides the ability to refer clients to a specific Unit/Bed from the Community Queue. Enabling Bed & Unit Management for a program disables the ability to post openings for that program under LIMITED AVAILABILITY on the Availability tab.
Note: Even though enabling Bed & Unit Management for a program disables the ability to post openings for that program under LIMITED AVAILABILITY on the Availability tab, users will still need to click the LIMITED AVAILABILITY option for the program on the Availability tab in order to refer clients to a specific Unit/Bed.
Use the Bed & Unit Management picklist under Referral Settings to designate whether the system’s Bed & Unit Management functionality will be applied to all programs (“Required”), or no programs (“Disabled”), or can be turned ON or OFF for each program as appropriate (“Optional”). Refer to our Referral Settings: Overview article for more information.
Note: When the program-level setting Bed & Unit Management = Disabled, referral visibility follows the program-level Program Visibility: Community Queue setting logic. Refer to the How to Set Up a Program: Detailed Instructions and Program Setup: Program Visibility articles for more information.
Program-Level Settings
These settings are available for each program under MANAGE > PROGRAMS. Refer to our How to Set Up a Program: Detailed Instructions article for more information.
- Bed & Unit Management toggle
- For programs in a Referral Setting where the Bed & Unit Management picklist is set to Optional, turn ON the toggle to enable the ability to refer clients to a specific Unit/Bed from the Unit Queue and the Community Queue.
-
Turning on the toggle disables the ability to post program openings under LIMITED AVAILABILITY on the Availability tab.
- However, in order to enable the ability to refer clients to a specific Unit/Bed from the Unit Queue and the Community Queue, users will still need to click the LIMITED AVAILABILITY option for the program on the Availability tab.
- Refer to our Referrals: the Availability Tab and Unit Queue articles for more information on LIMITED AVAILABILITY settings.
- However, in order to enable the ability to refer clients to a specific Unit/Bed from the Unit Queue and the Community Queue, users will still need to click the LIMITED AVAILABILITY option for the program on the Availability tab.
-
- For programs in a Referral Setting where the Bed & Unit Management picklist is set to Optional, turn ON the toggle to enable the ability to refer clients to a specific Unit/Bed from the Unit Queue and the Community Queue.
Notes:
When the program-level setting Bed & Unit Management = Enabled (ON), program visibility access rights and program setup Unit/Bed Limit Type settings provide an added layer of granular control over where unit/bed referrals can be directed.
The Create Referrals for Limited Units access right provides further control over referral permissions. When this access right is enabled for a user, they can send referrals to specific units and beds with limited visibility, provided both of the following conditions are met:
- The Create Referrals for Limited Units access right is enabled
AND - The user and their current agency are selected for the program's Agencies/Users Sending Referrals setting; OR the user’s current access role is selected for the program's Access Roles Sending Referrals setting.
- The program-level Agencies/Users Sending Referrals setting or Access Roles Sending Referrals setting only appear if the program-level Unit/Bed Limit Type setting is enabled.
For more information about these access rights and settings, refer to the Program Setup: Program Visibility and How to Setup a Program: Detailed Instructions articles.
- Use Inventory Calculated Records toggle
- Turn ON the toggle for each program that should use INVENTORY information for reporting.
- If the toggle is OFF, reports will pull the Bed & Unit Information from the program level, even if you’re using INVENTORY.
- Turn ON the toggle for each program that should use INVENTORY information for reporting.
-
- Refer to our How to Set Up a Program: Detailed Instructions article for more information.
- Refer to our How to Set Up a Program: Detailed Instructions article for more information.
- Manage Units/Beds toggle
- Turn ON to enable the Units/Beds tab within the client’s program enrollment.
- Turn OFF to hide units. Although the units will be visible on the INVENTORY map, the units will be hidden in the client's program enrollment. In either scenario, users do not have the ability to assign the client to a room/unit.
- Turn ON to enable the Units/Beds tab within the client’s program enrollment.
- Direct Unit/Bed Referrals picklist
- Designate whether users will be able to select a Unit/Bed when making a referral via the client-level REFERRALS tab and the PROGRAM ELIGIBILITY DETERMINATION page:
- Disabled: Users will not be able to refer to a Unit/Bed while making a referral to the program.
- Optional: Users can select a Unit/Bed when referring to a program, but they are not required to.
- Required: Users making a referral to the program must select a Unit (and Bed, if applicable)
- Designate whether users will be able to select a Unit/Bed when making a referral via the client-level REFERRALS tab and the PROGRAM ELIGIBILITY DETERMINATION page:
Notes:
The selections made for the program-level Program Visibility settings impact the Direct Unit/Bed Referrals setting.
- When None is selected for Program Visibility: Client Referrals Tab AND Program Visibility: Eligibility Determination Screen, the Direct Unit/Bed Referrals setting field is hidden.
- When None is selected for all three Program Visibility settings, the Direct Unit/Bed Referrals setting field is hidden.
Direct Unit/Bed Referrals setting considerations for program and unit/bed referrals from the client Referrals tab(s):
- When Direct Unit/Bed Referrals = Disabled, referral visibility follows the Program Visibility: Client Referrals Tab setting selection logic.
- When Direct Unit/Bed Referrals = Optional or Required, the program visibility access rights and the Limit Unit/Bed Visibility settings in the INVENTORY configuration provide an additional layer of granular control over where referrals can be directed.
Direct Unit/Bed Referrals setting considerations for program referrals from Eligibility Determination screens:
- When Direct Unit/Bed Referrals = Disabled, referral visibility follows the Program Visibility: Eligibility Determination Screen setting selection logic.
- When Direct Unit/Bed Referrals = Optional or Required, the program visibility access rights and the Limit Unit/Bed Visibility settings in the INVENTORY configuration provide an added layer of granular control over where referrals can be directed.
For more information about Direct Unit/Bed Referrals and Program Visibility setting impacts, refer to the Program Setup: Program Visibility and How to Set Up a Program: Detailed Instructions articles.
Staff Access
Once INVENTORY has been configured, communities need to consider which access role permissions are appropriate for the various roles performed by their staff members.
Workflow
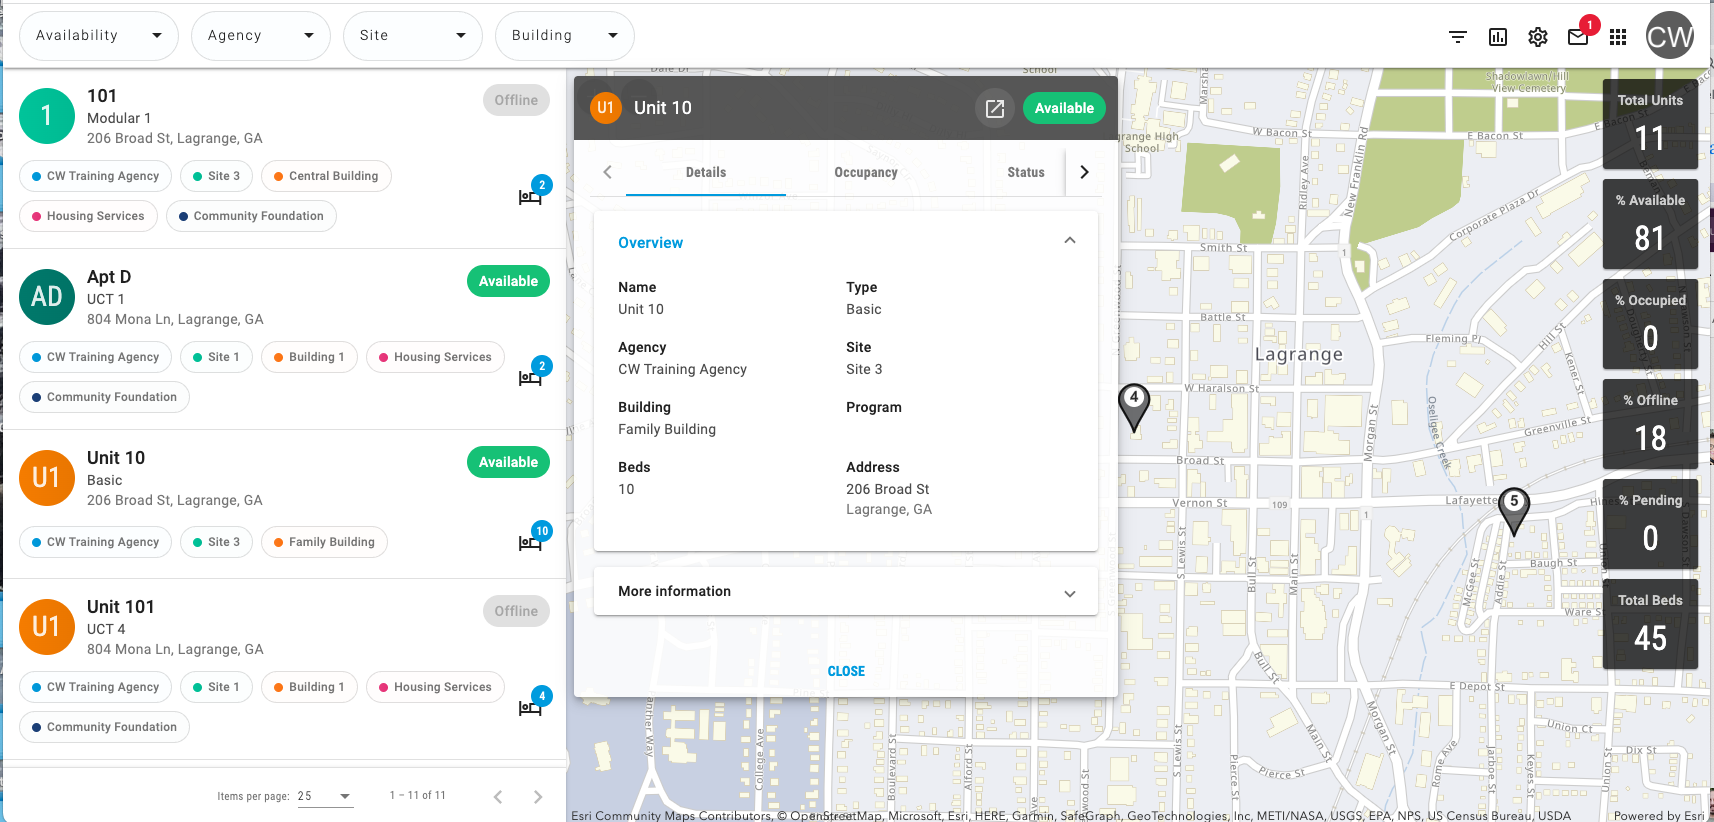
Once INVENTORY has been configured, staff members with the appropriate permissions will be able to view Unit details on the INVENTORY dashboard and will have the following options for assigning clients to Units:
- Direct Connection (no referral):
- Connect a client directly to a Unit/Bed through the Units/Beds tab within a program enrollment.
- Refer to our “Units/Beds Tab” article for details.
- Referral through Community Queue:
- Search for Units for which a particular client is eligible.
- Refer the client to the Unit/Bed.
- The client will automatically be assigned to the Unit/Bed through the enrollment.
- Refer to our Community Queue for End Users article for details.
- Referral through the Unit Queue:
- Search for clients who are eligible for a particular Unit.
- Refer the client to the Unit/Bed.
- The client will automatically be assigned to the Unit/Bed through the enrollment.
- Refer to our Unit Queue article for details.
- Referral to a program that has Units/Beds set up:
- Select a Unit/Bed when referring to a program from the REFERRALS tab or the PROGRAM ELIGIBILITY DETERMINATION page within the client-level ASSESSMENTS tab or the program-level Assessments tab.
- Refer to our Direct Referrals from the Client Referrals Tab article and our Direct Referrals from the Assessments Tab article for details.
- Select a Unit/Bed when referring to a program from the REFERRALS tab or the PROGRAM ELIGIBILITY DETERMINATION page within the client-level ASSESSMENTS tab or the program-level Assessments tab.
Updated: 06/16/2026