This article is for the new Clarity interface. Screenshots and descriptions will be updated as features are released. For the current interface article, see Creating and Managing Program Enrollments.
Table of Contents
Video Resources
Click play for a brief overview:
Click through for a hands-on experience:
Overview
In Clarity Human Services, a program (or Project in the HMIS Data Standards) represents a unit of an Agency (or Organization) in which a client or household enrolls. Program enrollments provide the framework for HMIS data collection and reporting.
Note: The programs available to a user will depend on agency and staff member settings. Refer to How to Set Up a Program: Detailed Instructions and Additional Agency Access for more details.
Program Enrollments (Without a Referral)
Program enrollments can be made with or without a pending program referral. This section provides details on how to enroll a client or household in a program without a pending program referral. Jump to the Program Enrollments (With a Referral) section in this article for those details.
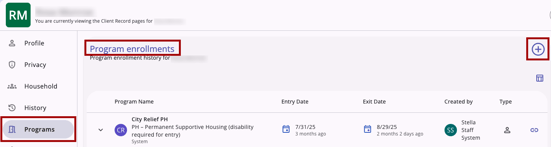
To enroll a client or household in a program, click the Programs tab on the client's navigation menu in the client record. The tab contains the program enrollment history and an Add icon.

The Program enrollments section lists the enrollment history for the client. To add a new program enrollment for your agency (or the agency you are switched into), click the Add icon.
Available Programs
To enroll a client/household into a program, select an available program for your agency and click Next.

Additional information and options will display when you click the drop-down arrow.

The programs that have documentation requirements will include a Required Documents section and will list any required documents for that program.

Include Household Members
If you have created a family/household for the client, you will be prompted to select family/household members to include in the enrollment. Click the name(s) next to the family member(s) who should be enrolled in the program and then click Next.
The system will display a Currently Enrolled label for other household members who are actively enrolled in the same program (i.e., there is no enrollment end date, or the end date is after today).
Note: The system will not display the Currently Enrolled label for a household member whose enrollment in that program starts on a future date.

If you turn on the toggle to select a Currently Enrolled family member and click Next, the system will allow the client to be enrolled. However, the system will display the following pop-up:
“Please note that at least one of these household members has an active enrollment in this program. To continue with the creation of this enrollment, please select the “OK” button below.”
Enroll Clients
The Program Enrollment screen will display for your original client first.
All program enrollments have an associated Program Enrollment screen. The Program Enrollment screen is the equivalent of an intake or entry form; it contains data fields to record client information.
Enrollment screens for Permanent Housing (PH) projects will include a Housing Move-In Date field that should be completed when the client moves into a PH unit. The Housing Move-In Date field must be on or between the Program Start Date and Program Exit Date.
Click Save & Close to complete the enrollment screen.
Notes:
-
If you are enrolling other household/family members, you will see a Save & Next button. Clicking this button will enroll the current member and automatically take you to the correct Program Enrollment screen for the next member.
- When a client is enrolled in a housing program with an applicable project type that is using INVENTORY and has the appropriate settings configured, the Initial Occupancy Start Date shows as a separate field on the enrollment screen within a section Initial Occupancy Information.

Refer to the Initial Occupancy Information (New Clarity Interface) article for more information.
After all steps have been completed, click Complete.

If a pending Referral was connected to the program during the enrollment process, the Completed screen for the enrollment will show additional information:
- A Task Summary showing which actions were completed
- An Undo option for the referral link.
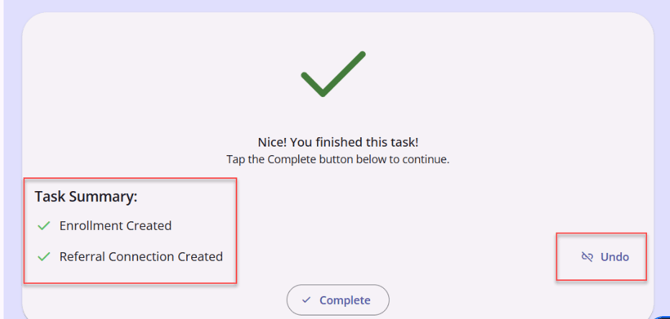
- If the user clicks Undo, the referral connection is removed.
If the program has been configured with Default Goals or Auto Service Placement, a pop-up will appear on the Provide Services screen that lists all the actions the system conducted automatically upon enrollment.
Program Enrollments (With a Referral)
Program enrollments can be made with or without a pending program referral. This section provides details on how to enroll a client or household in a program with a pending program referral. Jump to the Program Enrollments (Without a Referral) section of this article for those details.
To enroll a client or household in a program, click the Programs tab on the client's navigation menu in the client record. The tab contains the program enrollment history and an Add icon.
The Program enrollments section lists the enrollment history for the client. To add a new program enrollment for your agency (or the agency you are switched into), click the Add icon.
Available Programs
To enroll a client/household into a program, select an available program for your agency and click Next.
Additional information and options will display when you click the drop-down arrow.
The programs that have documentation requirements will include a Required Documents section and will list any required documents for that program.
Connecting a Pending Referral to a New Enrollment
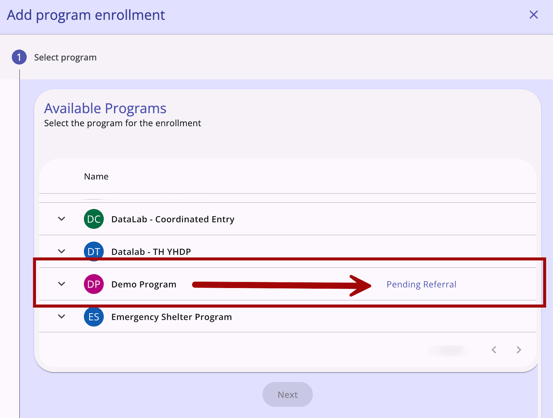
When a user is creating a new enrollment for a client, the system will display any active referrals on the Available Programs section of the Add program enrollment modal with the label Pending Referral.
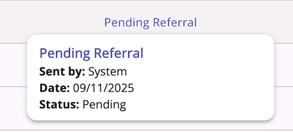
If you hover over the label Pending Referral, additional information will appear.
Once the client is enrolled in a program with the Pending Referral label, the referral is automatically linked. The system also updates the selected referral's end date to the current date, and marks the Referral as Complete.
Additional steps (including group members, if needed, and completing enrollment screen fields) will be necessary to complete the enrollment and are detailed later in this article.
On the Completed screen for the enrollment with a linked referral, additional information appears:
- A Task Summary showing which actions were completed
- An Undo option for the referral link.
- If the user clicks Undo, the referral connection is removed.
More details about linking Referrals to new and existing enrollments can be found in the Referral Connections Help Center article.
Enrolling a Client from a Household Referral
When a user enrolls a client from a household referral, the system automatically populates all household members and their bed assignments.
Enrollment Page
Above the Household Member section, the following text is displayed:
"Program Placement a result of Referral to [Unit (Bed)] provided by [referring agency]."
There is no toggle to enable or disable this message.
In the Add Program Enrollment modal, when the user reaches Step 2 (Include household members (optional), the following behavior applies:
- Members with a Pending Bed/Unit Assignment: All household members included in the original referral who have a Pending Bed/Unit Assignment status are selected by default. These members appear with a checkmark to the left of their name and are highlighted.
- Members without a Pending Assignment: Household members who do not have a pending assignment are not selected by default. They appear without a checkmark and are not highlighted.
After all steps have been completed, click Complete.
Modifying Household Member Bed Assignments
Removing a Household Member
If a user unchecks a household member who was selected by default (e.g., the member is no longer joining):
- The Pending Bed/Unit Assignment is removed from their record.
- The bed status updates accordingly:
- If the Set remaining [x] Beds to "Offline" setting was ON, the bed status changes to Offline.
- If the Set remaining [x] Beds to "Offline" setting was OFF, the bed status changes to Available.
- This change is noted in the referral audit log.
Adding a Household Member
If a user checks a household member who was not selected by default (to add a new member):
- The system checks for available beds in the same unit.
- If a bed is available, a Select Bed dropdown appears.
- If no beds are available, a popup displays:
"No available units or beds match the current criteria."
Status Changes on Save/Complete Enrollment
When the enrollment is saved or completed, the following changes occur for each enrolled member:
- The assigned bed status changes from Pending Occupancy to Occupied.
- The Pending Bed/Unit Assignment history item is closed by setting its End Date to the Initial Occupancy Start Date.
- The bed/unit assignment appears in each member's individual enrollment record on the Units/Beds tab.
- If all beds in the unit are Occupied or Offline, the unit status changes to Occupied.
Cancellation
If the user cancels the enrollment process for one household member:
- That member and all subsequent members in the list are not enrolled.
- Their Pending Bed/Unit Assignment records are deleted.
- Their beds revert to Available or Offline, based on the original setting.
Enrolling a Non-Referred Member
If a user attempts to enroll a non-referred member who has a Pending Bed/Unit Assignment directly, a popup displays:
"Client [Client Name] has a referral to Bed: [Bed]. Please enroll the client and connect the referral to ensure all connections to beds are completed."
Using Referral Connections
If the user enrolls the household separately and then attempts to use the Referral Connections feature on the original referral, a popup displays:
"Referral includes bed assignments, only the referred client bed assignment will be completed. Please go to individual enrollments to complete bed assignments for Household members."
- If the user clicks OK, only the referred client's bed assignment is connected.
- The remaining members' Pending Bed/Unit Assignment items remain open until manually managed.
Signature Fields on the Enrollment Screen
If a system administrator has added a core or custom signature field to the enrollment screen, users can collect a signature on the enrollment screen.
- The field can be signed via a cursor or an electronic signature pad
- When the user views the field, there is an empty box for the signature and a Reset Signature icon (an X) visible

- Once a signature is added the Apply Signature icon (a checkmark) appears and the user can apply the signature by clicking the checkmark icon or reset the signature by clicking the Reset Signature icon (an X)

- Tooltips show when the user hovers over the Apply Signature icon (a checkmark) and the Reset Signature icon (an X)
- Depending on where the user or client is signing, move to the next field on the screen or click Save & Next to save the screen and move forward in their workflow.
Additional Enrollment Information
Once you save the enrollment, additional information will display in the information boxnear the top of the screen.
Information Box

The information box contains the following program enrollment information:
- Program Name
- Associated Agency
- Program Type
- Program Start Date
- Program End Date or Active
- Total days enrolled or since exited
- Group or Individual Enrollment icon
- Privacy icon
-
The Privacy Lock icon is located at the top right corner of an enrollment and marked Public by default. The end user can hover over the lock icon to see a tooltip that indicates if the item is marked as Private or Public.

An end user can click on the lock icon and a privacy pop-up appears so they can update the privacy to private.

An end user can use the same process to change privacy to public.

-
- Program Warnings
- Head of Household Warning: when an enrollment is missing an active Head of Household, a warning message will appear on all program screens in the information box.

- Head of Household Warning: when an enrollment is missing an active Head of Household, a warning message will appear on all program screens in the information box.
-
Restrictions
- Restrictions Alert: when a client has a program restriction, a Restrictions alert is visible in the information box. Refer to the Program Restrictions article for more details.

- Restrictions Alert: when a client has a program restriction, a Restrictions alert is visible in the information box. Refer to the Program Restrictions article for more details.
Group Tab
A Group tab is available within a client’s program enrollment that allows you to manage and view all household members associated with the enrollment. The Head of Household (HOH) will also be listed here.
Accessing the Group Tab
To view enrollment details, select a client, select a specific program, and click the Group tab.

The information displayed on this tab varies depending on the type of enrollment:
- Individual Enrollment: The page displays only the current client, as they are the designated Head of Household (HoH) for the enrollment.
- Group Enrollment: The page displays all program members, including the current client.
Identifying the Head of Household
A Star icon appears to the far right of a household member's name to indicate they are the Head of Household (HOH).

- Tooltip: Hovering over the Star icon will display the message:
"Head of Household.
Household Member Management
To the far right of each household member row, click the Action Menu Icon (three vertical dots) to access the following options:

View Household Relation
This option allows you to view or edit how a member is related to the Head of Household.
- Visibility: This option is only visible for Group Enrollments. It will not appear for Individual Enrollments.
- Permissions:
- Edit Access: If you have the Edit Agency Programs or Edit Any Agency Programs permission to modify the program, you can update relations and will see Save and Cancel buttons.
- Read-Only Access: If you do not have the Edit Agency Programs permission, you can view the modal but will only see a Cancel button.
When you select the View Household Relation option, the Household modal opens on the right side of the screen.

When you select View Household Relation option, the Household modal opens on the right side of the screen.
Use the Relationship to Head of Household dropdown to select one of the following:
- Self (Head of Household): This can only be assigned to one member at a time.
- Head of Household’s child
- Head of Household’s spouse or partner
- Head of Household’s other relation member
- Other: non-relation member
Click Save to complete the update or Cancel to return to the Group tab.
Changing the Head of Household (HoH)
To reassign the HoH status to a different member, follow these steps:
- Locate the current HoH and click their Action Menu icon.
- Select View Household Relation.
- Change their relation from Self to a different value.
- Upon changing the HoH from Self, the system will display a warning:
“The enrollment does not have an active Head of Household. Assign a new Head of Household to maintain compliance.”
-
Click Confirm.
- Navigate to the new HoH’s Action Menu icon > View Household Relation and select Self (head of household) for the new HoH.
- Complete the steps to update the relationship.
Go To This Client Record
Selecting this option navigates you directly to that member's client record page.
Note: This option is available for all household members except the current client you are already viewing.
Assigned Staff
The Assigned Staff tab allows you to view and manage the specific team members responsible for a client’s program enrollment. To manage staff assignments, select a client, then select a specific program, and click the Assigned Staff tab.
For full details, refer to the Assigned Staff article.
Adding Household Members to Existing Enrollments
Refer to the How Do I Add a New Household Member to an Enrollment? article for instructions on adding a household member to an existing enrollment.
Program History
Clicking the Programs tab displays the Program enrollments section, which lists the client's current and past program enrollments.
The program's history section displays the following details that also appear with an enrollment in the History tab:
- Name: This column displays the name, type, and agency of the enrollment program.
- Entry Date: The Program Entry Date for each enrollment.
- Exit Date: The Program Exit Date for each enrollment. If the client is still enrolled in the program, the End Date will display as Active.
- Type: whether the client was enrolled in the program as a group with household members or as an individual.
Editing an Enrollment
To edit a program enrollment, go to the Entry tab within the enrollment and click on the Edit icon (a pencil) on the right side of the screen.

If the program is outside your agency, your ability to edit it depends on your sharing settings. If you have any questions about your sharing settings, please consult with your system administrator for details.
Clicking the Edit icon will allow you to edit the client’s enrollment data. Click Save after making changes. Your access to other tabs (Services, Events, Assessments, Goals, Notes, Files, Charts, Units, Forms, and Exit) depends on the program's configuration and your access role settings.

Deleting an Enrollment
For users who have the Delete Agency Programs or Delete Any Agency Programs access right(s) enabled in their access role, the Delete option will be available in a program's Action Menu.

To access the Delete option, click on the desired program in the Programs tab for the client. Click the Action Menu (⋮) icon on the right side of the Home tab, then click Delete.
Before any record is deleted, a confirmation dialog appears with the following standardized messaging:
- Title: Delete Record
- Body: "Are you sure you want to delete this record?"

The dialog includes two buttons:
- Delete (bottom right) confirms the deletion. When clicked, the pop-up is dismissed, the record is deleted, and the user is returned to the screen they were on. The table refreshes to reflect the removal.
- This button displays in red with a Delete (trash can) icon.
- Cancel (bottom left) cancels the delete action. When clicked, the pop-up is dismissed, and the record is not deleted. The user is returned to the screen they were on with no changes made.
- This button displays as dark purple with an X icon to the left.
Notes:
-
Before you will be able to delete the enrollment, you must first delete the services.
- The Delete option only appears for users who have the Delete Agency Programs or Delete Any Agency Programs access right enabled in their access role for the associated record type. If the user does not have delete access, the option does not appear in the dropdown.
- If the Delete option is the only option in the action menu and the user does not have the Delete access right enabled, the Action Menu (⋮) icon does not appear at all.
Restoring Deleted Data
Users with the Restore Deleted Data access right can now restore deleted records.
Accessing the Restore Deleted Data option
When deleted records are available to restore, an Action Menu (⋮) icon appears to the right of the Add (+) icon on the screen header. When selected, a Restore Deleted Data modal opens from the right side of the screen.

When selected, a Restore Deleted Data modal opens from the right side of the screen.
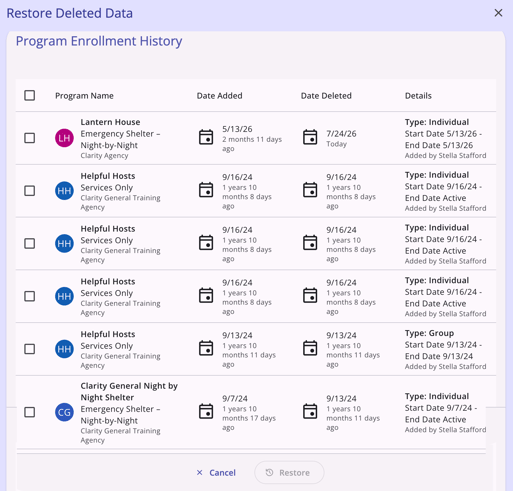
The Restore button is grayed out and cannot be clicked until at least one record is checked.
[Record Type] History Section
Records which can be restored are listed under a [Record Type] History section in the Restore Deleted Data modal. Users can selectively choose records listed by clicking the checkbox to the left of the desired records or select/unselect all records with the checkbox in the header row.

When one or more records have been selected, the Restore button becomes active.
When ready, click the Restore option. After the restore is complete, the panel closes and the restored records appear on the screen without requiring a page refresh.
Refer to the Restoring Deleted Data (New Clarity Interface) article for more details.
Program Enrollment Warnings
The following warning banners are available when navigating program enrollment screens.
Housing Move-In Date Warning
When an end user is working in a program enrollment screen, a warning message will appear if the Move-in Date for the Head of Household is prior to the enrollment start date. The warning banner will be displayed for all household members in the enrollment (not just the Head of Household) so that a user viewing another household member's enrollment will know that the Head of Household's Move-In Date is outside of the appropriate date range.

Aging into Adulthood Warnings
When the Aging into Adulthood notification setting is turned on, and the client is close to turning 18 or has turned 18 after the Program Start Date, a warning will appear on the program enrollment screen.
Aging into Adulthood Soon
For the client close to turning 18, an Aging into Adulthood Soon warning will populate based on the Aging into Adulthood notification setting set by the system administrator. The warning will appear on the program enrollment screen.

Aging into Adulthood
For the client that has already turned 18, an Aging into Adulthood warning will populate based on the Aging into Adulthood notification setting set by the system administrator. The warning will appear on the program enrollment screen.

Audit Log
The View Audit Log option can be selected from the action menu on the Edit Client Program screen by a system administrator with audit log access rights.

A log of all changes to the program is displayed.
Additional Video Resources
Click play for tips for working within the enrollment:
Icons & Tooltips
| Icon | Icon/Tooltip Name | Tooltip | Icon Location |
|
Action Menu | "Show more actions" | Program's Edit Client Program screen |
|
Add | "Add" | Anywhere the Add icon appears |
|
Apply signature |
"Apply signature" |
Program's Enrollment screen |
|
Assessment Score |
“[Processor Name]: [score]” repeat “[Processor Section Name]: [score]” for each section. |
Program's Assessments tab |
|
Delete | "Delete" | Anywhere the Delete icon appears |
|
Edit | "Edit" | Anywhere the Edit icon appears |
|
File Preview | "Preview," also shows a preview of the file | Program's Files tab |
|
Group Enrollment | "Group enrollment" | Program's information box |
|
Individual Enrollment | "Individual enrollment" | Program's information box |
|
Note | “Note [formatted note text]” | Program's Notes tab |
|
Privacy - Private | "Private" | Top right of the screen when viewing program details |
|
Privacy - Public | "Public" | Top right of the screen when viewing program details |
|
Program Connection | “[Program Name], [Agency Name], [Enrollment Date], [Active or Expired enrollment status]” | Program's Assessments tab, program's Files tab |
|
Referral Connection - Enrollments | “Referral by [Agency] on [Assessment Date]” | Programs tab |
|
Reset signature | "Reset signature" | Programs's Enrollment screen |
Configuration Resources
The following configuration resources were noted in this article:
Updated: 07/24/2026