This article is for the new Clarity interface. Screenshots and descriptions will be updated as features are released. For the current interface article, see Working with Files in the Client Record.
Table of Contents
Video Resource
Click play for a brief overview:
Overview
Files uploaded to a client record can be shared between agencies or kept private.
Notes:
- There's no limit to the number or format of files staff members can upload.
- The maximum size per file is 25 MB.
- Compressed files can be uploaded.
Some examples of how an agency might use this feature include:
- Uploading third-party documentation of homelessness
- Scanning and storing forms of client identification
- Keeping agency agreements and signed policies
- Sharing files as part of the community's Coordinated Entry process.
Data Collection Requirements
The HUD HMIS Data Standards do not contain any requirements concerning file uploads; however, local programmatic requirements may exist.
Staff Member Settings
The access rights enabled in a staff member's Access Role impact their ability to view, edit, and delete files.
Agency and Program Settings
- An agency's assigned Navigation Profile impacts its staff members' access to the client-level FILES tab.
- Sharing files with other agencies is subject to the uploading agency's Files sharing settings. Additionally, if the uploading agency's Files sharing setting is "Basic Shared" or "Full Shared" with another agency, but Service/Programs/Assessments Placed is "Not Shared," staff members at the shared-with agency will only see files from the client-level FILES tab.
- To access the Files tab within a program enrollment, toggle on Program Files for the enrolling program.
System Settings
System administrators can customize File Categories in System Settings Advanced Options.Staff members can upload files within (or link to) a program enrollment or from the client-level Files tab.
Agency-Level Files
Accessing the Files Tab
To view, edit, or upload agency-level files:
- If applicable, switch into the correct agency.
- Navigate to the Files tab within the client record.
/Files.NI.1.png?width=120&height=361&name=Files.NI.1.png)
Viewing Previously Uploaded Files
Users have dynamic options to customize their results and their view with:
- A Search bar
- Filter options
- Sorting options
- A Column Selector.

Search Bar
Users can enter text into the search bar to search the client files by:
- File Category
- Predefined Name
- File Name
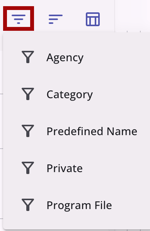
Filter Options
Users can click the "Filter" icon and choose one or more of the following to filter the list of files:
- Agency (that uploaded the file)
- Category (selected for file)
- Predefined Name (selected for file)
- Private (Privacy = Yes/No)
- Program File (Program Connection = Yes/No)
Sorting Options
Users can sort the files table by clicking on a column header or clicking on the sort icon. Each column descends by default, and the user can choose the sort order (ascending or descending).
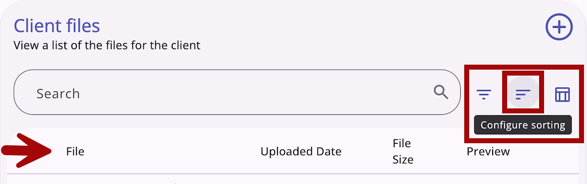
Users can select multiple fields to sort by and can click and drag fields to set the sort order. The following are available by default:
- File (File names are alphabetical)
- Uploaded Date (latest date at top)
- File Size (largest file at top)
Users can also sort by the following fields:
- Category
- Created by
- File
- File Name
- File Size
- Uploaded Date

Column Selector
Users can use the Column Selector to customize their view. When the user clicks the "Column Selector" icon, they will see a search bar, the fields that are available by default (or currently selected) in the Visible Fields section, the fields available to select in the Available Fields section, and a section to add fields that will collapse on the screen in the Collapsed Fields section.

The following fields are available:
- File
- Uploaded Date
- File Size
- Preview
- Created by
- ID (locked)
Fields with a lock icon cannot be moved or removed. For more information on how to use column selectors, refer to the Client Record Overview article.
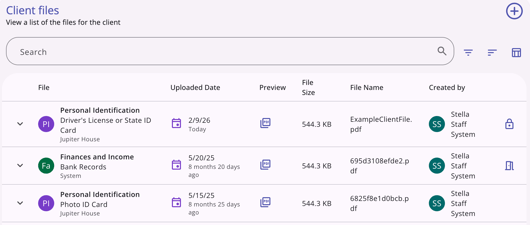
File Information
Files uploaded by staff members at your agency (or the agency you're switched into) or shared with your agency display the following information from the Files tab:
- File Category and Pre-defined Name
- Agency that uploaded the file
- Date of upload
- File Preview (File type icon; hover over the icon to see preview)
- Size of the file
- File Name (name of original file)
- Privacy (a privacy icon will show if the file has been made private)
- Program Connection (a program connection icon will show if the file was added from within a program enrollment).
Editing Files
Users can view and edit existing files by clicking the file, then clicking the edit icon on the Edit File modal.
/Edit%20File.NI.1.gif?width=670&height=372&name=Edit%20File.NI.1.gif)
Note: If you click Save on the Edit File page without making any changes, the system will not display the green "Changes successfully saved" banner, will not record the action in the Audit Log, and will not update the last_updated and ref_user_updated fields.
Deleting Files
Users with the appropriate permissions may delete a file by clicking the trash can icon on the Edit File screen.
/Files.delete.NI.1.png?width=312&height=396&name=Files.delete.NI.1.png)
Note: Files linked to an enrollment that are deleted from the client-level Files tab will also be deleted from the enrollment, and vice versa.
Uploading New Files
To upload a new file, click the Add icon on the Client Files page.
/Files.Add%20Icon.NI.1.png?width=462&height=283&name=Files.Add%20Icon.NI.1.png)
- Select the most appropriate Category and Predefined Name for the file. Turn on the Private toggle if you do not want the uploaded file to be shared with staff members at other agencies, regardless of your agency's sharing settings. For more information, refer to the Making Client Data Private article.
- You can drag and drop files or click Choose A File to upload the file from your computer or device.
- Click Save.
/Files.Add.NI.2.png?width=307&height=393&name=Files.Add.NI.2.png)
Note: Files uploaded to a client record from the client-level Files tab will not be associated with a program enrollment unless linked using the process described below in this article.
Program-Level Files
Accessing Program Files
To view, edit, upload, delete, or link files within an enrollment:
- Create a new enrollment or navigate to an existing program enrollment within the client record.
- Within the enrollment, navigate to the Files tab.
/Files.Program%20Tab.NI.1.png?width=670&height=110&name=Files.Program%20Tab.NI.1.png)
Note: You can only upload and link files for an enrollment to a program within your agency or the agency you're switched into.
From the program enrollment Files tab, you can either add a new file or link a previously uploaded file from the client-level Files tab.
Linking Files to an Enrollment
Linking a client-level file to an enrollment displays the file within the program enrollment Files tab and allows the file to be reportable as linked to the enrollment.
Note: Client-level files can be linked to multiple enrollments.
To link a file to an enrollment:
- Click the three dots to the left of the Add icon to access the action menu
/Files.Program.Link.NI.1.png?width=585&height=178&name=Files.Program.Link.NI.1.png)
- click Link From Files
- Select one or more files previously uploaded from the client-level Files tab and click Link.
/Files.Program.Link.NI.2.png?width=594&height=204&name=Files.Program.Link.NI.2.png)
Note: To link to a file uploaded by a staff member at another agency, that agency's Files sharing setting must be "Basic Shared" or "Full Shared."
A file uploaded within (or linked to) an enrollment is listed in the client-level Files tab with a link icon.
Note: When a staff member deletes a file linked to an enrollment from the client-level Files tab, it's also deleted from the enrollment and vice versa.
Icons & Tooltips
| Icon | Icon/Tooltip Name | Tooltip | Icon Location |
|
Add | "Add" | Anywhere the Add icon appears |
|
Delete | "Delete" | Anywhere the Delete icon appears |
|
Edit | "Edit" | Anywhere the Edit icon appears |
|
File Preview | "Preview" and shows a preview of the file | Files tab, program's Files tab |
|
Program Connection | “[Program Name], [Agency Name], [Enrollment Date], [Active or Expired enrollment status]” | Files tab, program's Files tab |
Updated: 04/21/2026