Screen Field Editor Overview
This article explains how to modify a field in Clarity Human Services so that the changes only apply to a particular screen.
Overview
Data is collected in screens through fields.
- When you edit a field in FIELD EDITOR, the modifications will apply to that field wherever it appears in Clarity Human Services.
- When you modify within a screen, those modifications only apply to that particular screen. These modifications take place in the SCREEN FIELD EDITOR.

This article explains the different ways to modify fields within screens. For information about adding fields to screens, see Creating and Editing Screens.
Editing Fields in Screen Field Editor
Navigate to SETUP > SCREENS and click the Edit icon  next to the screen where the field you want to edit is used. The SCREEN EDITOR opens.
Click the Edit icon  next to the field you want to edit. The SCREEN FIELD EDITOR opens.

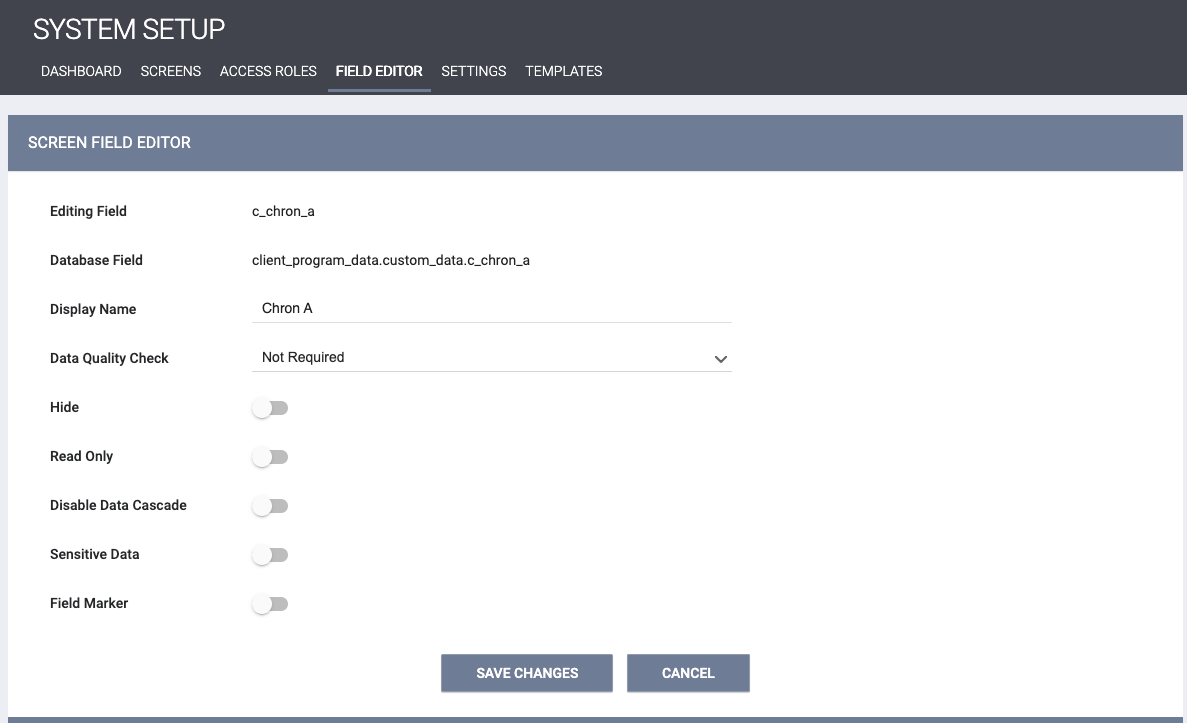
The following components of the field will display in SCREEN FIELD EDITOR:
Editing Field: synonymous with Field Data Name in FIELD EDITOR; a unique identifier for the field. Once you save a field, you cannot change the Editing Field name. No two data fields have the same Editing Field name.
Database Field: a unique identifier for the field in the screen. You cannot change the Database Field name. No two data fields have the same Database Field name.
Display Name: how the field name will display in the screen. Modifying this will only impact the screen you're editing.
Data Quality Check: select one of the following:
- Not Required: The screen can be saved if the field is left unanswered.
- Soft Required: The screen can be saved if the field is left unanswered. However, the field will briefly have a yellow underline when it's saved. In addition, a yellow warning ribbon will flash across the top of the page, encouraging the user to check soft required fields for accuracy.

- Required: The screen cannot be saved until the field is answered. Trying to save changes after leaving a required field blank will cause the data field to turn red. A red warning ribbon appears at the top of the page. If you don't enter a response, you cannot save the screen.

Note: If a field with Data Quality Check set to “Required” also has a display constraint on a screen, and the display constraint isn't met (which means that users will not see that field on the screen), users will be able to save the screen without answering that field.
Hide: hides the field in the screen. For more information, see Hidden Fields.
Read Only: This prevents users from editing this field in the screen.
Note: When Read Only is enabled, data entered in that field will only be saved in the database if the field does not cascade and is not used in any calculations.
Disable Data Cascade: this setting appears for fields with cascade functionality; turn on the toggle to prevent the data entered in that field from cascading.
Note: Because cascaded data overwrites default values, be sure to turn on Disable Data Cascade for any fields for which you do not want cascaded data to overwrite a default value.
Sensitive Data: a staff member's ability to see data entered for the field in the screen will be determined by the access rights enabled for the staff member's access role.
- If Agency Sensitive Data and Any Agency Sensitive Data are toggled off, the only sensitive data the staff member will see is the sensitive data they have entered.
- If Agency Sensitive Data is toggled on and Any Agency Sensitive Data is toggled off, the staff member can see sensitive data entered by any staff members at the agency.
- If Agency Sensitive Data is toggled on and Any Agency Sensitive Data is toggled on, the staff member can see sensitive data entered by any staff member at any agency.
Note: The following fields, which are integral to client records and federal reporting, cannot be marked as Sensitive Data:
- assessment_date
- program_date
- clients.alias
- non-custom fields on the Profile screen
- Note that this change does not affect whether a field can be marked sensitive on other screens; for example, Veteran Status can't be marked as sensitive on a Profile screen but could be marked as sensitive on an Enrollment screen.
Field Marker: if the Field Marker functionality has been enabled for this field in the FIELD EDITOR, you can turn this toggle on to allow data to cascade from a Housing Inventory setup screen to the screen below it.
If you turn on the Field Marker toggle for a field:
- The field will be read-only on the screen.
- The Display Name will be editable.
- The system will look at the value of that field on the screen above it and insert that value. The value will be displayed on the screen when in use unless Hide is toggled on.
- After you SAVE CHANGES, the system hides the following fields:
- Data Quality Check
- Read Only
- Sensitive Data
- When you save the screen, you will see the following pop-up: "If there is existing data associated with this field on this screen, enabling Field Marker may overwrite that data. Please confirm."
Note: If “Field Marker” is enabled for a custom housing inventory field used on a Bed screen, then the following options do not appear:

Size: determines the width (and in the case of text boxes, height) of the field or drop-down menu. For example, a drop-down menu with words will require a wider drop-down menu size than a drop-down with just numbers.
The system defines the field size by a number.

This number determines the width of the field in pixels, using the formula x*9+30. So, if the size is "50," this will display as 50*9+30 or 480 pixels.
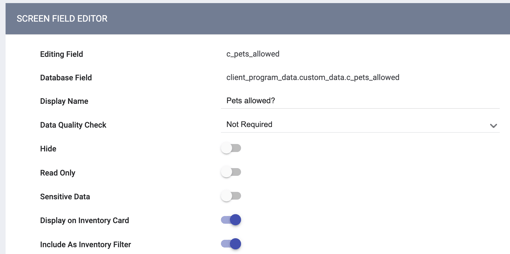
Display on Inventory Card: This setting is available for "Housing Inventory Custom" fields that are attached to Housing Inventory screens. Enable this setting if you want to display this field in the More Information section of the Unit Card on the Inventory Tab.
Include As Inventory Filter: This setting appears when Display on Inventory Card is enabled for a Housing Inventory Custom field. When Include as Inventory Filter is enabled, the field will appear as a custom filter on the Inventory map.

Display Constraints and Calculations
SCREEN FIELD EDITOR includes two additional sections: DISPLAY CONSTRAINTS and CALCULATIONS.
Display Constraints
Refer to the Screen Field Editor: Display Constraints article.
Calculations
Refer to the Screen Field Editor: Calculations article.
Audit Log
Click the button in the lower right corner of the SCREEN FIELD EDITOR to access the Audit Log.

Updated: 02/24/2025