Recording and Editing Service Items in the Client Record
This article explains how to record and edit the unique units of a service in a client record in Clarity Human Services.
This article is for the current interface. For the new Clarity interface article, please click this link.
Overview
Service items represent unique units of a service that can be recorded in a client record. Service items can be recorded as a stand-alone service at the agency level (under the SERVICES tab), within a program enrollment, or both (depending on how the service is configured).
Attendance-based services can also be recorded in the Attendance Module; refer to Managing Attendance Services in the Attendance Module for details.
Notes:
- All service items, whether recorded at the agency level or within a program enrollment (or both), are configured at the agency level.
- Refer to Additional Service Item Settings for details on additional configuration options available when editing a service item.
Recording Service Items
Before you can record a service item for a client, you must first navigate to the list of service items that are available to provide for the client, either at the agency level or from within a program enrollment.
At the Agency Level (Stand-Alone Services)
In the client record, click the SERVICES tab. A list of service items appears.

From within an Enrollment (Program Services)
Locate the enrollment in the client's HISTORY tab or in the PROGRAM HISTORY section of the PROGRAMS tab. Click the Edit icon to open the enrollment.

Within the enrollment, click the Provide Services tab. A list of service items appears.

Notes:
- You can only access service items within an enrollment if the enrollment is active (i.e., an exit has not been recorded for the enrollment).
- You can record service items during or after enrollment (but before exit).
- The ability to record service items within another agency's program enrollment depends on that program's Cross Agency Service setting.
From the list of service items, click the down arrow next to the Category of the service item you want to record.
![]()
- If the Category contains multiple service items, you will also need to click the down arrow next to the one you want to record.

Once you have clicked the down arrow for the service item, fields will appear for you to complete.

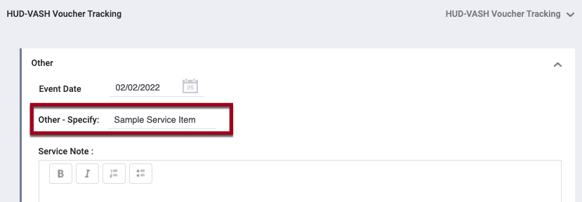
Service items with an "Other" category for Moving On Assistance Provided, VA SSVF Service, and HUD-VASH Voucher Tracking services will include an Other-Specify field for you to enter a description of the service item. The system will underline the field in red if you click SUBMIT without completing the field.

All service items have a date field (or fields).
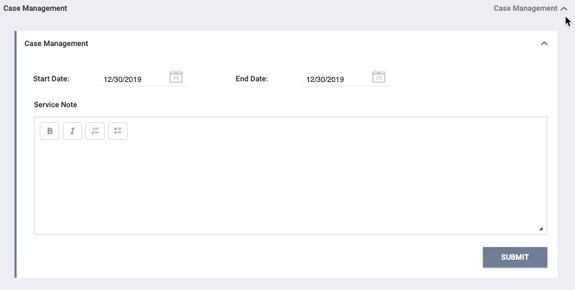
- Service items configured with a "Long Term" or "Daily Attendance" Delivery Type will have a Start Date and End Date.
- Service items with a Delivery Type of "Multiple Attendance" or "Single Event" have just one date field, which the system will record as both the Start Date and End Date for the service item.
- Service items with a Delivery Type of "Long Term" or "Single Event" will have a Service Note form.
Note: You cannot add a date that is before January 1, 1970, or after January 1, 2038.
Notes:
The date field for V3 Financial Assistance - SSVF service items is "Date Provided" when:
- The Service has a Delivery Type = Single Event, AND
- The service has a Category = VA SSVF Service, AND
-
- The service’s service item has a Category = Financial Assistance
The Date Provided field is required. For this type of service, additional date fields appear:
- Start Date of Financial Assistance (required)
- End Date of Financial Assistance (not required, can be added later)

If Group Placement Options is enabled for the service item, you can record the service item for other household members.

Depending on a service item's configuration, the following additional fields may appear:
Service Note
Users with the appropriate access rights to create and edit notes can tag one or more end users in a Service Note. A notification with a link to the tagged note and relevant client record will be sent to the user’s email and/or Staff Inbox. More information about tagging users can be found here.
Funding
Some service items will include fields for funding information, displayed according to the service item's Funding configuration:
- Expense Amount: either an adjustable or a pre-determined amount that cannot be modified, based on the Default Amount and Adjustable settings within the service item configuration
- Expense Date: user-selected date associated with the funding source
- Funding Source: either a picklist or a pre-selected funding source, based on the Automatically Charge and Adjustable settings within the service item configuration. If a picklist is provided, it will include all the agency's active funding sources that have Direct Expenses enabled and have a Fund Amount that is currently greater than 0. For services provided at the program level, the only funding sources included in the picklist will be those that are actively assigned to the program.

When you record a service item for multiple household members, the Expense Type setting determines whether the expense amount will be applied once or if it will be applied for every family member who receives the service item.
For Daily Attendance or Multiple Attendance services recorded from the SERVICES tab or the Provide Services tab, the HISTORY tab for clients receiving the service item will show the Expense Amount listed. (For Daily Attendance or Multiple Attendance services recorded from the Attendance module, the system will only show the Expense Amount next to the Expense Date if Charge per Attendance is enabled.)

Time Tracking
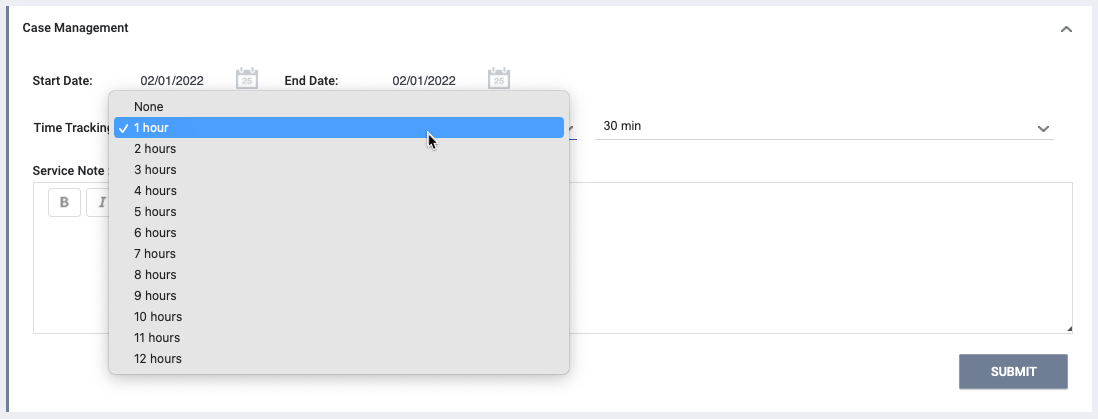
If Time Tracking is enabled for service items with a Service Category of "Case Management," you will see Time Tracking fields when you record the service item. This feature lets you track how much time you spend providing the service.
- If Tracking Time is Adjustable has been enabled for the service item, you will be able to select the amount of time you spent providing the service by selecting options from the drop-down menus for hours and minutes.

For example, you would record a 90-minute case management session by selecting "1 hour" and "30 minutes."
- If Tracking Time is Adjustable has not been enabled for the service item, you will not be able to adjust the Time Tracking fields.

Service items of any category with a "Multiple Attendance" Delivery Type will include a Time field for recording the time of day when you provided the service.

Accounts
If Account Required is enabled for a service item, you will need to select a vendor from a drop-down list when recording the item.
Employment
If Employment Placement is enabled for a service item, you will see fields for entering the client's Hourly Wage, Hours Per Week, Position, and Employer.
Reservation Options
For information about recording services with Reservation Options, see Making and Managing Reservations.
Once you have completed the fields, click SUBMIT to record the service item in the client's record.
Automatic Service Placement
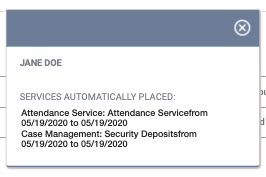
If Auto Service Placement is enabled for a program, the system automatically records services to a client record immediately upon program enrollment. A pop-up lists the recorded service items.

Linking Service Items to Program Enrollments
Service items initially recorded as stand-alone service items can be "linked" to a Program enrollment if appropriate.

Note: If a service is linked to a program in error, or you need to remove the program linkage, users with the appropriate access can delete the program linkage by editing the service in the HISTORY tab and scrolling down to the PROGRAMS section. Hover to the left of the program name and then click the Delete icon.

Deleting, Viewing, and Editing Service Items
Service items that have been recorded in a client's record are listed in the client-level HISTORY tab. You can also see the service item in the program-level History tab if you recorded it within an enrollment.
Deleting
To delete a service item, navigate to the client-level HISTORY tab and click the service item's trash can icon.

Note: You cannot delete a service item from within the program-level History tab.
Viewing and Editing
To view or edit a service item, click its Edit icon in the client-level HISTORY tab (or the program-level History tab, if the service was recorded within an enrollment).

The HISTORY: EDIT page for that service item appears.

Refer to our Additional Service Item Settings article for details on additional settings such as Expiry Warning, Authorization lock, Expenses, etc. Note that Attendance services have unique configurations that can be edited in the client record history.
For users who are switched into an agency that is different from the one that provided the service, the system will hide the following functions:
- ADD EXPENSE link
- Edit and Delete (trash can) icons for existing expenses
![]()
Edit as needed, then click SAVE CHANGES.
Audit Log
Users with the appropriate access can view an Audit Log for the service item by scrolling to the bottom of the page and clicking the Audit Log button.

Note: If you click SAVE CHANGES on the HISTORY: EDIT page without making any changes, the system will not track the change in the Audit Log, will not display the green "Changes successfully saved" banner, and will not update last_updated and ref_user_updated.
Updated: 10/22/2025