Persons in Encampments
This article describes how to add Persons to an Encampment and move them to a different Encampment.
Overview
The client locations, or "Persons," included in an encampment in Outreach are based on the CoC’s Location Filters and the Data Filter options defined by the user in the Outreach map. To view the Persons in an encampment, click any area within an encampment’s boundaries.
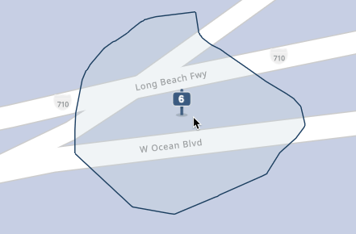
Searching Persons in an Encampment
Note: Geolocation Fields in Client Profile screens designated as “Geolocation Field Based” in the CoC’s Location Filters (SETUP > SETTINGS > Location & Outreach) always display in Outreach. Locations in Client Profile screens are static, whereas other locations displayed in Outreach are dynamic, and only the most recent record displays. Consequently, if you use Client Profile location data in Outreach, you should always update the client’s current location in the Client Profile, even if you track it elsewhere.
When you click on an Encampment on the map, a panel will appear on the right side of the screen with the PERSONS section selected. The PERSONS section displays all the clients in the encampment.
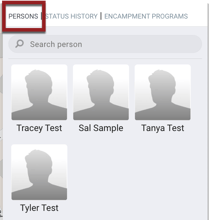
To search for a person by name, you can type the name in the Search person area. As you type, the results are limited to those clients matching your search term(s). The map only displays clients that meet the search criteria.
Clicking on a client in the search results opens the PROFILE INFO pop-up for the client, which includes the Client UID (with a copy icon), DOB, the location details, a location icon that opens the client's LOCATION tab, and a VIEW button that opens the Client Profile.
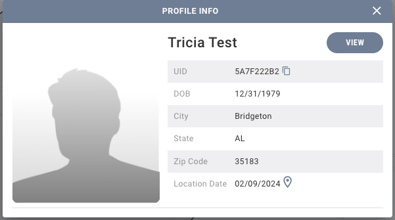
If there are Encampment programs for which the client is eligible, the client pop-up will include an Encampment Program section that provides one-click enrollment. If the client has Encampment program enrollments, the pop-up will also include an ENCAMPMENT PROGRAM HISTORY tab. Refer to our Enrolling Clients in Encampment Programs article for details.
When a user clicks on the VIEW button, the location icon, or a program name (on either the PROFILE INFO tab or the ENCAMPMENT PROGRAM HISTORY tab), the URL that redirects to the main Clarity interface will include the Client’s Unique Identifier.
Adding Persons to an Encampment
To add a person to an encampment, click the Add Person(s) icon on the PERSONS tab.

Notes:
- A Field Interaction location record will be added to the client record of persons added to an encampment through the Outreach map. To view the location record in Outreach, ensure that Field Interactions are enabled in the CoC’s Location Filters.
- You must set the map's Time Filter in the DATA FILTER to “Use Current Date/Time” to add a person to an encampment.
- Only client records that are shared with a user can be added to an encampment. Client records that are Private or created by an agency with Clients Created set to “Not Shared” or “Basic Shared” to a user’s agency cannot be added to the encampment.
You can search for persons to add to the Encampment by name, DOB, SSN, or UID. If the client is already in the encampment, a "Currently showing in this encampment" icon will be displayed next to their name, and the toggle will be greyed out.
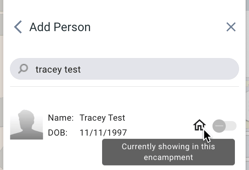
If the client is currently in another encampment, a "Currently showing in other encampment" icon displays next to their name, and the toggle can be turned on.
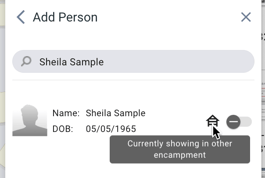
If a record does not exist in the system for the client, you can create a new record by clicking CREATE NEW CLIENT.

The system will navigate you to complete the CREATE A NEW CLIENT screen. After you save the screen, the system will navigate you back to Outreach with the new client available as a selection option.
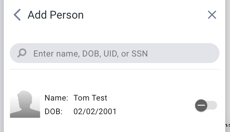
To add a person to the encampment, turn on the toggle for that person and click ADD <#> PERSONS (the button will indicate the number of persons you have selected to add).
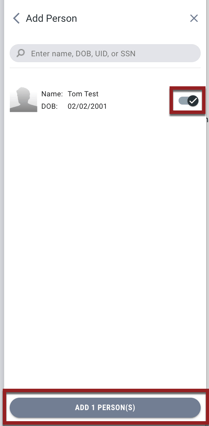
After clicking ADD <#> PERSONS, you’ll be prompted to confirm your selection.
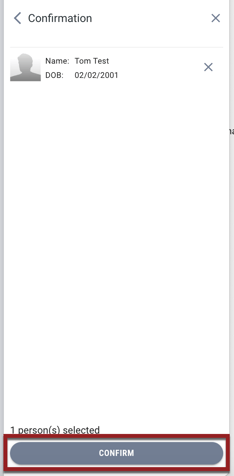
If the person(s) being added are currently in other Encampments, the system will display a pop-up message asking you to confirm that they will be moved to this Encampment.
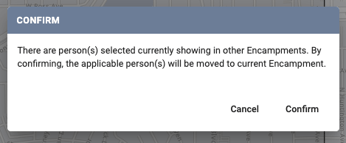
Click Confirm.
By default, the client location will be in the center of the encampment. If desired, you can move the client location within the Encampment:- Click the pencil icon in the sidebar (note that the location icon on the map changes to red).

- Click and drag the red icon on the map.
- Once the correct location is selected, click DONE.

In the Encampment AUDIT LOG, click the "Person" icon next to a staff member's toggle to see the names of clients the staff member has added and the date and time they were added.
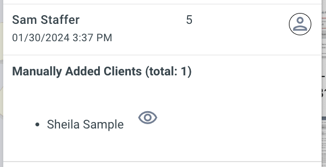
The new location record will appear as a Field Interaction in the client record LOCATION tab.
Moving Clients to Different Outreach Encampments
You can also move a client from one encampment to another by clicking the Move Person(s) icon.
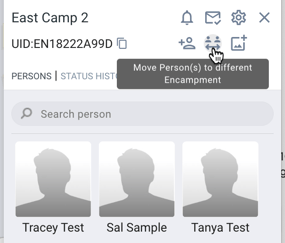
Note: To use this function, users must have the Move Clients to Different Outreach Encampment access right enabled.
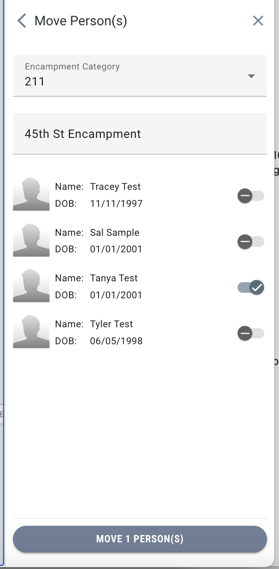
After you click the Move person(s) icon, the Move Person(s) screen appears.
- The selection in the Encampment Category field will be the category for the current Encampment, but you can select a different category if needed.
-
Choose an Encampment from the Enter Encampment Name or ID field, which is filtered according to the selected Encampment Category.
- Turn on the toggle for the person you want to move.
- Click MOVE <#> PERSONS.
If the client has an active enrollment in an Encampment program, or the client’s Encampment program enrollment has an End Date in the future, the system will display a pop-up:
- If one client is moving, the pop-up says, “This client is being moved to a different Encampment. If their Encampment program should be exited, please exit the client.”
- If multiple clients are moving, the pop-up says, “Multiple clients are being moved to a different Encampment with active Encampment program enrollments. If their Encampment program should be exited, please exit the client.”
When you click OK, the client will be moved to the selected Encampment.
Note: If the program enrollment is private to the user, the pop-up will not appear.
The rest of the steps are similar to those described above for adding persons to encampments.
The new location record will appear as a Field Interaction in the client record LOCATION tab.
Removing an Individual from an Encampment
End Users with the appropriate permissions can edit or delete the location recorded for an individual in an Encampment by navigating to the client's LOCATION tab.
Click on the client on the Encampment's PERSONS tab to open the client's PROFILE INFO. To navigate to the client's LOCATION tab, click the icon next to Location Date to open the LOCATION tab in the client record.

On the client's LOCATION tab, use the trash can icon to delete the Outreach location for the client.

Enrolled/Housed/Sheltered/Deceased Icons
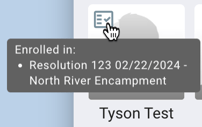
The system displays an "Enrolled" icon to indicate that a client is enrolled in an Encampment program.
Hovering over the “Enrolled” icon will display a tooltip saying, “Enrolled in <Encampment Program Name>.” All of the client’s active Encampment programs will be displayed in a bulleted list.
If Automated Label When Housed or Sheltered is turned on, the system will automatically create labels for identifying housed, sheltered, or deceased clients according to specific system parameters. For more information, please visit System Advanced Options: Location & Outreach.
|
Label |
Enrolled |
Housed |
Sheltered |
Deceased |
|
Icon |
|
|
|
|
Updated: 12/04/2024