This article is for the new Clarity interface. Screenshots and descriptions will be updated as features are released. For the current interface article, see How Do I Create a New Client Record?
Table of Contents
Video Resources
Click play for a brief overview:
Click through for a hands-on experience:
Overview
Note: If the client is a domestic violence survivor, follow your community's procedures for entering their information into the system.
If you search for a client record and do not find it in the system, you can create a new client record.
Adding a Client Record
Click the plus icon on the Search for a client page to create a new record.

The Client Profile Form opens from the right and is where you’ll record core data about the client. The fields displayed here are based on the Client Profile screen assigned to the agency (or based on the Client Profile screen assigned to the staff member, if a system administrator has used the Profile Override setting to assign a Client Profile screen other than the Agency Default to that staff member).

Certain fields are required before you can save the record. If a required field is left blank, the system highlights the field red to indicate why the record cannot be saved.

Note: To assist with data entry, if you enter xxx-xx-xxxx for the Social Security Number field value, the Quality of SSN field will auto-populate with “Client doesn’t know". If you enter up to eight placeholder ‘x’ characters to represent unknown SSN numerals, the Quality of SSN field will auto-populate with “Approximate or partial SSN reported". You can update this value as needed. Similarly, since the HUD Data Standards only require users to enter a value for the Date of Birth field when specific Quality of DOB field selections are made, the Quality of DOB field is listed first; the selection you make for the Quality of DOB field will then determine whether the Date of Birth field remains on the screen:
- If you select “Full DOB Reported” or “Approximate or partial DOB reported,” the Date of Birth field remains on the screen for you to complete.
- If you select “Client doesn’t know,” “Client prefers not to answer” or “Data not collected,” the Date of Birth field will disappear from the screen.
If the assigned Client Profile is customized locally, it may also contain fields that aren’t required.
One of the fields that may be included on this screen is the Alias field. If the client is known by other names, you may enter them in this field. Insert a comma between each name.
If the Pronouns field appears on the screen, you can make a selection from the drop-down menu.

If you do not see the client's pronouns listed, you may select "Manual Entry" and use the Pronouns Manual Entry field to enter custom pronouns for the client.

After completing all necessary fields, click Complete to create the client record.
Unique Identifier
Click the drop-down arrow (⌄) on the right side of the screen in the information bar to reveal the client’s Unique Identifier (UID), Personal ID, and more. This information is available on all screens when working with the client.

Refer to our Personal ID article for more information on the Personal ID and how it is used to identify duplicate client records.
The URL for a client’s record contains the client’s UID. Users can edit the URL to navigate to another client’s record.

Profile Management
End users with the access to edit client profile information can click on the client's Profile tab, and then click on the edit icon.

Privacy
On the client's record on the information bar, there is a lock icon in the top right hand corner which indicates if a client record is public or private.

There are 3 options:
- Option 1: Client is public but can be switched to private - this is the default when the client record is first created
- Option 2: Client is public and cannot be switched to private because other agencies have added data to the record
- Option 3: Client is private and can be switched to private.
For more information, refer to the Making Client Data Private article.
Adding a Photo
Click play for a brief overview:
Click through for a hands-on experience:
When the user hovers over the client’s photo (or initials, if there is no current photo), they see a camera icon in the top right corner of the image/initials.

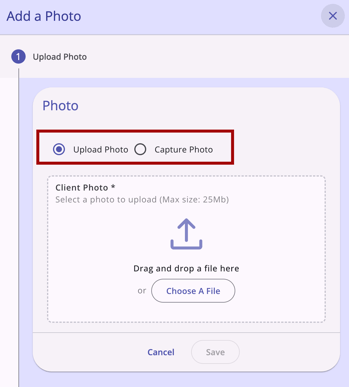
When the user clicks on the camera icon, the Add a Photo page opens and the user sees two options:
- Upload Photo
- Capture Photo
If the user selects Capture Photo, there are two options:
- Clicking Capture Photo takes a picture instantly
- Clicking Capture After 3s takes a picture after 3 seconds
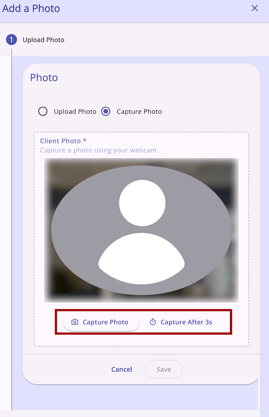
When the user clicks on Capture Photo, the webcam takes a picture immediately. When the user clicks on Capture After 3s, the webcam takes a picture after 3 seconds.
When the user drags and drops a file or clicks on Upload File and selects a file from their computer, the user sees the name of the uploaded file appear. The user can click Save if the correct file is selected.

Next, the user can select the desired crop area of the photo to use on the profile. They can click Reset to redo what they selected or Save.

Once the user has a photo captured or uploaded, they can click Save and, on the next step, Complete.

When the user returns to the client profile page, they will see that the photo has replaced the initials of the client.

Additional details:
- If the file is larger than the 25MB max file size, the user sees a red outline and red error text that says, "File size must be less than 25 MB."
- If the user clicks X to the right of the file name, the file is deleted and the user can drag and drop a different file or click Choose a File to select a different photo from their computer.
- If the user clicks Cancel at the bottom of the sidebar, the picture is not saved to the client’s profile and the right sidebar disappears; the user remains on the client profile page.
- If the user takes a photo using their computer’s webcam AND uploads a file from their computer before clicking Save, the action that was completed last will be used to determine which photo/file to use.
- All actions are recorded in the audit log.
Audit Log
System Administrators with audit log access rights can view audit logs for client profile information.
All audit log records are accessible in the relevant screen from the action menu located at the top right of the screen.

When you click on the action menu, a small pop-up window appears that reads “View Audit Log.” Click on the “View Audit Log” to review the audit log.

Icons & Tooltips
| Icon | Icon/Rich Tooltip Name | Rich Tooltip | Icon Location |
|
Action Menu | "Show more actions" | Top right corner of the Client profile information screen. NOTE: f no actions are available to the end user, this icon will not show. |
|
Add | "Add" | Anywhere the Add icon appears |
|
Delete | "Delete" | Anywhere the Delete icon appears |
|
Edit | "Edit" | Anywhere the Edit icon appears |
|
Privacy - Private | "Private, client data is not shared" | Top right corner of the information bar on the client record |
|
Privacy - Public | "Public, client data is not shared" | Top right corner of the information bar on the client record |
Additional User Resources
Refer to the following Help Center articles for details about the client record:
- Client Record Overview
- How Do I Create a Household and Manage Members?
- Client Profile SSN Validation and Partial SSNs
- Release of Information (ROI) Overview
Configuration Resources
Refer to the following Help Center articles for the configuration details noted in this article:
Updated: 04/23/2026