This article is for the new Clarity interface. Screenshots and descriptions will be updated as features are released. For the current interface article, see The Global Referrals Tab Overview.
Table of Contents
Overview
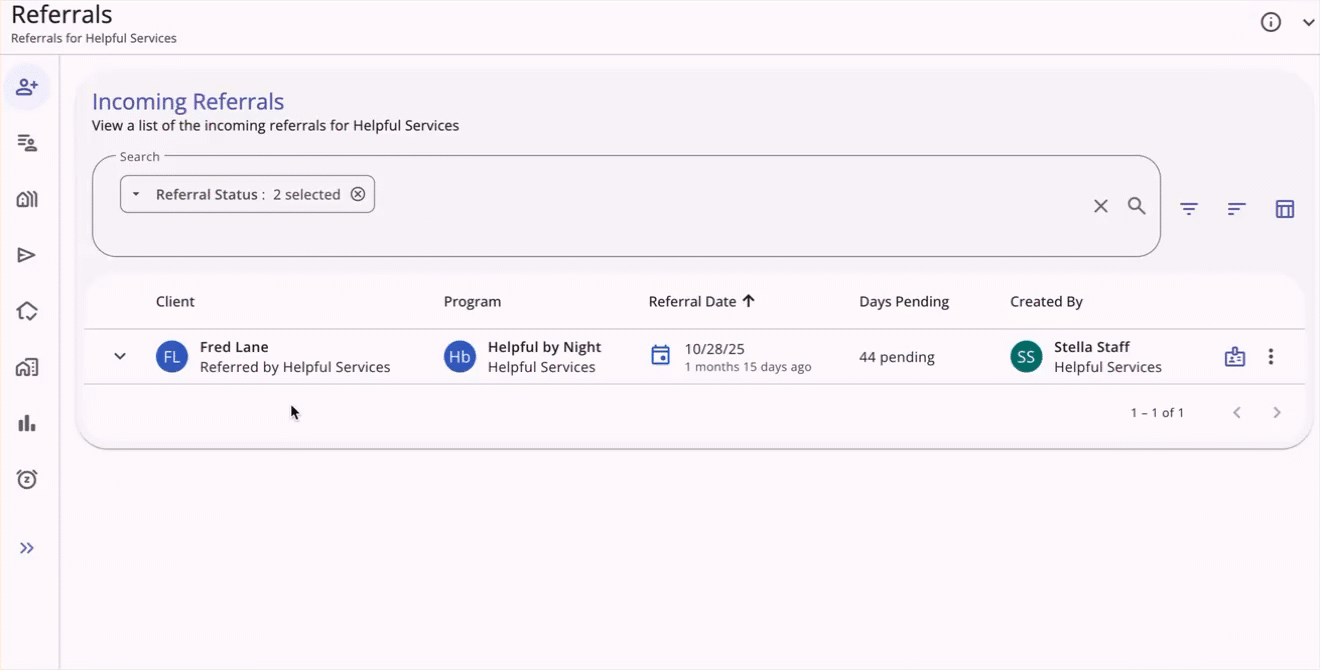
Users with Referrals tab access can view and manage the agency’s referrals in a central area in the new Clarity interface.
Note: A user's access to the global Referrals tab is configured in Access Roles. Users can be given access to all, none, or specific sections of the Referrals tab. Refer to the Rights Glossary for Access Roles and Coordinated Entry Roles Help Center articles for more information about the different access settings.
Accessing the Global Referrals Tab
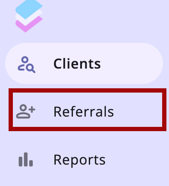
Users access the global Referrals tab from the primary navigation menu.
The Referrals tab includes a navigation menu that brings all your Referrals and Community Queue options together in one place. Click on the links below to review a Help Center article for each tab.
- Incoming Referrals: all incoming referrals for an agency.
- Community Queue: referrals made to the Community Queue.
- Unit Queue: show available units, determine client eligibility, and reassign referrals to Units/Beds for individuals and households.
- Outgoing Referrals: all outgoing referrals for an agency.
- Availability: users can record program availability information that is displayed during the referral process.
- Open Units: allows users with Looker access to view all open units in their Programs in one place.
- Analysis: users with Looker access can view and sort a list of current referrals to the community queue.
- Snoozed: users can snooze referrals and manage snoozed referrals (if enabled for your community).

Options to Refine Search Results
Referrals found on the global Referrals tab include multiple options to refine and view search results:
Search Bar
Each tab available in the global Referrals tab includes a Search bar. Users can enter their search terms, then press Enter on their keyboard or click the magnifying glass icon to see search results.

Filters
Users can add a filter to search results by clicking on the Filter icon to the right of the Search bar. To search for a record using filter options, choose a filter, enter the relevant information, or select options from a multi-select filter.
The filter options available differ by tab, and each tab's filters are detailed in its respective Help Center article, linked above in the Accessing the Global Referrals Tab section.

Multi-select Filters
Multi-select filters allow users to select one or more values for a single filter in a single step.

When you select a filter that has multiple options, a filter menu pop-up appears with all available values for the field. Click Apply when you have made your selections. Once you have selected one filter, you can add more if needed.
Users can review, edit, or clear previous selections by clicking on the filter within the Search bar.
- Review: Users can click outside the filter menu box (or click Apply) after a review without changes to leave selections as they are.
- Edit: Users can make changes to their original selections in the filter menu and click Apply to make updates to the filter.
- Clear: Users can click Clear All to remove selections, and refresh the table.
When more than one value is selected within the same filter, the chip shows "[Filter title]: #Selected." For example, you will see "Referral Status: 3 selected" if you select 3 of the referral status values for the multi-select Referral Status filter on the client’s Referrals tab.

When multiple values are selected in the same field filter, the system uses OR logic to filter results that contain any of those values.
- OR logic only applies to multiple values selected within the same field filter.
- Per current functionality, the system will use AND logic across multiple field filters.
All selected filters will remain displayed in the Search bar until you change the filter, remove it, or navigate away. Users can click the X icon to quickly clear filters.

Multi-select filters are found on the following global Referrals tabs:
- Referrals > Incoming Referrals
- Referrals > Community Queue
- Referrals > Outgoing Referrals
- Referrals > Availability
- Referrals > Snoozed
Sorting Options
There are dynamic, multi-layer Sorting options available for each tab. The sorting options available are different for each tab and those options are detailed for each tab in their respective Help Center articles, linked above in the Accessing the Global Referrals Tab section..

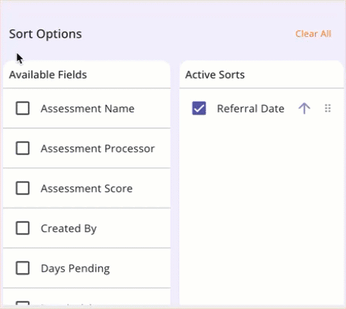
When the user clicks the Sort icon, a pop-up opens with the available sorting options. This example includes the Incoming Referrals sorting options:
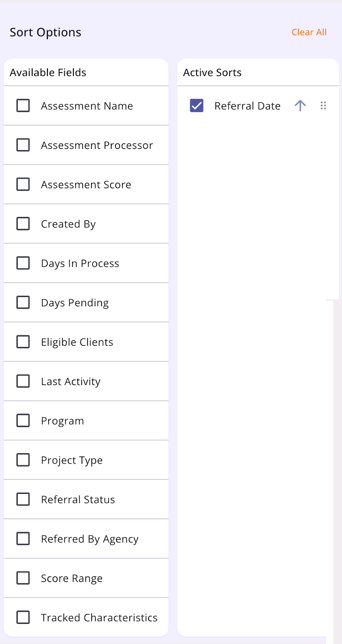
Users can utilize the checkboxes to add or remove sort options and the arrows to set the sort direction. Use the drag and drop method to move the sort options up or down, or use Clear All to remove all sort options.
Column Selectors
A column selector is indicated by this icon:

When a user sees a column selector, they can click on it to see fields available for customizing their view. The user will see a Search bar, the default (or currently selected) fields in the Visible Fields section, the available fields in the Available Fields section, and a section to add fields that will collapse on the screen in the Collapsed Fields section.
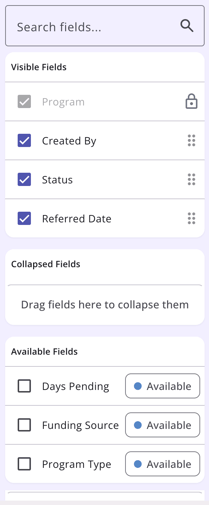
Fields in the Visible Fields section with a Lock icon cannot be moved or removed.

Clicking a checkbox next to an Available Field option will add the field to the Collapsed Fields section. The user can use a “drag & drop” feature to move the field into the Visible Fields section to display it on the screen. Users can also drag a Visible Field to the Collapsed Fields section. Any field with a checkmark can be moved between the Visible Fields and Collapsed Fields sections.
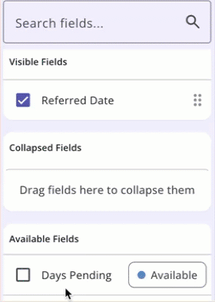
To remove a field from the Collapsed Fields or Visible Fields section, click the checkbox next to the field to clear the check; this moves the field to the Available Fields section.
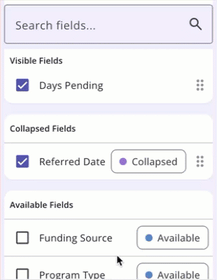
The selections made in the column selector will save in the user’s browser and will determine what they see the next time they view that screen. Learn more about column selectors in our Client Record Overview article.
Note: If the user uses a different browser to access Clarity, they will see the default view.
Managing Referrals
The user's ability to view or manage referrals depends on their access rights. For more information on Coordinated Entry-related access rights, refer to the Coordinated Entry Roles article or the Rights Glossary for Access Roles article.
To review, edit, or manage any referral in the global Referrals tab, several options are available.
Users can simply click on the referral to open it and review History, edit details, update status, click Check-in, or add Notes.
Refer to the Referral Details Glossary article for more information about the details that can be viewed/edited on this page.
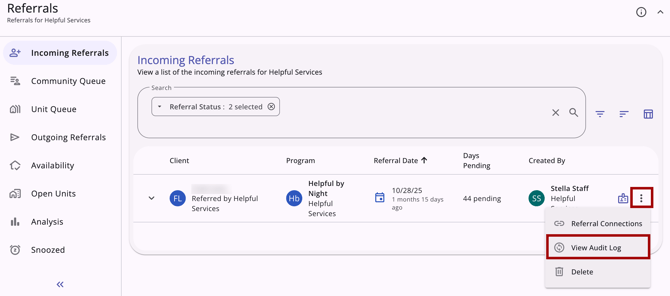
Users can also click on the Action Menu icon to see more options for the referral. The items in the Action Menu appear based on access rights. If the user does not have access rights for an item, it will not show. If the user does not have access rights for any of the items, the Action Menu icon will not appear.
Here is an example of the items in an Incoming Referrals action menu:
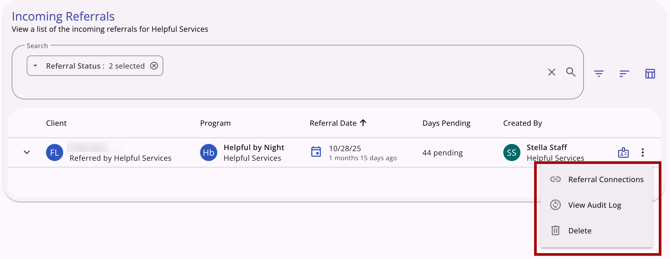
The specific items in Action Menus are described in more detail in the article for each tab in the global Referrals tab. Links to a Help Center article for each tab are provided in the Accessing the Global Referrals Tab section of this article.
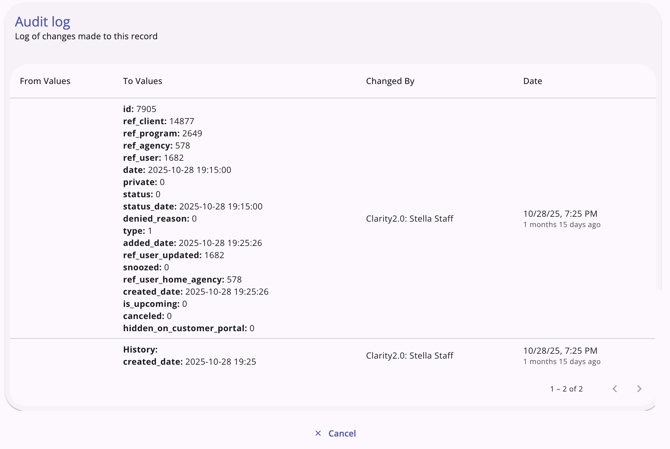
Audit Log
Users with the System Administrator/Admin access role can view an audit log for a referral by clicking the Action menu icon for that referral, then selecting the View Audit Log option.
The audit log allows users to review actions that can be entered or adjusted on the referral:
- Date when the referral was created
- Date when the referral status was changed
- Updating the fields:
- Case Manager
- Status
- Send to Community Queue
- Denied By Type
- Denied Reason
- Denial Information
- Updating the Private toggle
- Clicking the Check-in button
- Adding or deleting a Referral Connection
- Sending or deleting a Note
- Assigning a Navigator
- Updating fields in the Reassign section
- Updating fields in the Move to Another Queue section
- Updating fields in the Remove From Queue section
- Deleting or restoring a referral
- Snoozing a referral
- Hiding on Customer Portal
- A referral automatically moving from Pending to the Community Queue or from the Community Queue to Expired.
Icons & Tooltips
| Icon | Icon/Tooltip Name | Tooltip | Icon Location |
|
|
Action menu, also known as:
|
"Show more actions" |
All Screens: typically on the far right of a screen or section |
|
Add | "Add" | Anywhere the Add icon appears |
|
|
Analysis |
"Analysis" |
All Screens: located on the primary navigation menu and visible at all times for those with access to Analysis |
|
|
Availability |
"Availability" |
All Screens: located on the primary navigation menu and visible at all times for those with access to the Availability tab |
|
|
Column Selector |
"Show/hide fields" |
All Screens: typically paired with a search bar |
|
Community Queue | "Community Queue" | All Screens: located on the primary navigation menu and visible at all times for those with access to the Community Queue |
| Delete | "Delete" | Anywhere the Delete icon appears | |
| Edit | "Edit" | Anywhere the Edit icon appears | |
|
|
Filter |
"Add a filter" |
All Screens: typically paired with a search bar |
|
|
Incoming Referrals |
"Incoming Referrals" |
All Screens: located on the primary navigation menu and visible at all times for those with access to Incoming Referrals |
|
Note | "Note [formatted note text]" | Location tab |
|
Open Units | "Open Units" | All Screens: located on the primary navigation menu and visible at all times for those with access to Open Units |
|
Outgoing Referrals | "Outgoing Referrals" | All Screens: located on the primary navigation menu and visible at all times for those with access to Outgoing Referrals |
|
Privacy - Private | "Private" | Top right corner of the referral on the Edit referral details screen |
|
Privacy - Public | "Public" | Top right corner of the referral on the Edit referral details screen |
|
|
Referrals (also called Global Referrals Tab) |
"Referrals" |
All Screens: located on the primary navigation menu and visible at all times for those with Referrals tab access |
|
|
Search |
"Search" |
All Screens: typically paired with a search bar |
|
|
Snoozed |
"Snoozed" |
All Screens: located on the primary navigation menu and visible at all times, when enabled, for those with access to Snoozed Referrals |
|
|
Sort |
"Configure sorting" |
All Screens: typically paired with a search bar |
|
|
Status |
(no tooltip) |
Shown on a list of referrals and on individual referrals; color changes based on the status of the referral |
|
|
Tracked Characteristic |
“Characteristic - [list of applicable tracked characteristics].” |
Anywhere a tracked characteristic is found |
|
Unit Queue | "Unit Queue" | All Screens: located on the primary navigation menu and visible at all times for those with access to Unit Queue |
Updated: 06/09/2026