This article is for the new Clarity interface. Screenshots and descriptions will be updated as features are released. For the current interface article, see Community Queue for End Users.
Table of Contents
Overview
This article describes the structure and basic functionality of the Community Queue tab in the new Clarity interface, which allows communities to triage and prioritize client referrals across programs, agencies, and systems of care.
For additional information on the workflows for the different roles involved in managing the Coordinated Entry referral process, refer to our Coordinated Entry Roles article.
Accessing the Community Queue Tab
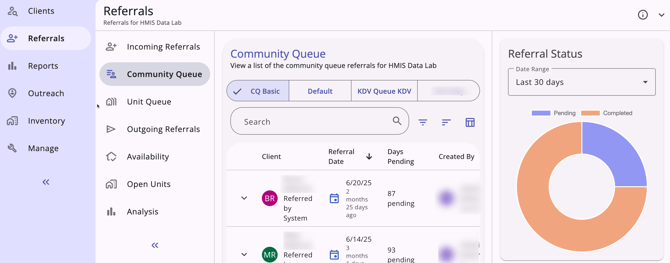
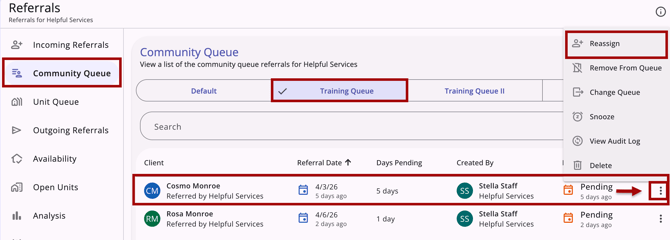
The Community Queue tab is available to users with Referrals tab access by clicking the global Referrals tab in the primary navigation menu, then selecting the Community Queue tab.
If multiple community queues are enabled, a selection bar at the top of the page lets end users select the appropriate queue. If multiple community queues are not enabled, the default community queue will show.
Options to Refine Search Results
The Community Queue page includes multiple options to refine and view search results:
Search Bar
Users can use the search bar to search for clients.

Filters
Users can apply filters to narrow search results.
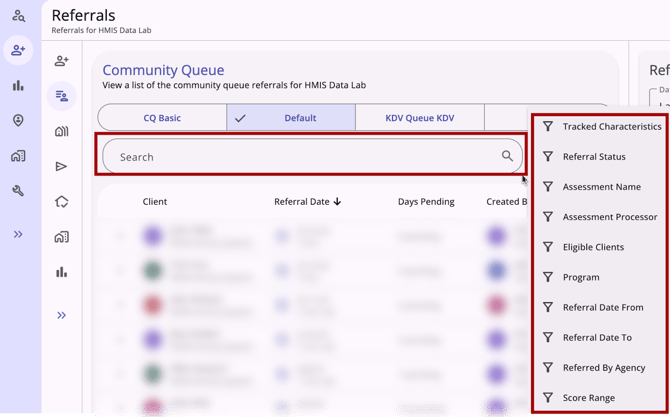
The filters available are:
- Tracked Characteristics
- Referral Status
- Assessment Name
- Assessment Processor
- Eligible Clients - filters for clients eligible for programs at the user’s current agency, unless a different Active Agency and/or Program filters are selected.
- Active Agency
- Program
- Referral Date From
- Referral Date To
- Referred By Agency
- Score Range
Refer to the Client Record Overview article for more information about filters.
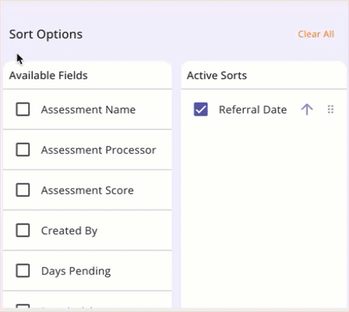
Sorting Options
The Community Queue tab includes dynamic sorting options that allow for multiple layers of sorting logic.

Sorting options are based on the following:
- Assessment Name
- Assessment Processor
- Assessment Score
- Created By
- Days Pending
- Last Activity
- Navigator
- Referral Date
- Referral Status
- Referred by Agency
- Score Range
- Tracked Characteristics
- Returned to Queue
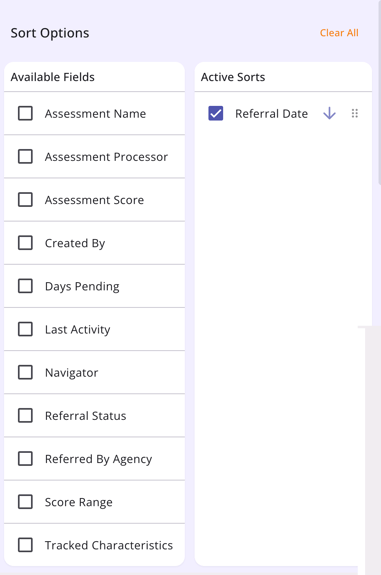
Users can click one or more checkboxes in the Available Fields list to sort by that field. Users can arrange the list of Active Sorts using the drag and drop method, choose the sort direction by clicking the arrow, remove a selection by clicking the checkbox, or clear the list of Active Sorts by clicking Clear All.
Column Selector
The Community Queue tab includes a column selector that lets users customize their results view.
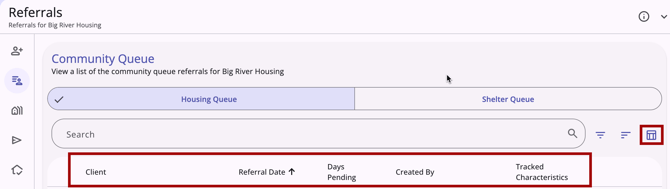
The columns shown by default are:
- Client
- Name
- Referred by Agency
- Referral Date
- Days Pending
- Created By
- User Creating
- User Home Agency
- Tracked Characteristics
Clicking the column selector displays a search bar, the currently selected fields, the available fields to select, and a section to add fields that collapses when the screen is resized. The Client field cannot be removed.
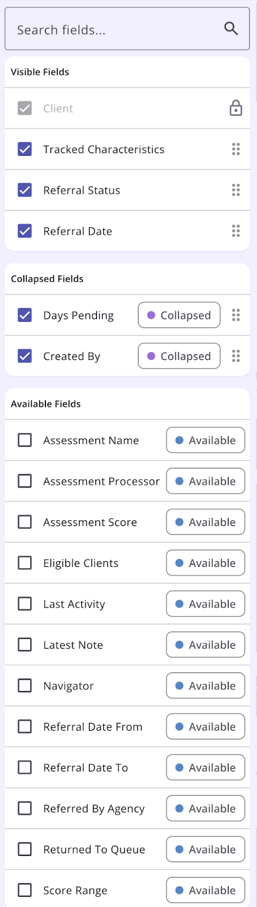
Clicking a checkbox next to an Available Field will add the field to the Collapsed Fields section. The user can then drag the field to the Visible Fields section to show it on the screen. Users can also drag a Visible Field to the Collapsed Field section.
The selections made in the column selector are saved in the user’s browser and determine what they see the next time they view that screen.
Note: The user can use a different browser to see the default view.
Learn more about column selectors in our Client Record Overview article.
View and Edit Community Queue Referrals
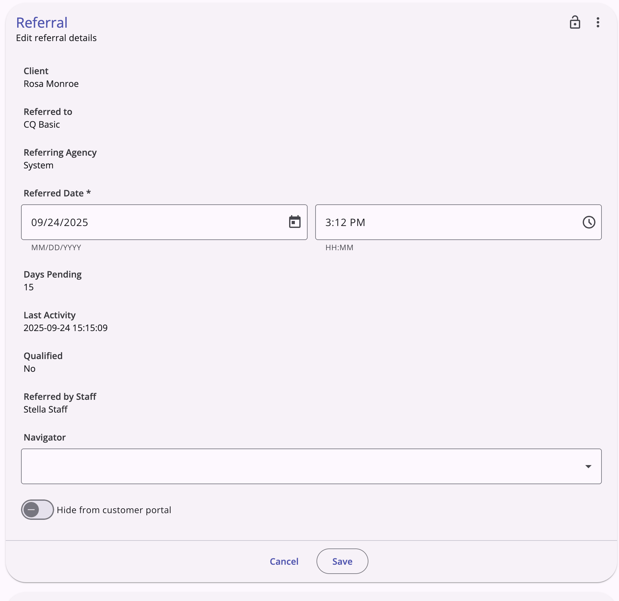
Users with the appropriate access can view and/or edit referrals in the Community Queue.
The Edit Referral section includes the following (depending on referral type and status):
- Client
- Referred to
- Referring Agency
- Referred Date/Days Pending
- Last Activity
- Qualified
- [Assessment Processor Name] Score
- Referred by Staff
- Navigator
- “Hide from customer portal” toggle
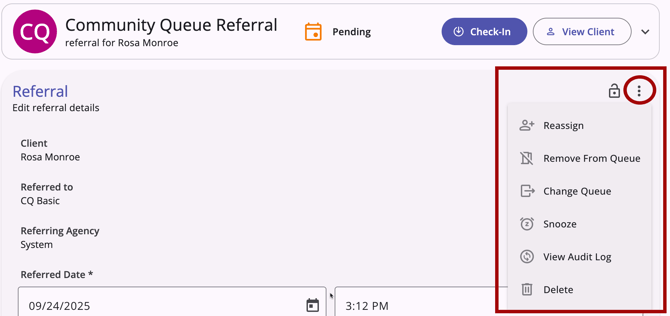
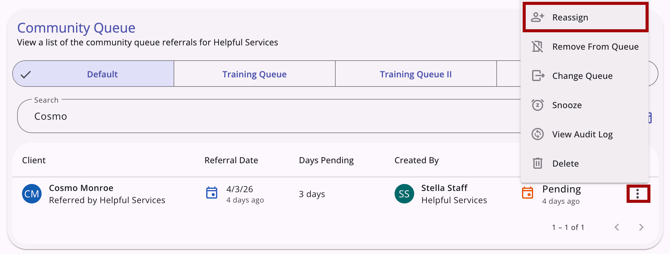
Users with the appropriate access can click on the Action Menu icon for additional actions:
- Reassign
- Remove from Queue
- Change Queue
- Snooze (when enabled)
- View Audit log (requires System Administrator access)
- Delete (may require additional access rights)
When a user chooses an action, a modal opens to the right with additional options, when available:
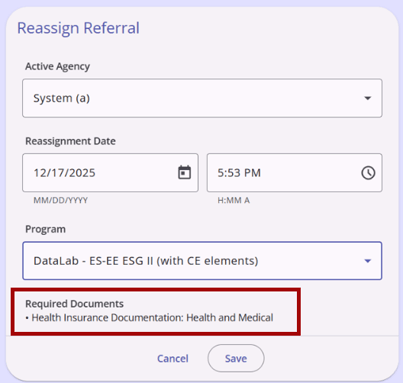
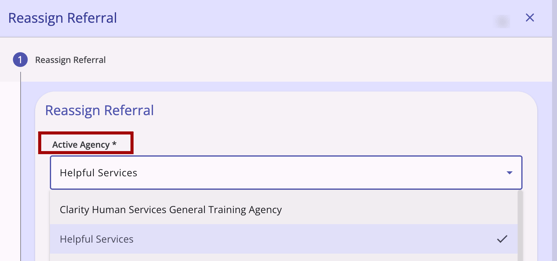
- The Reassign Referral modal has the following available:
- Active Agency
- Reassignment Date
- Program
- Available Unit / Beds
Refer to the Reassign Referrals section of this article for more details.
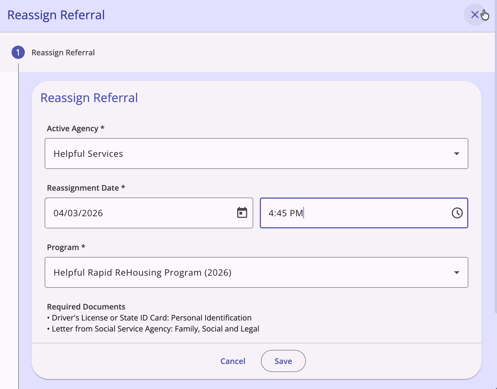
Note: When navigating to Referrals > Community Queue > Reassign Referral, the selected program from the dropdown will include the Required Documents section and will list any required documents for that program.
- The Remove from Queue modal has the following additional actions:
- Reason for Removal (picklist)
- Sub-reason for removal (when applicable)
- Queue Removal Date
- The Change Queue modal has the following additional actions:
- Community Queue (picklist)
- The picklist will only include queues where the client does not have an active referral
- Community Queue (picklist)
- Snooze (when enabled/no additional actions)
- View Audit Log (requires System Administrator access rights/no additional actions)
- Delete (may require additional access rights/no additional actions)
Notes
The Notes section of any referral includes a list of notes and the ability to add notes.

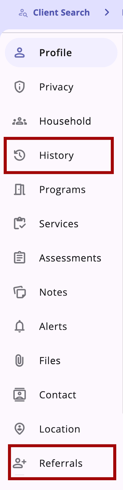
History
The History section of any referral includes a complete history of all actions taken for the referral.
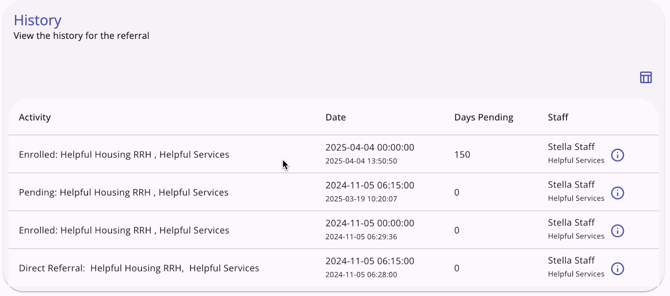
The table in the History section displays the following columns:
- Activity
- Date
- Days Pending
- Staff
A referral’s history can be viewed on a referral accessed from the following locations:
- Incoming Referrals tab on the global Referrals tab
- Community Queue tab on the global Referrals tab
- Outgoing Referrals tab on the global Referrals tab
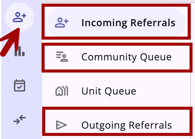
- Referrals tab on the client’s record
- History tab on the client’s record
Reassign Referrals
Reassigning is a way for Matchmakers and users with the Referrals - Send Referrals to Other Agencies access right to refer a client to a program or Unit/Bed. This section of this article will cover the basics for any referral. The Reassigning Individuals to Units/Beds and Reassigning Households to Beds sections will provide specific details for those workflows.
Once you have located the client in the Community Queue, click the quick Action Menu icon and select Reassign.
You can also click on the client's record in the Community Queue, then click on the client's Edit referral details Action Menu on the Community Queue Referral screen.
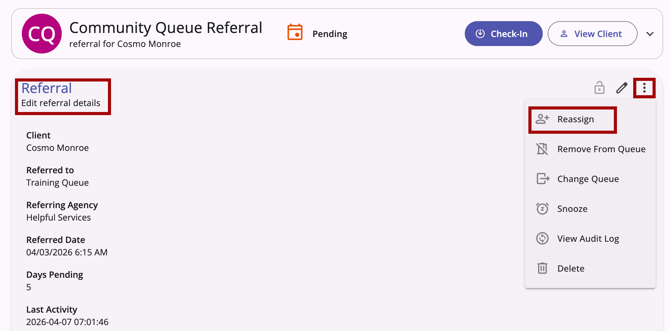
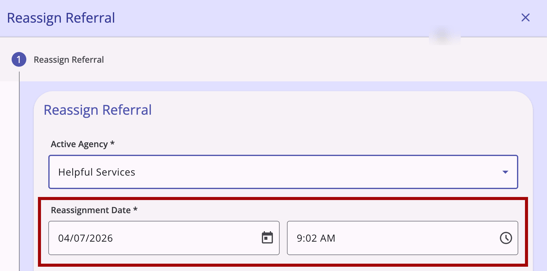
Once you click on Reassign (from either location), the Reassign Referral modal opens.
Choose an Active Agency from the dropdown.
- This will populate eligible programs available for referrals.
Choose a Reassignment Date.
-
The default Reassignment Date will be the current date/time, but you can select a different date if needed.
- If you choose a Reassignment Date/Time that is in the future:
- The referral will remain on the Community Queue tab and will not move to the Incoming Referrals tab until the Reassignment Date at 12:00 AM.
- The Reassign and Change Queue sections on the referral's Action Menu will be hidden.
- The system will not allow users to create a direct referral to the program that is associated with the future-dated reassignment.
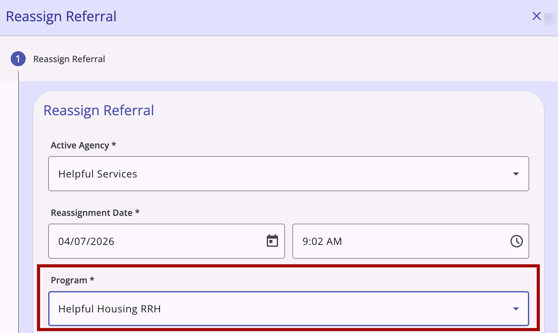
Select a Program from the drop-down list.
- This will populate eligible units/beds available for referrals (if enabled). More information about reassigning to available units/beds is in the Reassigning Individuals to Unit/Bed and Reassigning Household Members to Beds sections.
Review the list of Required Documents (if any).
-
The selected program from the dropdown will include the Required Documents section and will list any required documents for that program.
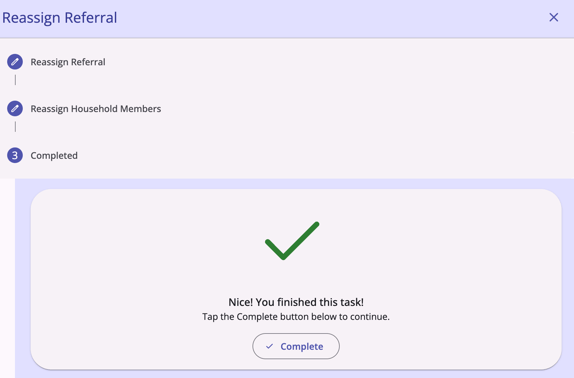
Click Save to create a pending referral.
You will see a green checkmark and a note that reads:
"Nice! You finished this task!"
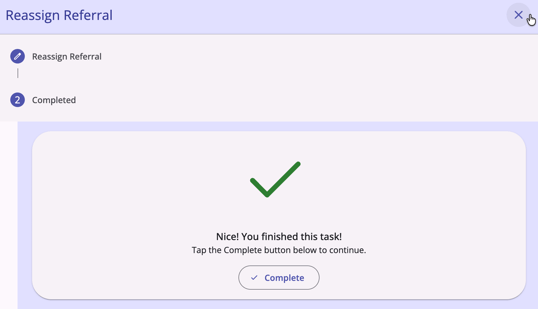
Click Complete. You will return to the Community Queue.
Notes: The Reassign option on the Action Menu will appear only if there is at least one Active Agency with at least one Program (and, when applicable, available Units/Beds) available for reassignment.
If there are no programs available at any Active Agency, then the Reassign option will not appear in the Action Menu.
This logic update applies to:
- the row-level quick Action Menu on the Community Queue tab
- the client's Edit referral details Action Menu on the Community Queue Referral screen.
Reassign Individual Clients to Unit/Bed
When reassigning a referral for a client without household or group members, the Reassign Referral modal appears as a 2-step form.
Step 1
After selecting an Active Agency, confirming or modifying the Reassignment Date/Time, and choosing a Program, the Available Units / Beds field appears below the program selection (if your community is using INVENTORY) or a posted opening for a program set to Limited Availability. From the Available Units / Beds field, you can select a unit/bed for the client.

Click Save to create a pending referral and proceed to Step 2.
Notes:
- The field previously labeled Opening is now labeled Available Units / Beds.
- Units/beds with Reservations enabled are not available for selection when reassigning from a Community Queue.
- Hierarchy-select fields are available in the Available Units / Beds field. These fields let users choose from a structured tree of options organized into nested levels that can be expanded and collapsed within the field, making it easier to navigate long lists of related items. A built-in search and filter feature allows users to type ahead and quickly narrow the tree to matching options.

Step 2
You will see a green checkmark and a note that reads:
"Nice! You finished this task!"
Click Complete. You will return to the Community Queue.
Age and Program Restrictions
By default, only units/beds that meet the client's eligibility requirements are shown. Units/beds with age or program restrictions are excluded from the initial list because these constraints cannot be validated in real time.
If you select a unit/bed that turns out to be ineligible, a validation message will appear, and the selection cannot be saved.
The validation message(s) that appear are:
- “This client has an active program restriction and cannot be referred.”
OR - “This client will not meet the age requirements of this unit/bed placement on [referral date], and cannot be referred.”
Additional Details for INVENTORY
- The options listed in the Program drop-down list will be programs that are linked to the available Units/Beds.
- By default, the Available Unit / Beds list includes only Units/Beds assigned to the selected Program for which the client meets the full eligibility criteria (including inherited eligibility) based on the Units'/Beds' current and future Unit Configuration Type (UCT) with respect to the Reassignment Date/Time.
- If the selected Reassignment Date/Time is in the past, the system will not allow the user to create a pending occupancy that conflicts with an occupancy between that past date and today.
- Units/Beds with future-dated Offline or Inactive dates will be available for referral from the Community Queue and can be connected to a referral for an occupancy that is outside of the actual Offline/Inactive Date/Time.
- If you enable the Eligibility Override toggle, the Available Unit / Bed list will include all Units within the system that are assigned to the selected Program, except Units with Prohibit Eligibility Override enabled. Refer to our "Eligibility Override" article for details.

- If the Unit has Beds enabled, the available Beds in a Unit will be listed underneath the Unit. Bed eligibility is considered in the drop-down with the same logic as Unit eligibility.
Eligibility Override Details
The Eligibility Override toggle gives you control over eligibility filtering for units/beds:
- If the Prohibit Eligibility Override setting is enabled (for Referral settings or INVENTORY settings), the Eligibility Override toggle remains visible, but ineligible units from those sites are excluded from the dropdown.
- If no eligible units are available with the Eligibility Override toggle set to Off, a message displays:
"No eligible units are available in the selected program."
- If no units are available with the Eligibility Override toggle set to On, a message displays:
"No units are available in the selected program."
Both messages include a Close button to dismiss them.
Reassign Household Members to Beds
When the client is in a household with group members that need to be assigned to a unit/bed, the Reassign Referral modal appears as a 3-step form.
Step 1
Select an Agency, confirm or modify the Reassignment Date/time, and choose a Program.

Click Save to proceed to Step 2, or Cancel to close the modal without saving.
Step 2
This step displays four read-only reference fields (Referred Program, Referred to Agency, Referring Agency, and Referral Date) along with the Eligibility Override toggle and the Available Units/Beds field.
Once you select a unit/bed for the current client, it appears next to the client's name.

Assigning beds to household members
Toggle on a household member's name to reveal a Bed Assignment dropdown showing available beds in the selected unit. Only active beds that meet the member's eligibility requirements are listed (with the same age and program restriction exceptions that are noted for individual reassignments).

Note: Any beds set to an Offline status will not be listed in the Bed Assignment dropdown.
This functionality applies:
- To programs where Bed and Unit Management is toggled ON and where Units have Beds enabled.
- To Coordinated Entry (CE) and non-CE assessments.
- To both standalone/global-level and program-level assessments.
- To referrals made from any program type.
The Reassign Household Members section includes a series of toggles showing each household member associated with the originally referred household member.
- The toggle for the household member (typically the Head of Household) who is referred to the queue is enabled by default and read-only.
- An Enrollment icon indicates if the household member was included in the program enrollment used to refer the Head of Household to the Community Queue.
Users can select an Available Unit / Bed and refer just the referred client, or toggle on additional Household Members to include them in the program referral.

Choose a Bed Assignment for each household member you wish to include, then click Save.
Clicking Cancel will return you to the Community Queue tab.

After clicking Save, click Complete to return to the Community Queue.
Program-based Assessments
If the referral was made from an assessment completed in a program, an Enrollment icon appears next to each household member included in the enrollment household for that program. A tooltip for the icon reads:
“Client is enrolled in the Assessing program.”

The Enrollment icon shows for household members:
- If the enrollment is an individual enrollment, only the one person enrolled shows with an Enrollment icon (and is enabled and read-only).
- If non-HOH Household members have separate enrollments in the same program, those enrollments populate the Enrollment icon.
- Only those household members enrolled in the specific program enrollment where the assessment was completed/initiated will be indicated with an Enrollment icon. Household members without an Enrollment icon can still be enrolled in a Unit/Bed.

- If the completed assessment is a standalone assessment, the Enrollment icon will not show for Household members.
Bed Openings
As the user enables toggles for household members, only openings with the same number of beds or more than the number of household members enabled are shown.
Units that have occupied beds are shown, but the count of available beds is sufficient for the number of household members.
- If there are no openings with enough beds, a message appears and reads:
“There are no units with the required number of beds.”
- If the user attempts to toggle on more household members than there are available beds, a warning appears and reads:
"The Unit has [x] bed(s) available for household members"
- Any beds that are not active or are offline will not show in the list. Any beds the member is not eligible for will not appear on their list.
- The user can assign each household member to a bed. Once a bed is assigned to a household member, it no longer appears in the list for the other household members.
Set remaining beds to Offline Toggle
If there are more available beds in the unit than household members, a toggle labeled Set remaining [x] beds to "Offline" appears, where x = number of remaining beds. When enabled, all unassigned beds in the unit are set to Offline status.
The count updates dynamically as beds are assigned. This toggle does not appear if some beds in the unit are already occupied or pending occupancy by another household.
- If this toggle was Off when the pending occupancy was created, and a household member later leaves, or their assignment is deleted, their bed returns to an Available status.
- If this toggle was On, the bed returns to Offline status instead.
- If the user does not turn on any of the household member toggles, the single client is referred to the chosen bed, and the current logic and workflow remain unchanged. The exception is that the Set remaining [x] beds to "Offline” toggle will show, and the user can choose to set any remaining beds in the unit to an Offline status.

- If the unit already has some beds occupied or some beds with pending occupancy by another household, but some beds are empty, the Set remaining [x] beds "Offline” toggle will not show, and the remaining beds would need to be set offline manually.
Notes:
-
Offline, Inactive, and deleted units/beds are automatically excluded from the available options.
- If you select a unit/bed with one or more future pending occupancies, a warning message will display the start date of the earliest upcoming pending occupancy. If the unit/bed has multiple referrals enabled, you can still proceed with the selection.
Additional Unit/Bed Assignment Details
If a client has a pending Unit/Bed assignment through a referral for another household member, they can also receive a referral to the same program for themselves.
- When one of the referrals is completed, a warning is displayed to the user that the other referral is still pending.
If a user tries to add a household member to the household, or remove a household member from the household while the Unit/Bed assignment is pending, a pop-up appears that reads:
“This household has a referral with a Unit/Bed assignment. Please make adjustments through the referral and enrollment as needed.”
Competing Referrals
If a client has a "Pending Unit/Bed Assignment" and then receives a new, separate referral, and a user tries to enroll them from that new referral, the system shows a warning that reads:
“[Client Name] has a referral to [Program X Unit Y]. Please adjust referral as needed."
If a user tries to add or remove a member from a household that has a pending bed assignment, the system shows a warning that reads:
"This household has a referral with a bed and unit assignment. Please make adjustments through the referral and enrollment as needed."
Referral and Inferred Event Logic
No changes have been made to referral logic or inferred event logic. Referrals and inferred events are still only given to the Head of Household.
Unit/Bed Status Updates
When the reassignment is saved, all reassigned beds change status to Pending Occupancy.
- If all the beds in the unit are assigned, the unit changes status to Pending Occupancy.
- If the user enables the “Set remaining [x] beds to Offline” toggle, any remaining beds in the unit will change status to “Offline.”
- The offline status start date = pending occupancy start date, and offline status end date = occupancy end date or date of denial/expiration, if the referral is denied or expired.
- If the occupancy end date is added, then the offline end date is also added as the same date as the occupancy end date.
- If the Head of Household has an occupancy end date and the other household members are still active, the offline end date is set to the end date of the last household member.
- If a bed is offline, the user can manually end the offline status to open the bed, in case someone joins the household and program, and needs to be assigned to a bed.
- If the referral is denied or expired, and the pending occupancy is removed, then the offline beds will become active again.
- “Offline” status for beds is added to the Unit’s Audit Log.
- If the “Set remaining [x] beds to Offline” toggle is left disabled, the beds remain active, and the unit remains “Available.”
Referrals & Client History
After a referral has been reassigned to the Head of Household and any household members, and assigned a bed, all beds and their assigned household members appear on client history records.
Client History
A Pending Unit/Bed Assignment Referral with a Referral icon will appear in the Head of Household's client History tab.
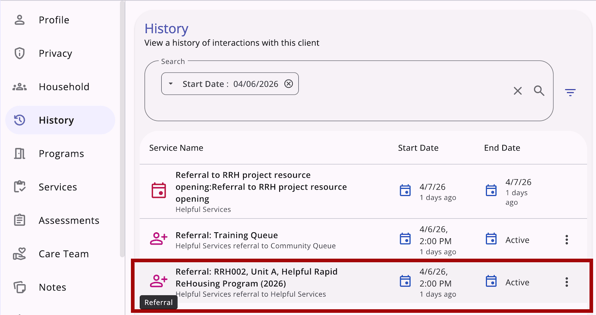
A Pending Unit/Bed Assignment Referral, with a Bed Assignment icon, will appear in the client History tab of each household member assigned to a bed who received a bed assignment through the Head of Household's referral.
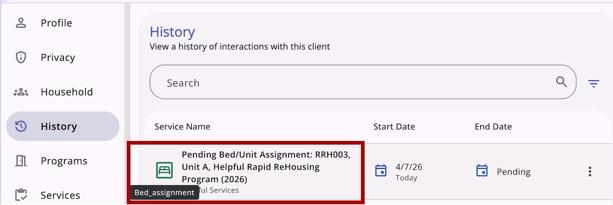
Refer to The History Tab article for more information.
Icons & Tooltips
|
Icon |
Icon/Tooltip Name |
Tooltip |
Icon Location |
|
|
Action menu, also known as:
|
"Show more actions" |
All Screens: typically on the far right of a screen or section |
|
|
Add |
“Add” |
All Screens: anywhere the “Add” option occurs |
|
|
Bed Assignment |
"Bed_assignment" |
Client History Tab (Household Members assigned to a bed through the Head of Household's referral) |
|
|
Column Selector |
"Show/hide fields" |
All Screens: typically paired with a search bar |
|
Community Queue | "Community Queue" | All Screens: located on the primary navigation menu and visible at all times for those with access to the Community Queue |
|
|
Delete |
“Delete” |
All Screens: anywhere the “Delete” option occurs |
|
|
Edit |
“Edit” |
All Screens: anywhere the “Edit” option occurs |
|
|
Enrollment |
"Client is enrolled in the Accessing Program" |
"Reassign Referral" screen when connecting household members to Units/Beds connected to programs |
|
|
Filter |
"Add a filter" |
All Screens: typically paired with a search bar |
|
|
Information |
Note: this icon information changes based on the location found. |
All Screens |
|
Note | "Note [formatted note text]" | Referrals |
|
Privacy - Private |
Varies depending on screen; example from client profile: “Private Client data is not shared.” |
All Screens: within the client record |
|
|
Privacy - Public |
Varies depending on screen; example from client profile: “Public Client data is shared.” |
All Screens: within the client record |
|
|
Referrals Tab |
(no tooltip) |
All Screens: located on the primary navigation menu and visible at all times for those with Referrals tab access |
|
|
Referrals |
"Referrals" |
Client's History Tab |
|
|
Search |
"Search" |
All Screens: typically paired with a search bar |
|
|
Sort |
"Configure Sorting" |
All Screens: typically paired with a search bar |
|
|
Tracked Characteristics |
“Characteristic - [list of applicable tracked characteristics].” |
Anywhere a tracked characteristic is found |
Updated: 05/30/2026