This article is for the new Clarity interface. Screenshots and descriptions will be updated as features are released. For the current interface article, see Completing an Assessment in the Client Record.
Table of Contents
Video Resources
Click play for a brief overview:
Click through for a hands-on experience:
Overview
Assessment screens allow staff members to record client data at any time within or outside of a program enrollment. Information collected during a project stay, known as a Project Update in the HMIS Data Standards, is recorded in an assessment.
Referrals not made from the client-level Referrals tab, including referrals to the Community Queue, are made from within a completed assessment from the Assessments tab in a program enrollment. Unlike Enrollment, Status, or Exit screens, assessments don't need to be connected to a specific event.
Assessments displayed in a client record are based on configurations made at the following levels:
- System level: the Assessment screens that system administrators create
- Agency level: the agencies those screens are made available to
- Program level: the assessments that are assigned to a program (if Program Assessments is enabled).
Note: Contact your System Administrator if you have questions about which assessments to complete in a client record and when/where to complete them.
Access to Assessments
Permission to share, edit, and delete assessment data within and across agencies depends on the staff member's Access Role and the sharing settings and assigned Navigation Profile of the agency.
Viewing Assessments
To access the Assessments tab, including previously completed assessments (which you can also view from the History tab):
- Switch into the correct agency.
- Navigate to the client record and click the Assessments tab.

A search bar is located at the top of the Assessments page to help you quickly find specific records. Filter the list by Assessment Name to find a specific assessment.
Column Selector
You can customize which columns are visible by clicking the Column Selector icon located to the right of the search bar.

The following fields are visible by default:
- Name
- Completed
- Created by
- Created on
- Processor Details
- Processor details do not have a column name but show as a button that displays the Assessment Processor name and score, if available. You can hover over the button for more details.
The following fields are available via the Column Selector menu:
- ID
- Updated on
- Updated by
For more information on how to use a Column Selector, refer to the Client Records Overview article.
Viewing Detailed Information
For more details about the assessment, you can expand individual rows.
- Click the Down Arrow icon located to the far left of any assessment name.
- The row will expand to display additional fields, including ID, Updated on, and Updated by.

Client Assessments Tab
The client's Assessments tab has two functions: Adding the Assessment and Assessment history.

Adding the Assessment
Here is how to complete a client-level assessment:
- Click the Add icon in the client's Assessments tab.
- Locate and then click on the appropriate assessment.*
- Click Next.

- Complete the assessment.
- Click Save & Next.
- Click Complete.
*Note: If the user's Access Role does not permit the user to add or edit the assessments, the user will not see any assessments displayed in this section.
Signature Fields on an Assessment Screen
If a system administrator has added a core or custom signature field to an assessment screen, users can collect a signature on the assessment screen.
- The field can be signed via a cursor or an electronic signature pad
- When the user views the field, there is an empty box for the signature and an X icon visible

- Once a signature is added the checkmark icon appears and the user can apply the signature by clicking the Checkmark icon or reset the signature by clicking the X icon

- Tooltips show when the user hovers over the Checkmark icon (Apply signature) and X icon (Reset signature)
- Depending on where the user or client is signing, move to the next field on the screen or click Save & Next to save the screen and move forward in their workflow.
Signature fields can be added to:
- Program Status Assessments
- Program-level Assessments
- Program Follow-up Assessments
- Client-level Assessments.
Hide from Customer Portal Toggle
The Hide from Client Portal toggle is available on an assessment when both of the following are true:
- The Customer Portal is enabled for your current agency,
AND
-
Your access role includes the Customer Portal Individual Record Management access right.

The toggle is available on assessments accessed from both the client-level Assessments tab and the Assessments tab within a program enrollment.
- By default, the toggle is Off, meaning the assessment will be visible in the Client Portal.

Assessment History
The Assessment history section displays previously completed assessments, which staff members can edit or delete if their Access Role allows. The system displays the following information within Assessment history:
- Name:
- Assessment name: the name of the assessment screen
- Agency: the agency the staff member was switched into for the assessment
- Completed: date/time/time elapsed
- Created by:
- Name of the staff member that completed the assessment
- Primary (Home) agency for the staff member that completed the assessment
- Created on: date/time/time elapsed
- Updated by:
- Name of the staff member who most recently updated the assessment
- Primary (Home) agency of the staff member who updated the assessment
- Assessment Processor Score: the Assessment Processor name and score (if configured for the assessment)
- Hover over the Assessment Processor score for more details
- Eligibility: a link to the Eligibility Results (if Eligibility Engine is enabled for the assessment) can be found by clicking on the vertical ellipsis, or action menu
- Measures: a link to the Assessment Measures (if configured for the assessment)

Program Eligibility Determination Screen
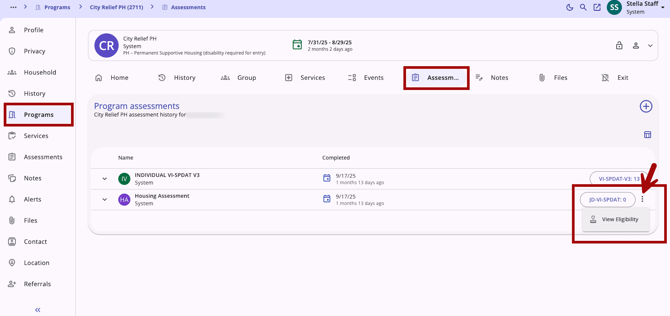
Users with the appropriate access can access the Program Eligibility Determination screen after completing an assessment that has the Eligibility Engine enabled on the Assessment screen setup.
To view program eligibility, navigate to the client’s global level Assessments tab on the client navigation menu. Users will click on the action menu icon to the right of the appropriate assessment and then click View Eligibility.
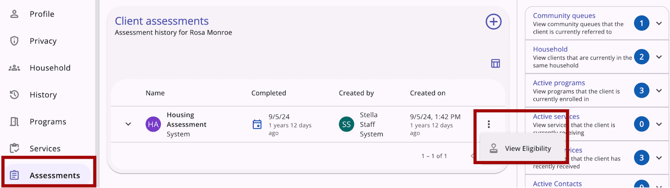
There will be up to 3 sections on the Program Eligibility Determination screen:
- Score/Information
- Community Queues
- Program Referrals.
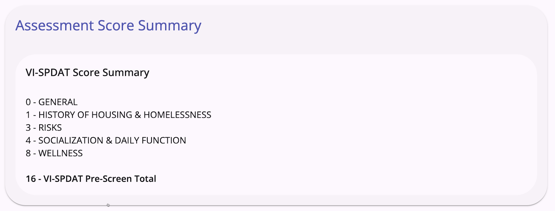
Score/Information Section
If Display Score is enabled on the assessment screen setup page, an Assessment Score Summary section will appear.
If Display Score is disabled on the assessment screen setup page, and there is text in the Alternate Text field on the assessment screen setup page, an Assessment Score Summary section will appear and include the text entered for the field.
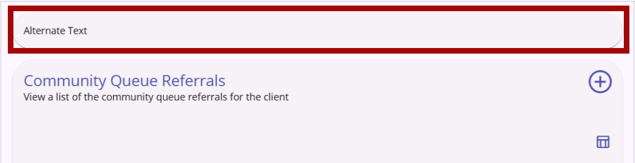
If Display Score is disabled on the assessment screen setup page and there is NO text in the Alternate Text field on the assessment screen setup page, the Assessment Score Summary section will not appear.

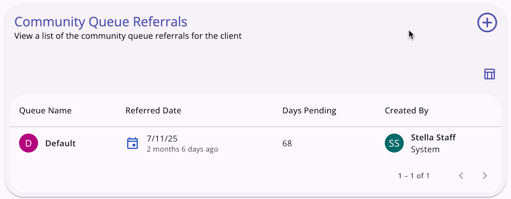
Community Queue Referrals Section
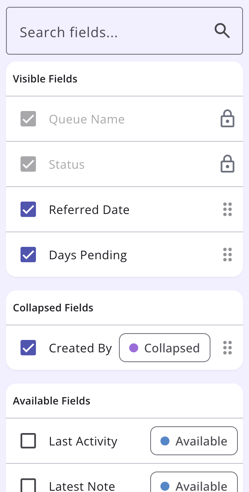
The Community Queue Referrals section will display current and historical Community Queue referrals for the client. There is also an Add icon for making referrals to a community queue and a column selector so that users can customize their view of this section.
The column selector includes a Search Bar to search for fields and a list of Visible Fields, Collapsed Fields, and Available Fields. End users can drag and drop the fields to customize their view of the Community Queue Referrals. Refer to the Client Record Overview article for more information about column selectors.
Program Referrals Section
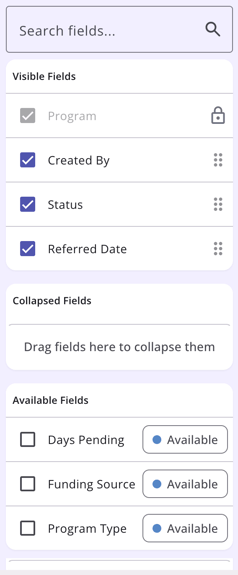
The Program Referrals section will display any direct referrals that have been sent for the client and a history of direct referrals. If at least one direct referral is listed, a column selector is available so that users can customize their view. The default view has Program, Created By, Status, and Referred Date.
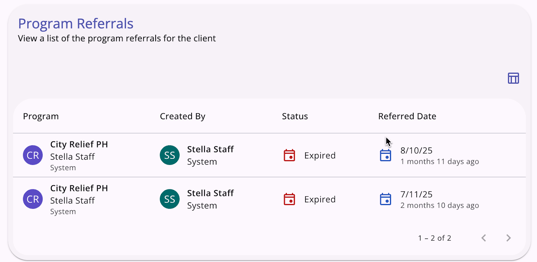
The column selector includes a Search bar to search for fields and a list of Visible Fields, Collapsed Fields, and Available Fields. End users can drag and drop the fields to customize their view of the Program Referrals. Refer to the Client Record Overview article for more information about column selectors.
Refer to the Global Referrals Tab: Community Queue article for more information about creating referrals from the Program Eligibility Determination screen.
Editing an Assessment
In the Assessment history section, click on the name of the Assessment and then click on the Edit icon for the assessment.

The assessment appears on screen. Edit as needed, then click Save.
Note: If you click Save without making any changes, the system will not display the green Changes successfully saved banner, will not record the action in the Audit Log, and will not update the last_updated and ref_user_updated fields.
Assessment Privacy
A Privacy lock icon is located at the top right corner of an assessment and marked public as default. The end user can hover over the lock icon to see a tooltip that indicates if the item is marked as private or public.

The end user can click on the lock icon and a privacy pop-up appears so they can update the privacy to private. The end user can use the same process to change privacy to public.
Program Assessments
If Program Assessments is enabled in the program's setup, you can record an assessment from the Assessments tab within a program enrollment.
Note: To provide any assessment other than an Annual/Status/Current Living Situation assessment within an enrollment, you will need to be logged in under the agency that owns that enrollment. If you are not logged in to the agency that owns the enrollment, the only assessments you will see in the program-level Assessments tab will be Annual/Status/CLS assessments.
Assessments added from within an enrollment will display in both the program enrollment Assessments tab and client-level Assessments tab and can be viewed and modified in either place.
Here is how to complete a program assessment:
- Locate the appropriate program enrollment from the Programs tab or in the Active Programs section on the right side of the screen. Click on the name of the program in the Programs tab or the Arrow for the program in the Active programs section.

- Click the Assessments tab within the enrollment and click on the Add icon.

- Click on the name for the assessment you want to complete and then click Next.

- Complete the assessment.
- Click Save & Next.
- Click Complete.
Program's Eligibility Determination Screen
Users with the appropriate access can access the Program Eligibility Determination screen after completing an assessment that has the Eligibility Engine enabled on the Assessment screen setup.
To view program eligibility, navigate to the client’s program level Assessments tab. Click on the vertical ellipsis, or action menu icon, to the right of the appropriate assessment and then click View Eligibility.
More information about the program eligibility screen can be found here in this article. Refer to the Global Referrals Tab: Community Queue article for more information about creating referrals from the Program Eligibility Determination screen.
Restoring Deleted Assessments
System Administrators and users with the Restore Deleted Data access right have the ability to view and recover deleted assessment records.
To restore an assessment, navigate to either the client’s Assessments tab or the client’s program Assessments tab.
Click the Action Menu icon (three vertical dots) at the top right of the page and select Restore Client Data.

Clicking Restore Client Data opens a modal on the right side of the screen that displays deleted records in two sections: Assessment History and Assessments - Unavailable for Manual Recovery.

Assessment History
This section lists all deleted assessments that are eligible for manual restoration. The table includes:
- Name: The title of the assessment.
- Completed: The completion status/date.
- Details: Additional metadata regarding the record.

How to Restore an Assessment
On the Recover Deleted Data modal, follow these steps to restore an assessment:
- Identify the Record: Find the assessment(s) you wish to recover in the Assessment History section.
- Select Record(s): To the far left of each row is an On/Off toggle. By default, these are set to Off (left). Select On (right) for each record you want to restore.
- Confirm Restoration: Click the RESTORE button.
- The modal will close, and the selected assessments will immediately reappear in the main Assessments list.
- Cancel: If you click Cancel, the modal will close without saving changes, and the records will remain deleted.
Assessments - Unavailable for Manual Recovery
This section displays assessments that have been deleted but cannot be manually restored.

Link From Assessments
Users with an access role that allows them to modify the client program can link an existing agency-level assessment to an active program enrollment from the action menu in a program's Assessments tab.

Refer to the Linking Assessments to Program Enrollments article for more information.
Icons & Tooltips
| Icon | Icon/Tooltip Name | Tooltip | Icon Location |
|
Add |
"Add" |
Anywhere the Add icon appears |

|
Assessment Score |
“[Processor Name]: [score]” repeat: “[Processor Section Name]: [score]” for each section. |
Client record Assessments tab, program's Assessments tab |
|
Delete | "Delete" | Anywhere the Delete icon appears |
|
Edit | "Edit" | Anywhere the Edit icon appears |
|
Privacy - Public | "This assessment is currently public" | Client record Assessments tab |
|
Privacy - Private | "This assessment is currently private" | Client record Assessments tab |
|
Program Connection | “[Program Name], [Agency Name], [Enrollment Date], [Active or Expired enrollment status]” | Client record Assessments tab, program's Assessments tab |
|
Referral Connection | "Referral to [Program Name],Sent by [Agency], [Date], [Referral Status] | Program tab |
|
Action Menu, also referred to as the kebab icon or vertical ellipsis | "Show more actions" | Program's Assessments tab, client record Assessments tab |
Additional Resources
Refer to the following Help Center articles for details on specific types of assessments:
- How Do I Conduct a Current Living Situation Assessment?
- How Do I Conduct a Program Status/Annual Assessment?
- How Do I Conduct a Follow-Up Assessment?
Updated: 06/10/2026