
This article is for the new Clarity interface. Screenshots and descriptions will be updated as features are released. For the current interface article, see Managing Attendance Services in the Attendance Module.
Table of Contents
Overview
The Attendance Module provides a streamlined workflow for tracking service participation, managing reservations, and handling high-volume check-ins with scanner support.
Accessing the Attendance Module
Users with the Attendance access rights enabled in their access role will see an Attendance tab in the left-side main menu.
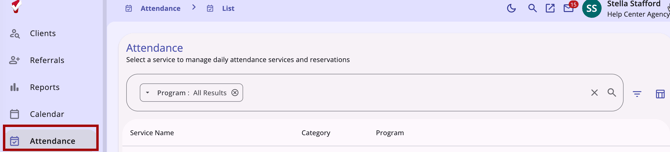
Notes: Additional access rights may be needed to fully utilize all features of the Attendance Module. The following access rights may be needed by users:
- Create Service Placements: Users with access to the Attendance Module will be able to add clients, make reservations and indicate whether a client is present or no show.
- The Services access right must be enabled.
- Delete Agency Services: Users with access to the Attendance Module will be able to delete a client from the In Attendance column and delete a reservation for a client.
- The Services access right must be enabled.
- Delete Any Agency Services: Users with access to the Attendance Module will be able to delete any client from the In Attendance column and delete a reservation for any client.
- The Services access right must be enabled.
For more information about access rights, refer to the Rights Glossary for Access Roles article.
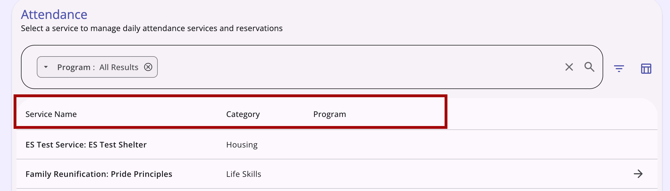
Clicking the Attendance tab directs you to the Attendance landing page. The landing page displays a data table of services with the following columns:
- Service Name (Sortable)
- Category (Sortable)
- Program (Lists all relevant programs associated with the service)
Search and Navigation
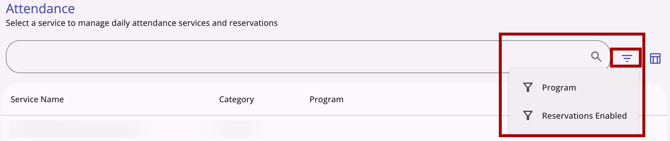
You can use the search bar for searches on Service names or use filters to narrow results by Program or Reservations Enabled status. When you open the Attendance Module, the filter defaults to Program: All Results.
Services without Reservations
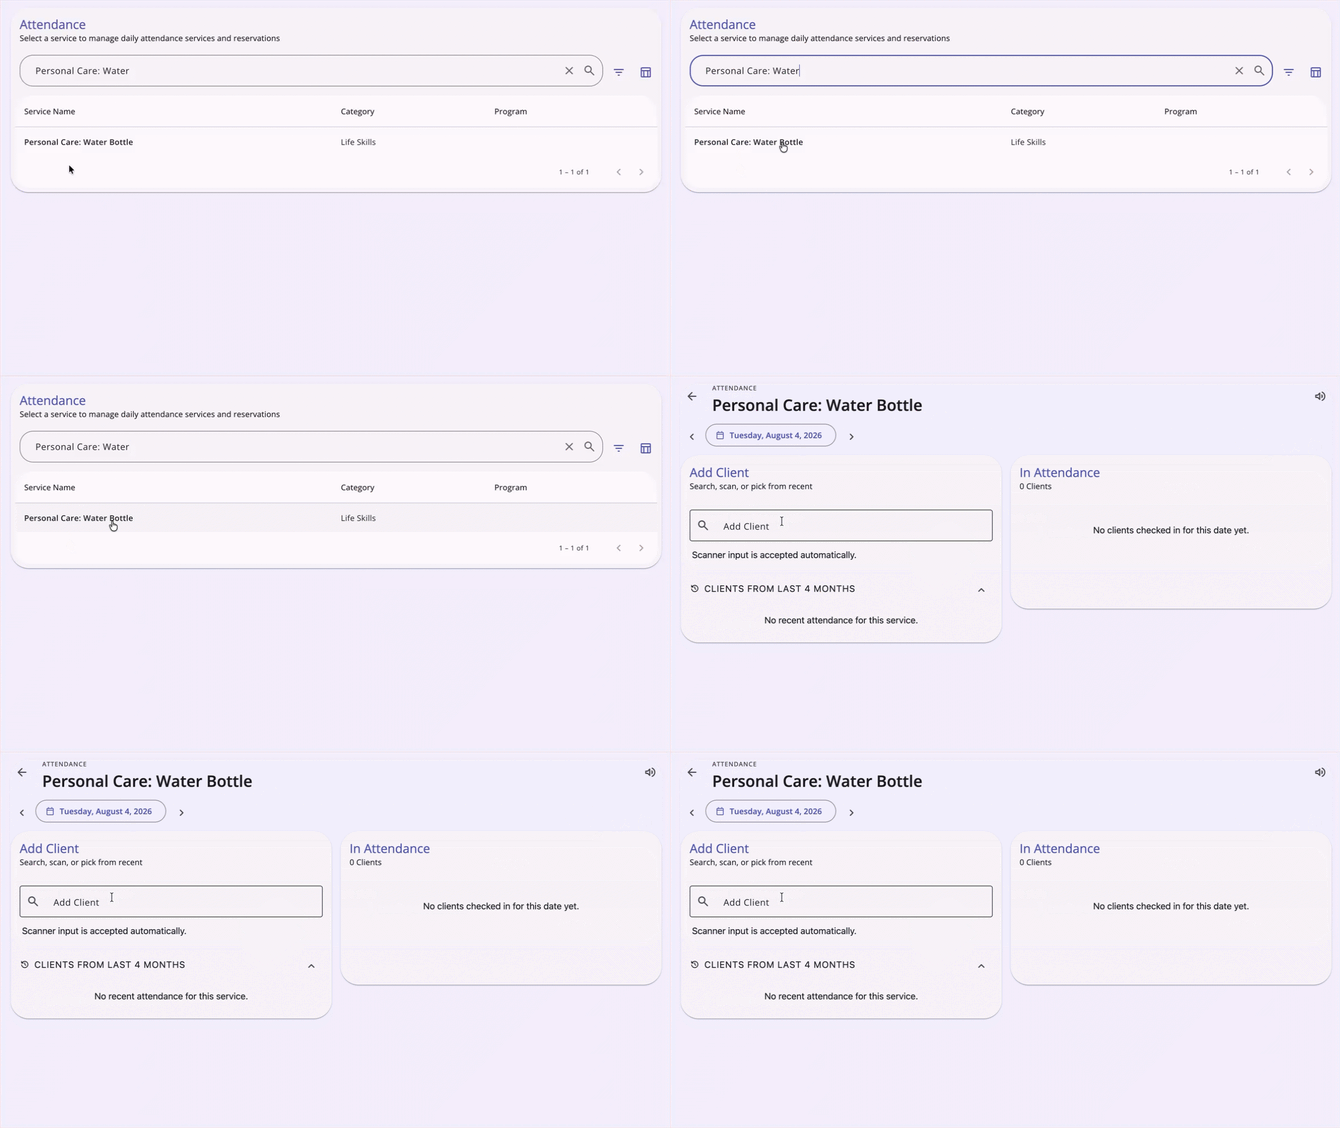
Clicking the service’s main row area opens the Service Attendance view.
Services with Reservations
Clicking the main row area for a service opens the Reservations Attendance view.
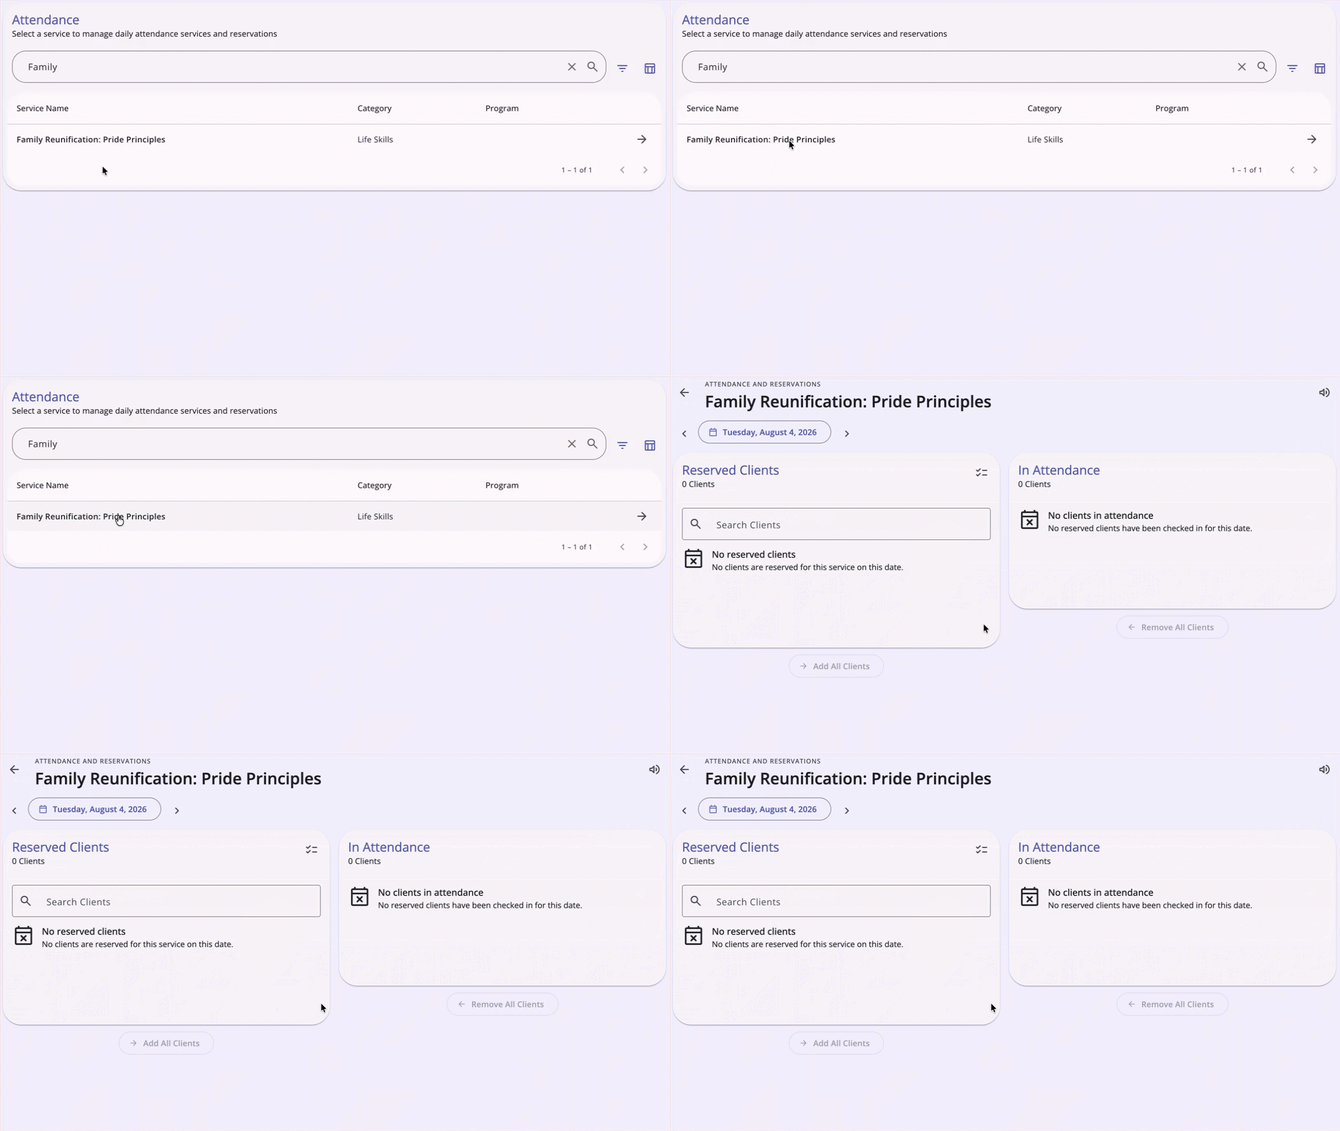
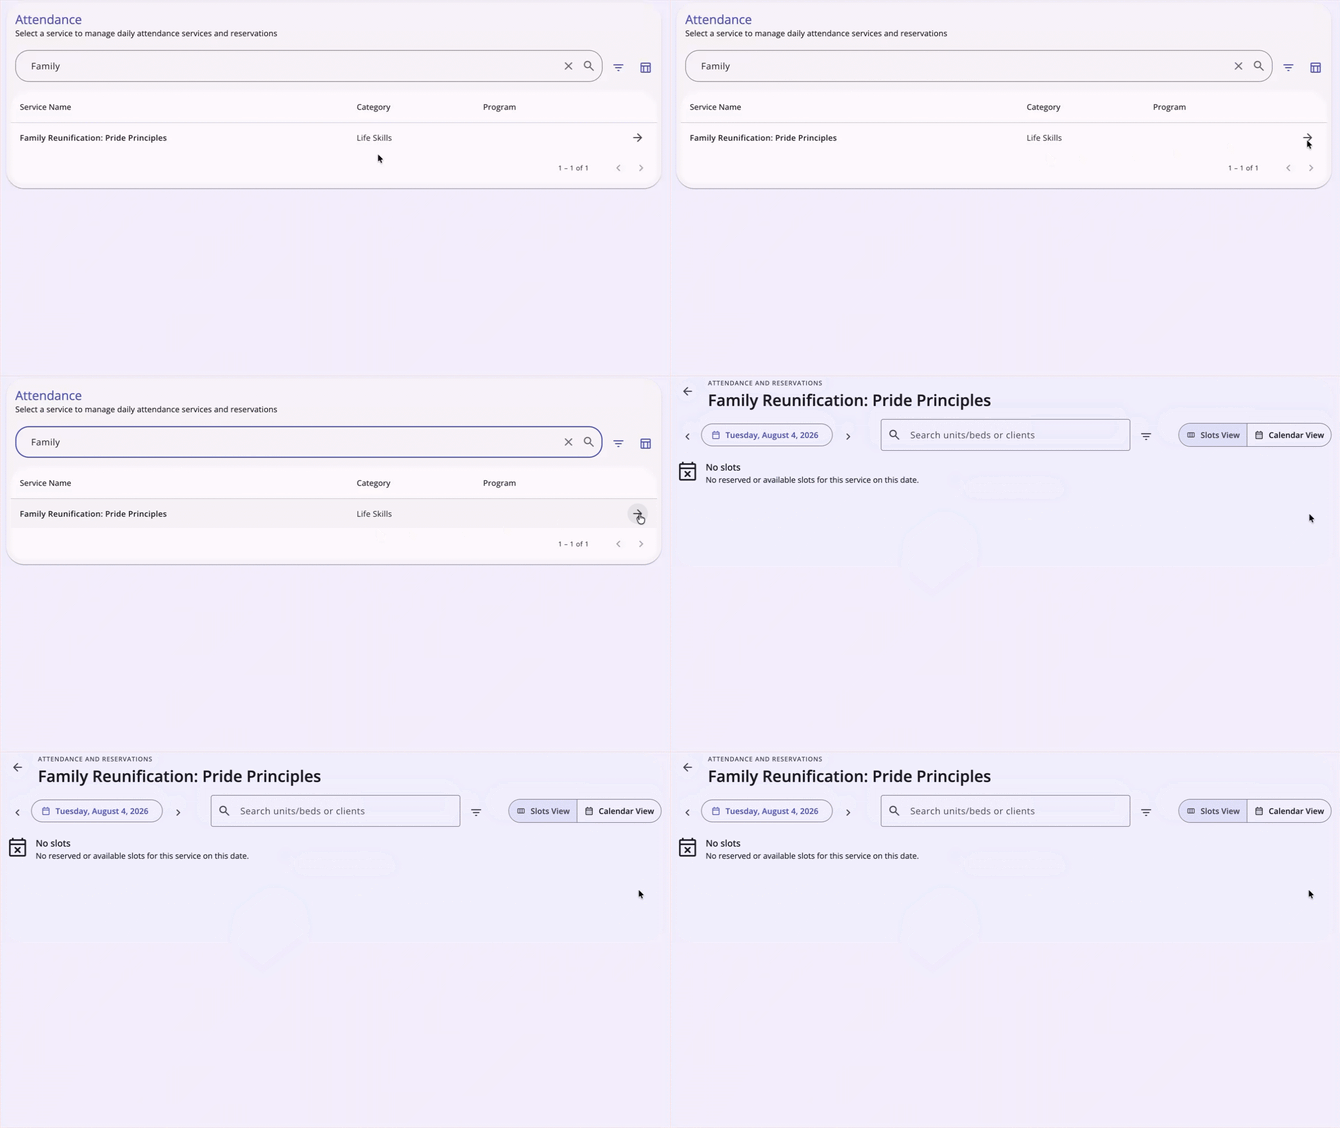
Clicking the Arrow (→) icon on the right side of a service’s row opens the Reservation Slot view.
Service Attendance View
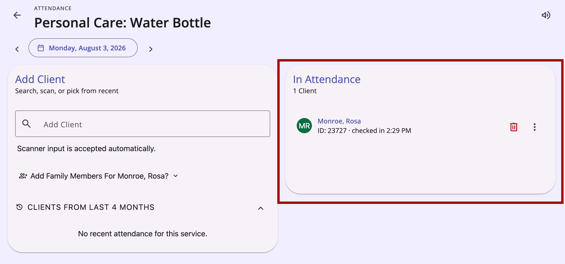
When you select a non-reservation service and open the Service Attendance View, the system defaults to today's date. You can change the date at any time using the date picker.
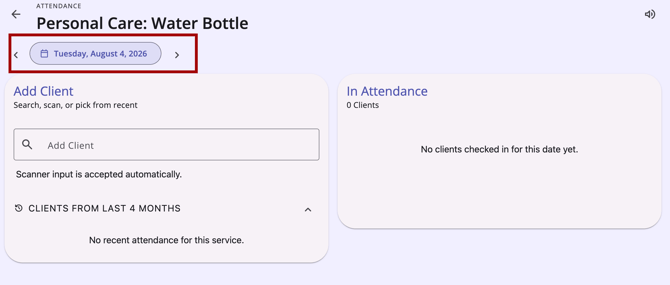
The view uses a side-by-side layout:
- CLIENTS FROM LAST 4 MONTHS (left pane): If the Attendance History Assist setting is enabled for the service, this collapsible pane lists clients who received the service within the last four months. You can add them to today's attendance with a single click of the Add button.
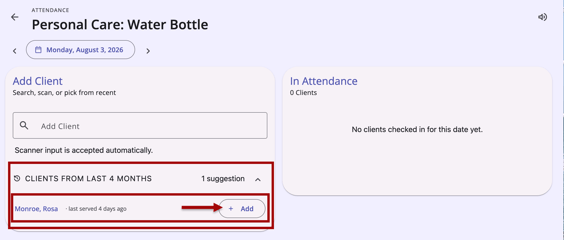
The CLIENTS FROM LAST 4 MONTHS section has an expand/collapse arrow. - In Attendance (right pane): Displays all clients checked in for the selected date.
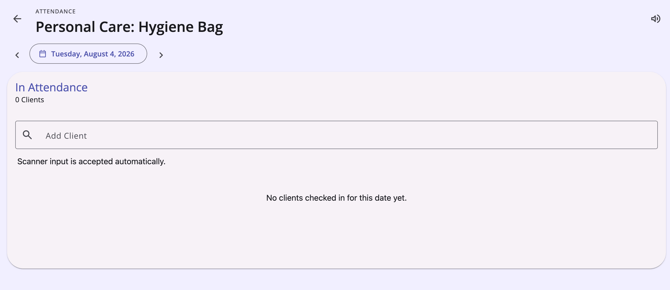
If the Attendance History Assist setting for the service is not enabled, the view shows a single In Attendance pane spanning the full width of the page.
Adding Clients in Service Attendance View
You can add clients via the search bar, a barcode scanner, or from the list of CLIENTS FROM LAST 4 MONTHS (if enabled). Adding a client adds them to the In Attendance list and creates a Service record for the selected date.
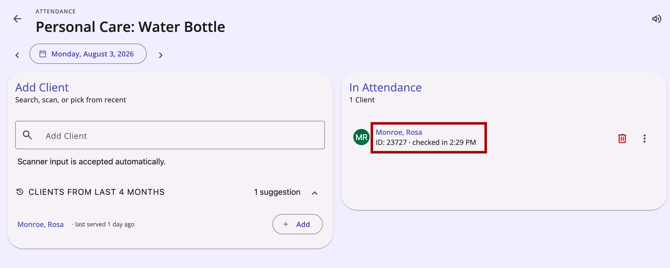
Each row in the In Attendance list displays the client's name as a link; clicking the link navigates to the client record in the same browser tab.
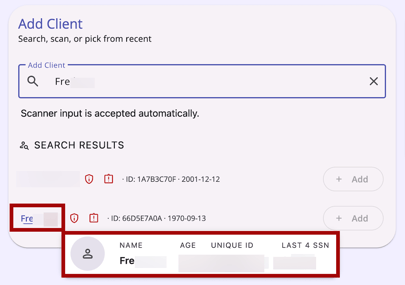
A client preview card is also available anywhere in the Attendance Module where you see a client's name. A client preview card displays the client's Photo, Name, Age, Unique ID, and Last 4 SSN. The card can be displayed by hovering over (or, on touch devices, tapping) the client's name.
Checking In a Client
Clients can be checked in to the Service Attendance view in any of the following ways:
- Searching for the client using the Client Search bar.
- Scanning the client's Clarity Human Services Photo ID barcode.
- Clicking Add next to a client listed in the CLIENTS FROM LAST 4 MONTHS panel (if enabled).
A successful check-in creates a new Service record for the selected date and adds the client to the In Attendance list.
Note: Scanning a valid barcode checks the client in immediately; no Add button click is required.
If a client cannot be checked in due to a missing program enrollment or a missing Release of Information (ROI), see the Enrollment Requirements and Release of Information (ROI) Requirements sections below.
Enrollment Requirements
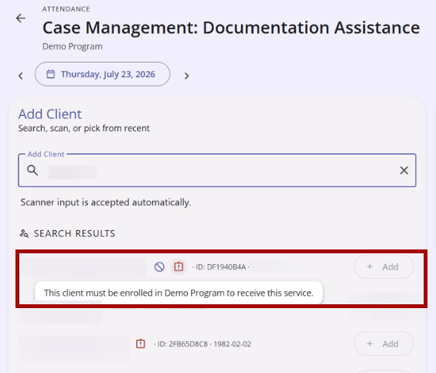
If a program enrollment is required and the client is not enrolled, the Add (+) button is grayed out. A Warning icon appears to the right of the client name, and the error message reads:
"This client must be enrolled in [Program Name] to receive this service."
Release of Information (ROI) Requirements
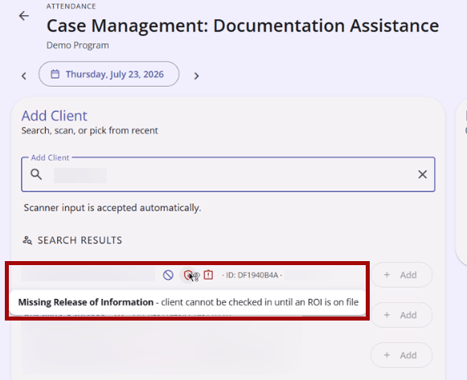
If the Require Release of Information setting is enabled for the service item and the client lacks an active ROI, the Add (+) button is grayed out. A Warning icon appears to the right of the client name, and the error message reads:
“Missing Release of Information - client cannot be checked in until an ROI is on file”
Public Alerts and Program Restrictions
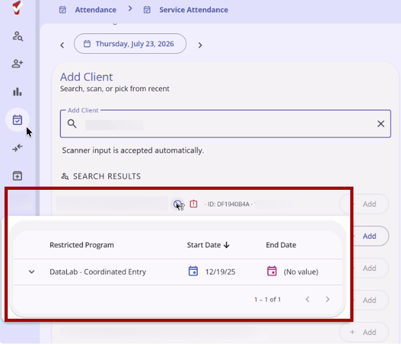
When a client appears in the Client Search results, the In Attendance pane, or the CLIENTS FROM LAST 4 MONTHS (if enabled) pane and has an active non-private Public Alert (with the Enable Public Alert Banner enabled for the service item) or an active non-private Program Restriction, Alert icons appear next to the client's name.
When you hover over an Alert icon, a pop-up shows more information.
Deleting Records in the Service Attendance View
Users with Delete access rights can delete attendance records in the Service Attendance view.
In the Service Attendance view, each row in the In Attendance list has a Delete (trash can) icon.
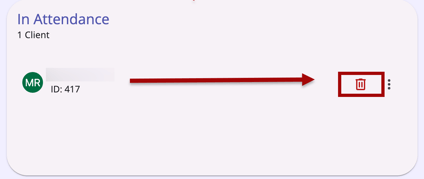
Clicking the Delete (trash can) icon triggers the standard delete confirmation:
-
Title: Delete Record
-
Subtitle: "Are you sure you want to delete?"
-
Buttons: Cancel (basic color) and Delete (red text color)
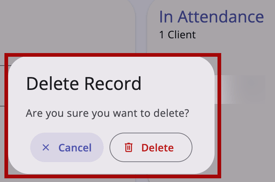
Once confirmed, the following actions occur:
-
The record is removed.
-
The list refreshes in place.
-
A success notification appears briefly, confirming deletion.
If the deleted client was added from a CLIENTS FROM LAST 4 MONTHS list, they are returned to the list (if the Attendance History Assist setting is enabled), so the user can re-add them without re-searching. If the service does not have the Attendance History Assist setting enabled, they are simply removed from the In Attendance list.
Users without delete permissions will not see the Delete (trash can) icon.
Reservations Attendance View
For services with reservations enabled, the Reservations Attendance view manages the transition from "Reserved" to "In Attendance."
Managing Check-Ins
Clicking the main row area for a service opens the Reservations Attendance view. The view uses a side-by-side layout:
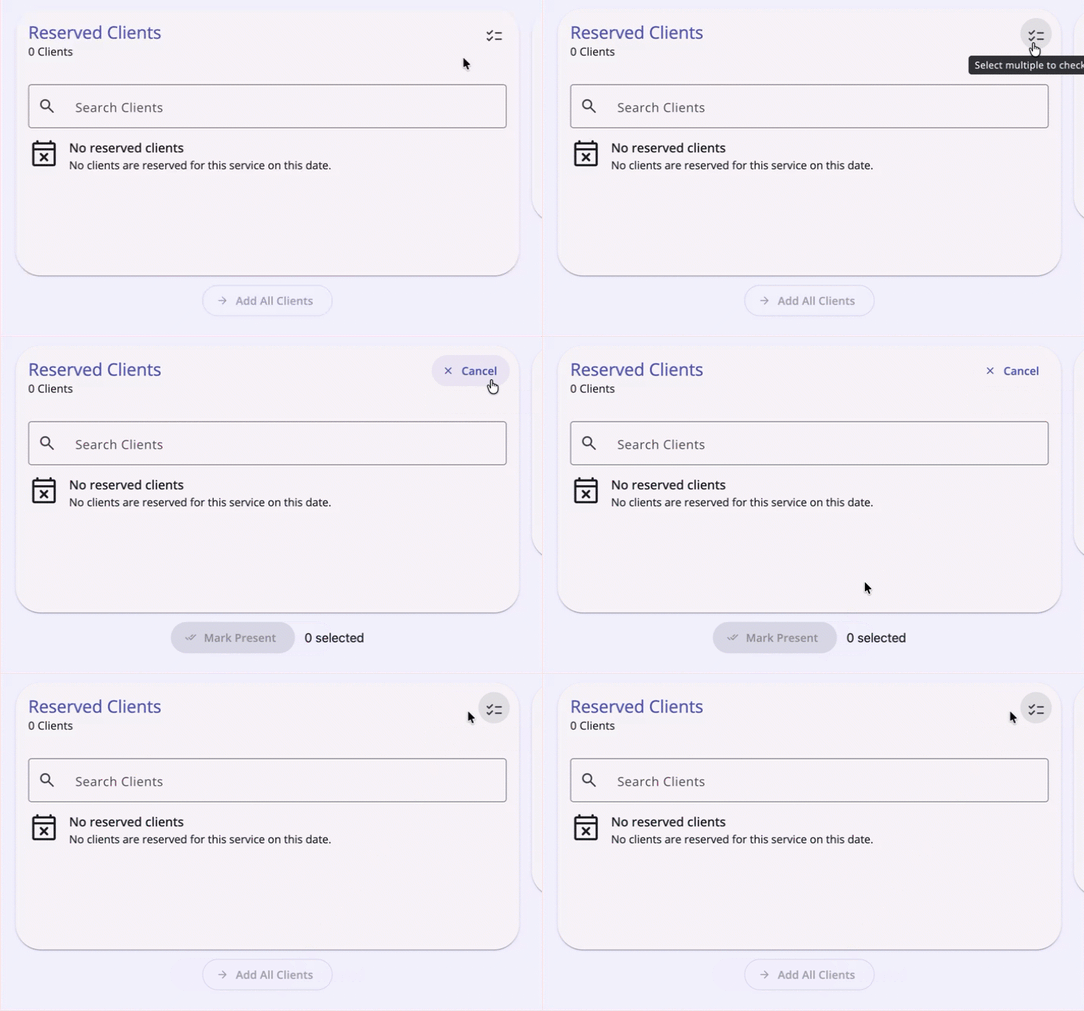
- Reserved Clients (left Pane): Lists clients with a reservation for the selected date. Click +Add for individual check-ins.
- In Attendance (right Pane): Lists clients currently checked in. Click -Remove to remove individual clients, and return them to the Reserved Clients list (without deleting the reservation).
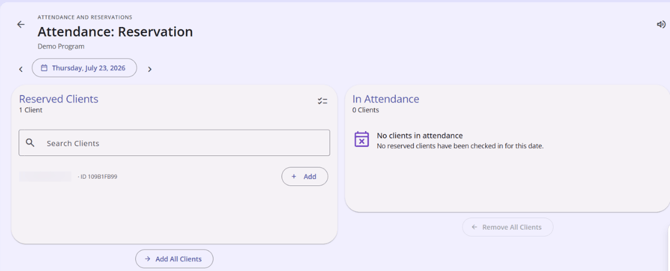
You can use the →Add All Clients or the ←Remove All Clients options at the bottom of the panes for bulk check-ins.
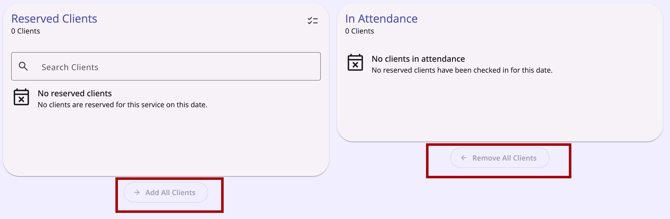
- When using the →Add All Clients option on the Reserved Clients pane, the system will check in all eligible clients and provide a summary snackbar (e.g., "Checked in 4 of 6 reserved clients"), noting any clients blocked by ROI or enrollment requirements.
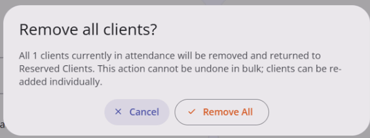
- The ←Remove All Clients option on the In Attendance pane requires a confirmation dialog to prevent accidental bulk deletions, with Cancel and Remove All buttons.
Checking In a Client
In the Reservations Attendance view, clients can be checked in in any of the following ways:
- Clicking +Add next to a client listed in the Reserved Clients pane.
- Searching for a client using the Client Search bar (for walk-ins who don't already have a reservation).
- Scanning the client's Clarity Human Services Photo ID barcode.
As in the Service Attendance view, scanning a valid barcode immediately checks the client in, without requiring an +Add click.
Program Enrollment and ROI Gating: The same enrollment and ROI requirements described in the Service Attendance View section apply here. If a client added via +Add, search, or scan does not meet these requirements, check-in is blocked, and a warning displays inline next to their name.
Multi-Select Mode
Click the Select Multiple icon at the top of the Reserved Clients pane to enter multi-select mode. This allows you to check boxes for specific clients and click Mark Present to check them in as a group.
Reservation Slots View and Calendar View
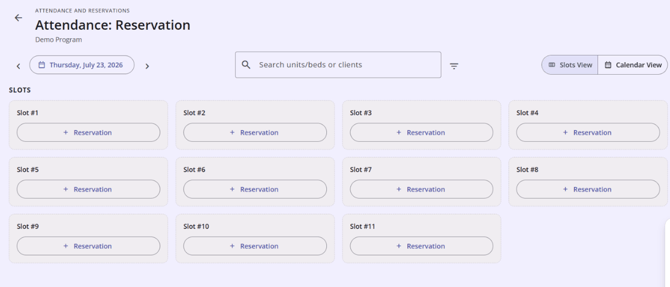
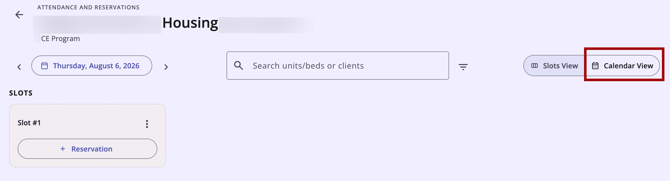
Clicking the Arrow (→) icon on a reservations-enabled service from the Attendance tab landing page opens the Attendance: Reservation page. The Slots View and Calendar View are available here. The page opens with Slots View visible by default.
Reservation Slots View
The Reservation Slots View dynamically updates based on the service configuration:
- Inventory Connected: Displays Unit/Bed cards using Inventory identifiers.
- Dedicated/Open Mode: Displays Slot cards.
- Latest Arrival Time: If enabled, cards display the required check-in time.
Search and Filters
The Reservation Slots view includes a Search bar and a Filter menu with options for:
- Status
- Available: Show only empty slots.
- Non-enrolled clients: Identify compliance gaps where a reserved client is not yet enrolled.
- Late arrival time: Show reservations past the default arrival time.
- Building/Program: Narrow results by specific locations or programs.
Quick Create
Tapping + Reservation on a slot launches the Create Reservation modal for that date. Refer to the Creating Reservations section of this article for details.
Reservation Calendar View
Click on the Calendar View option to show a monthly grid of availability.
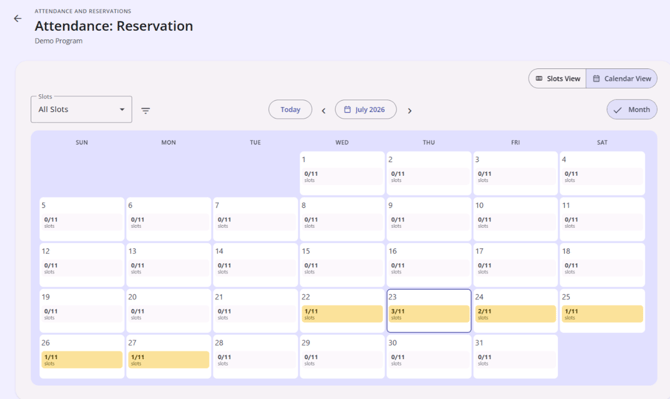
- Single Slot Selection: Shows the status (Reserved, Present, No Show, or Available) for a specific unit/bed across the month.
- All Slots Selection: Shows aggregate availability (e.g., "5/10" indicating 5 slots of 10 are available) for each day.
Quick Create
Tapping + Reservation launches the Create Reservation modal for that date. Refer to the Creating Reservations section of this article for more details.
Creating Reservations
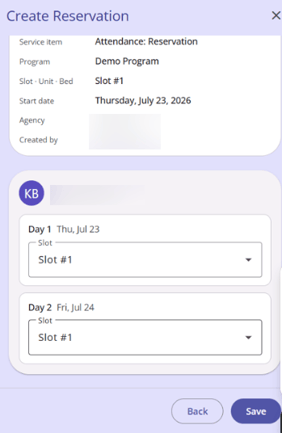
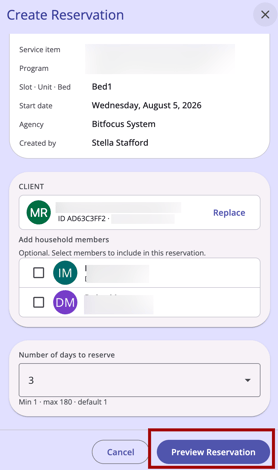
Tapping + Reservation on a slot in the Slots View or the Calendar View opens the Create Reservation modal to create single- or multi-day reservations.
Adding Referrals in Slots View
Tap + Reservation on a slot in the Slots View to open the Create Reservation modal to create single- or multi-day reservations.
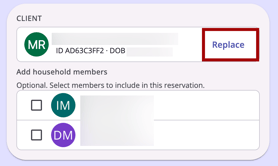
- Client Selection: Search for a client to assign the reservation.
- Click Replace to update the client choice if you selected the wrong client.
-
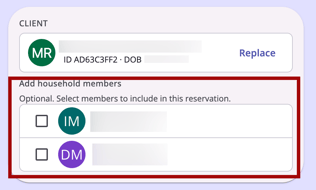
Household Members: If the client has eligible household members, you can multi-select them to include them in the reservation.
- Duration: Enter the number of days (up to 180).
- Multi-Day Preview: If reserving for more than one day, you must click Preview Reservation. This shows a per-date list where you can:
- Confirm slot availability for each day.
- Override the Latest Arrival Time for specific dates.
- Identify days where no slots are available (these will be skipped upon saving).
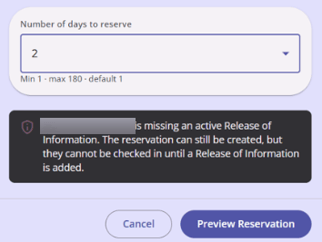
- ROI or Enrollment requirements: If a client lacks an ROI or enrollment, the reservation can still be created (to hold the spot), but a snackbar warning will warn you that they cannot be checked in until the requirements are met. The warning reads:
"[client name] is missing an active Release of Information. The reservation can still be created, but they cannot be checked in until a Release of Information is added."
Adding Referrals in Calendar View
The Calendar View shows a full month of slot availability and lets you start a reservation directly from a single day. From the Slots View, tap the view-switcher icon (top right of the header) to open the Calendar View for the same service.
Calendar View keeps the same single header row as the Slots View, but swaps the date picker for a slot/unit/bed picker.
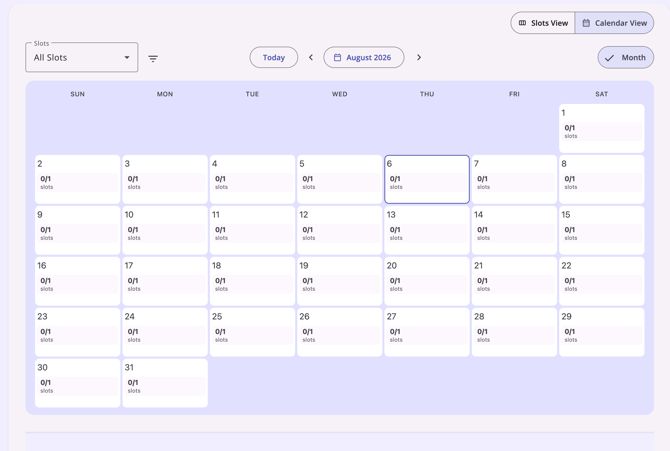
Picker options:
- Each individual slot, unit, or bed set up for the service:
- Named, if the service uses Dedicated mode.
- Numbered, if the service uses Open mode.
- Shown as a Unit/Bed identifier if Inventory is connected.
- All Slots (or All Units/Beds, for Inventory-connected services), an option covering every slot/unit/bed.
Filters:
A filter icon and menu in or near the header let you narrow the calendar:
- Building: Inventory-connected services only. Multi-select. Limits the calendar to slots/units/beds in the selected building(s); affects both the All-aggregate cells and the per-slot picker.
- Program: Multi-select. Limits the calendar to slots/units/beds associated with the selected program(s).
Month Grid
The main content area is a month grid.
When a specific slot/unit/bed is selected, each day cell shows that slot's status for the day:
- Reserved (client name shown)
- Present
- No Show
- Available (empty cell)
- Out-of-range (greyed out)
Tapping a cell:
- Available cells show a + Reservation option. Tapping it opens the Create Reservation modal, pre-filled with that date and the currently selected slot/unit/bed.
- Reserved cells: tapping one opens the Slot View for that date, scrolled to that specific slot.
When All Slots/Units/Beds is selected:
- Each Day cell shows aggregate availability as [reserved}/{total].
- Tapping a day opens the Slot View for that date.
- The + Reservation option is not shown in aggregate mode. You must select a specific slot/unit/bed first to create a reservation from the calendar.
No slots configured
If the service has no reservation slots set up, the calendar displays:
"This service does not have reservation slots configured."
Reservation Outcomes
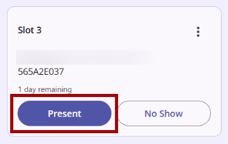
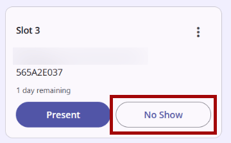
Users can mark reservation outcomes with a single click.
- Tapping Present sets the reservation status to Present for the selected date.
- Tapping No Show sets the reservation status to No Show for the selected date.
- Tapping Undo on a slot in the Present state reverts the card to the pre-action Reserved state.
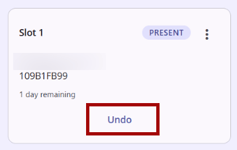
- Removing the reservation entirely is available through the Action Menu (kebab) icon on the slot, not via Undo.
Action Menu Options
The Action Menu (kebab) may contain additional options for the user, dependent on additional configuration or access rights. The possible action menu options are:
- View unit information (only when Inventory is connected).
- View audit log (when access rights allow; see the Audit Log section of this article).
- Delete Reservation (always present on a Reserved cell).
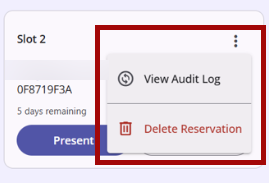
Navigate to the Audit Log section or the Deleting Reservation Records section of this article for more information.
Deleting Reservation Records
Users with Delete access rights can delete reservation records in the Attendance: Reservation view, the reservation attendance Slots View, and the reservation attendance Calendar View.
Deletions in the Reservation Attendance View
In the Attendance: Reservation view, when clients are in the In Attendance section, each client row in the In Attendance list has a Delete (trash can) icon, and the entire In Attendance section has a ← Remove All Clients button.
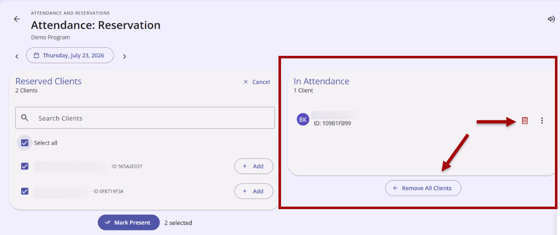
Clicking the Delete (trash can) icon or the ←Remove All Clients button triggers the standard delete confirmation:
-
Title: Delete Record
-
Subtitle: "Are you sure you want to delete?"
-
Buttons: Cancel (basic color) and Delete (red text color)
Once confirmed, the following actions occur:
-
The record is removed.
-
The list refreshes in place.
-
A success notification appears briefly, confirming deletion.
The deleted client is returned to the Reserved Clients list (if applicable to the service) or the CLIENTS FROM LAST 4 MONTHS list (if Attendance History Assist is enabled), so the user can re-add them without re-searching.
Users without delete permissions will not see the Delete icon or the ←Remove all Clients button.
Deletions in the Slots View
If you need to delete a reservation from a Reserved slot in Slots View, click the Action Menu (kebab) icon to show the available options.
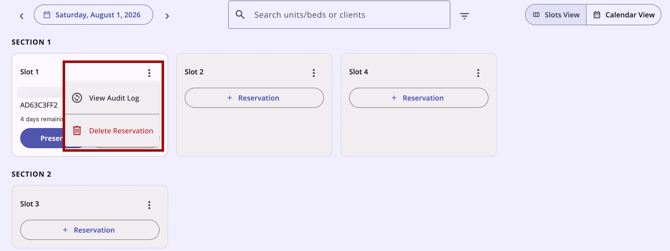
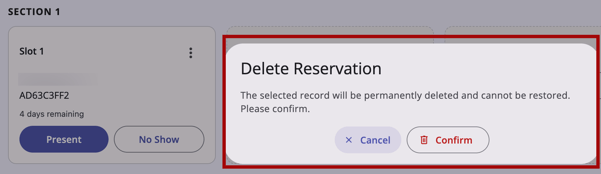
Select Delete Reservation to remove the client from the slot and delete the reservation. This action triggers the following confirmation:
-
Title: Delete Reservation
-
Subtitle: "The selected record will be permanently deleted and cannot be restored. Please confirm."
-
Buttons: Cancel (basic color) and Confirm (red text color)
Once confirmed, the following actions occur:
-
The record is removed.
-
The list refreshes in place.
-
A success notification appears briefly, confirming deletion.
The reservation for that day and slot will be deleted.
Users without delete permissions will not see the Delete Reservation option.
Deletions in the Calendar View
If you need to delete a reservation from a Reserved slot in Calendar View, tapping one opens the Slot View for that date, scrolled to that specific slot.
You can then follow the exact instructions for Deletions in the Slots View.
Audio Cues
To support high-volume workflows, the Attendance Module includes integrated barcode scanning with audio feedback.
Audio Feedback
Distinct tones play for the following events:
- Success: Client successfully added to attendance.
- Duplicate: Client is already checked in
- Warning message on screen: "This client is already checked in"
- Unrecognized Barcode: No client found
- Warning message on screen: "No client found with that ID. Please try again."
- Requirements Block: Client blocked by ROI or Enrollment requirements.
Bulk actions are silent: Audio cues play for individual check-ins — via search, scan, or Add/+Add — in both the Service Attendance and Reservations Attendance views. Audio does not play for bulk actions (→Add All Clients, ←Remove All Clients, or multi-select Mark Present).
A Mute toggle is available in the toolbar to disable these sounds for the current session.

Data Integrity
The Attendance Module employs a "first write wins" policy to prevent overwriting of data.
If you attempt to update a record (e.g., creating a reservation, marking a client Present / No Show, deleting a record, etc.) that was modified by another user while your page was open, the system will:
- Reject the action.
- Display an alert banner:
"This record was updated by another user since you loaded this page. The current status is ‘[current status]’. Please review before making changes."
There will be an option to dismiss the banner.
- Refresh the specific slot or row in place to show the current server-side state without disrupting the rest of your view.
Audit Logs
Every check-in, reservation, and status change creates an audit log entry.
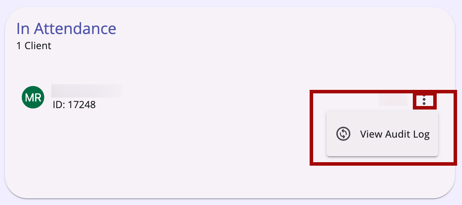
Admin users with Audit log access rights can view these by selecting View Audit Log from the Action Menu (⋮ or kebab) menu on any client row or reservation card.
Updated: 09/24/2026