
This feature is part of the December 2026 Feature Updates. The functionality described in the article will be available on training sites on November 17, 2026, and on production sites on December 1, 2026.
Table of Contents
Overview
A Unit Configuration Type (UCT) is a template for the attributes of a physical unit in Inventory, such as bed count and program. You assign a UCT to each unit.
Use this article to:
- Delete a UCT, including one that was assigned to units in the past.
- Delete a single past UCT connection from a unit’s Unit Configuration History.
- Select a program when you add a UCT.
- Change the program connected to a UCT.
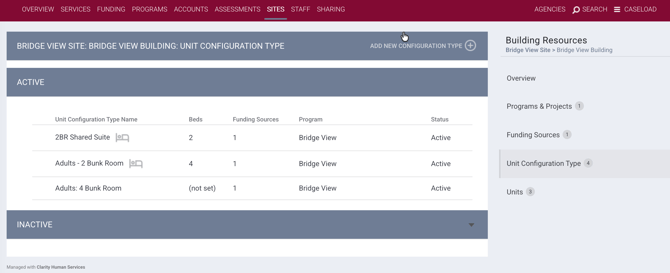
- View active and inactive UCTs.
Before You Begin
The tasks in this article depend on your access rights. For descriptions of every access right, refer to Rights Glossary for Access Roles.
|
Task |
Access Right |
|
Add a UCT and connect a program |
Create Sites - Administrative and Housing Inventory Entities |
|
Change the program on a UCT |
Edit Sites - Administrative and Housing Inventory Entities |
|
Delete a UCT or a past UCT connection |
Delete Sites - Administrative and Housing Inventory Entities |
|
See the Agency picklist when you select a program |
Agency Inventory - Add Any Agency Program |
Note: Users without Agency Inventory - Add Any Agency Program in their Access Role see programs from their own agency only and do not see the Agency picklist.
Deleting a Unit Configuration Type
You can delete a UCT after it has been assigned to a unit, as long as it meets the conditions below.
When You Can Delete a Unit Configuration Type
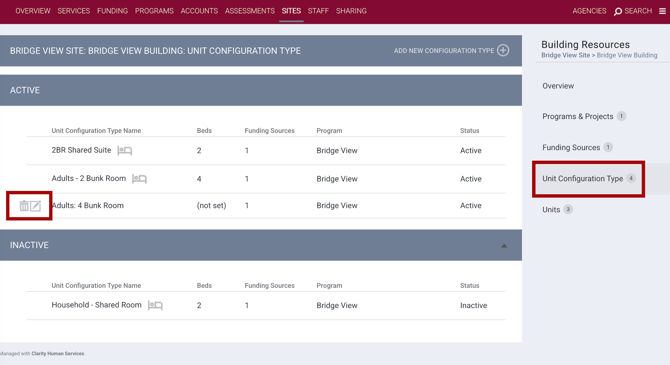
Go to Manage > Sites > Housing Inventory > [site name] > Buildings & Units > [building name] > Unit Configuration Types. The Delete icon appears for a UCT when both of these are true:
- The UCT is not the current configuration of any unit.
- No occupancy has ever been recorded under the UCT. This includes future, pending, future-pending, past, and past-pending occupancies.
Confirming the Deletion
Select the Delete icon and click OK to confirm. The confirmation message depends on how the UCT was used:
|
UCT History |
Message |
Next Step |
|
Never assigned to a unit |
“Please confirm the removal of this record.” |
Confirm to remove the UCT. |
|
Scheduled as an upcoming configuration |
“Please confirm the removal of this record. Upcoming configuration assignments will be removed.” |
Confirm to remove the UCT and its upcoming assignments. |
|
Assigned to units in the past |
“Please confirm the removal of this record. You will be redirected to fill any Unit Configuration History gaps.” |
Confirm, then fill the history gaps on the Assign new Unit Configuration Type page. |
Filling Unit Configuration History Gaps
When a UCT was assigned to units in the past, deleting it would leave gaps in those units’ Unit Configuration History. Choose a replacement UCT for each unit to fill them.
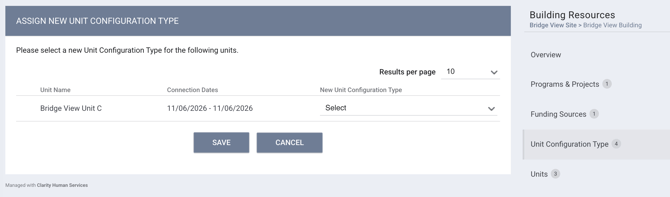
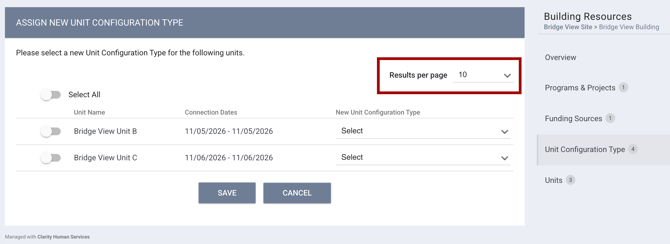
After you confirm the deletion, the Assign New Unit Configuration Type page opens with this message:
“Please select a new Unit Configuration Type for the following units.”
The Assign New Unit Configuration Type page lists each affected unit with these columns:
- Unit Name
- Connection Dates
- New Unit Configuration Type
To fill the gaps:
- Review each unit and its Connection Dates.
- In the New Unit Configuration Type picklist, select a replacement UCT for each unit.
- Select Save.
The picklist lists only UCTs in the same building with a Start Date on or before the start of the unit’s Connection Dates.
Updating several units at once
When more than one unit is listed:
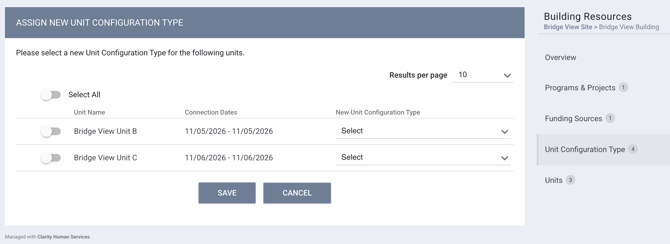
- A checkbox appears next to each unit, and Select All appears at the top of the list.
- Select All selects only the units on the current page. After you select one or more units, Select All changes to Clear All.
- Select a replacement UCT for any checked unit to apply it to all checked units.
- With multiple units checked, the picklist lists only UCTs with a Start Date on or before the earliest start of the checked units’ Connection Dates.
- The picklist is available for every unit, checked or not.
Paging through units
The list shows 10 units per page by default. Choose 10, 25, 50, 100, or Show All to change the number of units that appear.
After you save
The units you updated are removed from the list, and units from later pages move up. After you save the last remaining unit, the UCT is deleted, and you return to the Unit Configuration Types list.
Note: If you click Cancel and leave the Assign New Unit Configuration Type page before updating all units, the UCT will not be deleted.
Deleting a Past Unit Configuration Connection
Use this option to delete a single past UCT connection from a unit’s history. You need the Delete Sites - Administrative and Housing Inventory Entities access right.
- Go to Manage > Sites > Housing Inventory > [site name] > Buildings & Units > [building name] > Units > [unit name] > Configuration History.
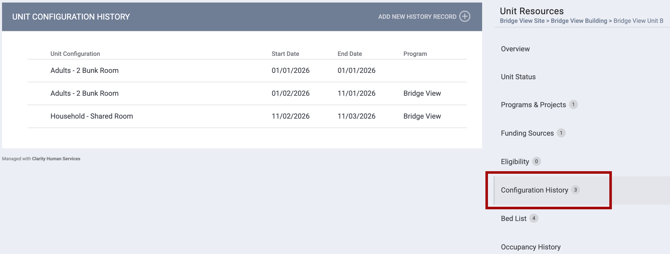
- Find the past connection. The Delete icon appears only when there is no occupancy within that connection’s dates.
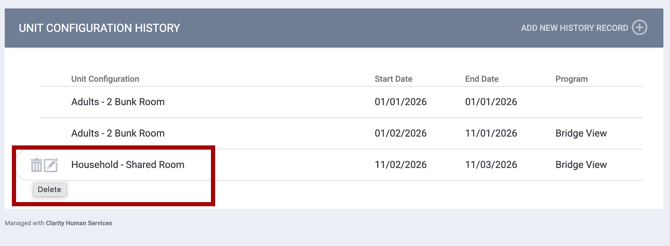
- Select Delete. The Assign new Unit Configuration Type window opens with this message: “Please fill any Unit Configuration History gaps to delete this connection.”
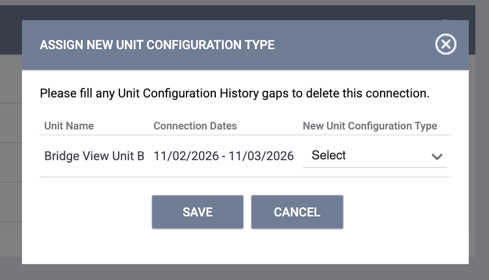
- Select the UCT that should cover those dates. The picklist follows the same rule as above: UCTs in the same building with a Start Date on or before the connection start date.
- Select Save.
After you replace the connection, neighboring periods on the same UCT and program merge into one period.
For example:
|
Stage |
Unit Configuration History |
|
Before |
UCT1 from 01/01/2026 to 02/01/2026, and UCT2 from 02/01/2026 to now |
|
Action |
Replace UCT1 with UCT2 |
|
After |
One period: UCT2 from 01/01/2026 to now |
Selecting a Program on a Unit Configuration Type
You can add the Agency and Program on a new Unit Configuration Type.
Adding the Agency and Program
The Agency and Program fields appear on the Unit Configuration Type screen, between Enable Beds and Program Type.
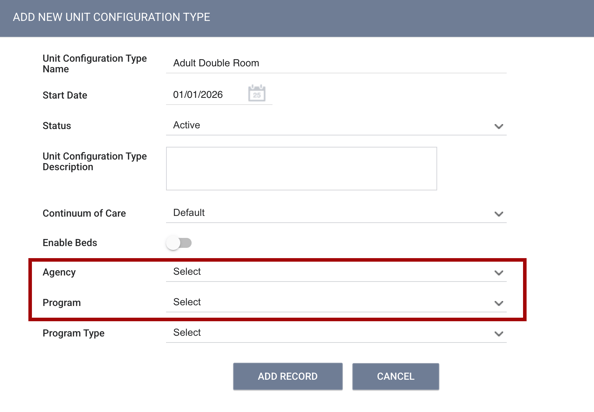
They appear when you:
- Add a UCT from the Unit Configuration Types tab.
- Add a UCT during unit creation.
- Open the UCT overview.
Note: Users with the Agency Inventory - Add Any Agency Program access right see the Agency drop-down. Everyone else sees only their own agency's programs, not the Agency field. Jump to the Before You Begin section of this article for more information.
How the fields behave depends on whether a program is already connected:
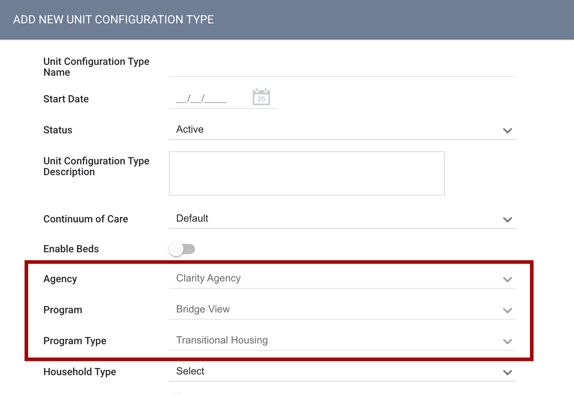
- Program connected at the site or building level: Agency, Program, and Program Type are pre-filled and read-only.
- No program connected at a higher level: Select a program before you save.
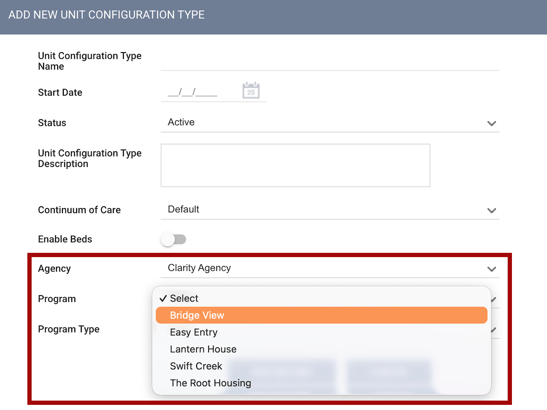
You cannot save a new UCT without selecting a program. Program Type is set from the connected program.
The picklists show only active agencies and active residential programs, in alphabetical order. For users with access to edit any agency, changing the Agency field reloads the Program picklist.
Changing the Program on a Unit Configuration Type
The following explains how to update the program for a Unit Configuration Type (UCT).
When You Can Change the Program
You can change Agency and Program on the UCT overview (for UCTs that you added Agency/Program at the UCT level) when no occupancy of any kind, including past occupancy, has ever been recorded under the UCT. This applies even while the UCT is a unit’s current configuration.
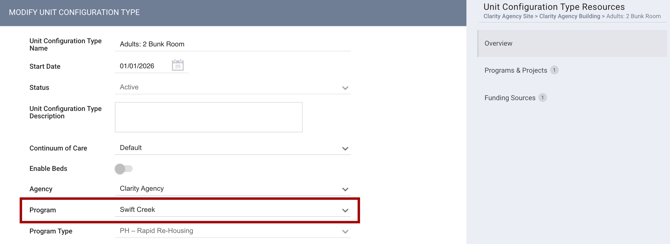
Otherwise, the fields are read-only.
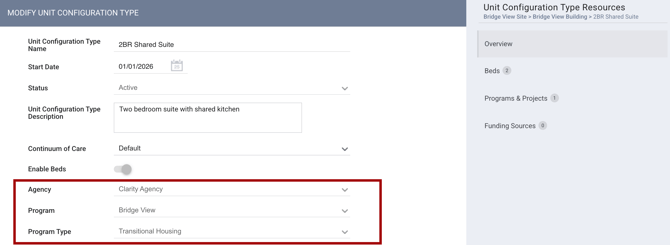
Note: Change a program only at the level where it was added. For example, if the program was added at the Building-level, change it there rather than on the UCT.
Removing a Program at the Site or Building Level
If you remove a program at the site or building level, the UCT’s Agency and Program return to Select. The UCT Audit Log records the previous Agency and Program being cleared. You can then connect a new program at any level.
When the Project Type Changes
When you update the program and the new program has a different project type, the Program Type field updates immediately. Bed types, availability, and the Rapid Re-Housing subtype fields update to reflect the program type. Complete the required fields before you save the UCT page.
Note: When a program at a site or building changes to a different project type, an alert appears on the Programs & Projects page: “The Project Type associated with this Site/Building has changed. Review Unit Configuration Type details to ensure accurate functionality and reporting. Affected Unit Configuration Types: …” The alert lists the UCTs to review. Open each listed UCT and confirm its details.
Viewing Active and Inactive Unit Configuration Types
The Unit Configuration Types page has two sections:
- Active at the top of the page.
- Inactive below it, collapsed by default. Select the arrow in the Inactive section header to expand or collapse it.
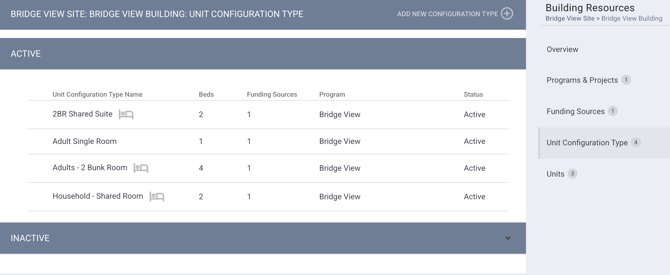
Both tables use the same columns and can be sorted independently.
Related Changes to Inventory Data
- Unit Configuration History: Past connections to inactive UCTs remain visible, so you can still read the timeline. The Program column shows the program recorded for each period, rather than the UCT’s current program on every row.
- Calculated program inventory: For programs with Use Inventory Calculated Records set to Calculated Records Only or Both Manual and Calculated Records, deleting a UCT or removing a connection flags the program’s inventory for recalculation. The removed configuration no longer counts toward the program’s bed and unit inventory.
- Programs & Projects counters: The sidebar counters on Sites, Buildings, and UCTs match the number of rows on the page.
- Program lists: Programs of deactivated agencies no longer appear in program lists. An existing connection to a deactivated agency stays visible and is marked “(Inactive).”
- UCT Programs & Projects tab: Adding or removing the program follows the same occupancy rule as the UCT screen. You can add or remove a program only when there is no occupancy under the UCT.
Additional Resources
Published: 11/10/2026