
This feature is part of the December 2026 Feature Updates. The functionality described in the article will be available on training sites on November 17, 2026, and on production sites on December 1, 2026.
Table of Contents
- Overview
- Access and Location
- Unit Card Header
- Action Menu Options
- Overview Sections
- Current Occupancy and Occupancy History
- Beds Tab and Bed Pages
- Changing a Unit or Bed Status
- Adding an Overnight Drop-In
- Adding a Status in Inventory Settings
- Additional Resources
Overview
The Unit Card shows a unit's details, status, occupants, eligibility, funding, and beds in one place. Use it to review a unit, see who has stayed there, and change the status of a unit or a bed.
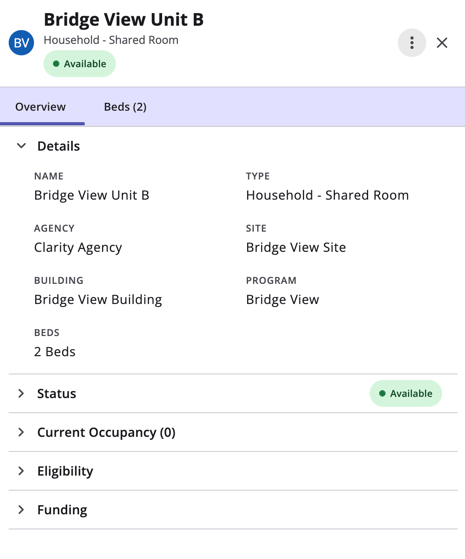
This article explains each part of the card.
Access and Location
- Location: Select a unit in the Inventory dashboard's unit list, or select its marker on the map. The Unit Card opens as a side panel on the right side of the workspace. See [Inventory Dashboard ].
- Viewing: The units you see depend on your access rights and sharing settings. Fields marked as Sensitive Data display as Protected unless you have the Agency Sensitive Data access right (for units in your own agency) or the Any Agency Sensitive Data access right (for units in other agencies).
- Changing a status: You need the Inventory - Add Bed/Unit Status access right to save a new status period, and Inventory - Edit Bed/Unit Status to change one. The unit must belong to your current agency (or the one you are switched into).
Note: For access rights, see Rights Glossary for Access Roles. For dashboard settings, see Configuring the Inventory Dashboard.
Unit Card Header
The header stays in place while the rest of the card scrolls.

It shows:
- Photo: The unit's own photo. If the unit has none, the photo shows the default photo of its Unit Configuration Type. If that is missing, it shows the building's default photo. If none of these exist, no photo or placeholder displays. See Adding Inventory Photos.
- Initial icon, unit name, and Unit Configuration Type.
- Status: A color-coded label that reads Available (green), Pending Occupancy (amber), Occupied (dark blue), Offline (gray), or Inactive (red).
- Action Menu (three dots) icon: Action Menu options depend upon access rights.
- A Close (X) icon.
Forms inside the card have a back arrow. If you close the card with an unsaved change, an Unsaved Changes message asks you to select Continue Editing or Discard Changes.
Action Menu Options
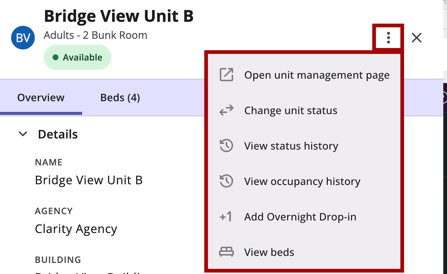
Select the Action Menu (three dot) icon in the header to see these options.
- Open Unit Management Page: Opens the Modify Unit page in the legacy interface, in a new browser tab. If you do not have the access rights to modify units, you will not see this option.
- Change Unit Status, View Status History, and View Occupancy History.
- Add Overnight Drop-In: Displays for units that take drop-ins. Displays for units with overnight drop-ins enabled for the unit.
- View Beds: Displays for units with bed management.
Overview Sections
Select a section title to expand or collapse the section.
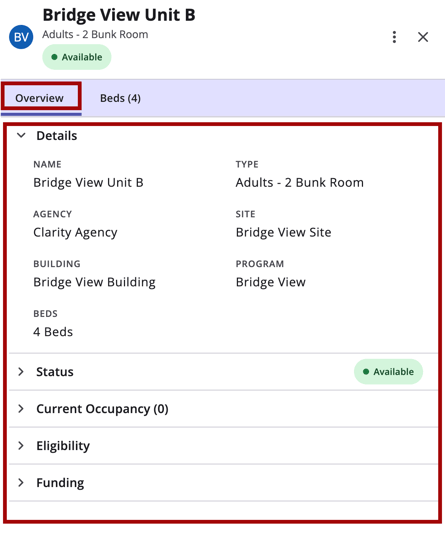
Details opens expanded. The other sections start collapsed.
- Details: Name, Type, Agency, Site, Building, Program, and, if the unit has beds, Bed count.
- Status: The current status, Change Status, and View status history →. See Changing a Unit or Bed Status.
- Current Occupancy: The current and pending occupants. See the next section.
- Eligibility: The criteria, grouped by where they come from, such as Unit or Program. AND or OR logic appears between criteria. A unit with eligibility turned off lists no criteria. The list includes eligibility that the unit inherits.
- Funding: Funding source names, grouped by level: Unit, Program, Building, Site, and the Unit Configuration Type. Amounts and dates don't display. The list includes funding that the unit inherits.
- More Information: The custom fields that have Display on Inventory Card turned on. Fields are grouped as Unit details, Unit Configuration details, Building details, and Site details.
Current Occupancy and Occupancy History
Current Occupancy (n) lists each occupant on one row, where (n) is the number of household members occupying the unit. A row shows the name, the program, the assigned bed, and the dates, such as "1/19/26 – Today." Pending rows read Referral Pending or Bed Assignment Pending. If the unit is empty, the section reads "No current occupant."
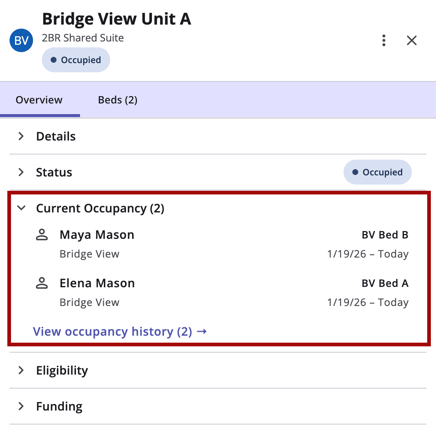
Select View occupancy history (n) → to see past stays. This link appears only when the unit has occupancy history.
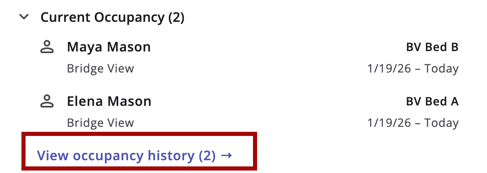
On the occupancy history page, expand a stay to see:
- Program Type.
- Occupants, with a link to each client record that opens in a new tab.
- The length of stay, such as "1 day," or Occupying for a current stay.
![The occupancy history page, showing the occupancy history for the unit.]](https://help.bitfocus.com/hs-fs/hubfs/The%20occupancy%20history%20page%2c%20showing%20the%20occupancy%20history%20for%20the%20unit.%5D.png?width=473&height=362&name=The%20occupancy%20history%20page%2c%20showing%20the%20occupancy%20history%20for%20the%20unit.%5D.png)
If a client isn't shared with your agency, the row reads "Undisclosed Client" and has no link. An unshared program reads "Undisclosed Program." The client record link also depends on your sharing settings and on whether the record is private. For more, see Unit Occupancy History.
Beds Tab and Bed Pages
For units with bed management, the Beds (N) tab lists the unit's beds, where N is the number of beds. The columns are Bed, Status, Occupant, and Occupancy Date.
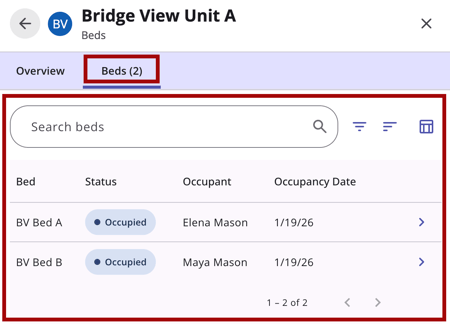
- Type in Search beds to search the list.
- Filter by Agency, Program, Status, and the bed custom fields.
- Use the column picker to add Agency, Building, Days Occupied, Program, Site, and the bed custom fields.
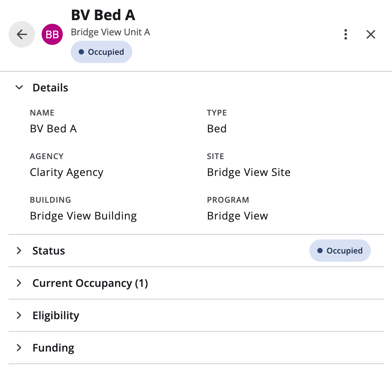
Select a bed to open its own page. It has the same sections as the unit. The header shows the bed name, the unit name, and the bed status. A bed's eligibility comes from its unit configuration. See Inventory: Beds.
The bed's Action Menu (three dot) icon offers Open Unit Management Page, Change Bed Status, View Bed Status History, View Bed Occupancy History, and Add Overnight Drop-In.
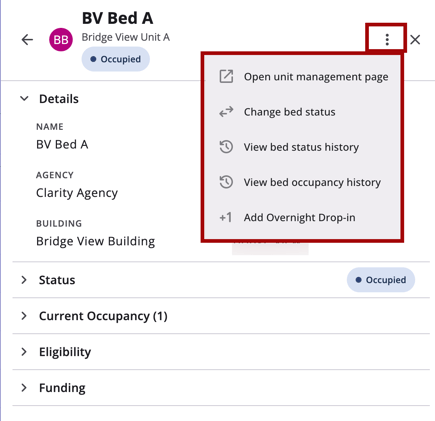
The options you see depend upon your access rights.
Changing a Unit or Bed Status
You can change a unit's or bed's status from the Unit Card, including to Inactive and back to Active. The Availability filter on the Inventory list has Also show: Inactive. Use it to find an Inactive unit and make it Active from its Unit Card.
Changing a Status
- Open the Unit Card and expand the Status section. You can also select Change Unit Status from the Action Menu (three dot) icon.
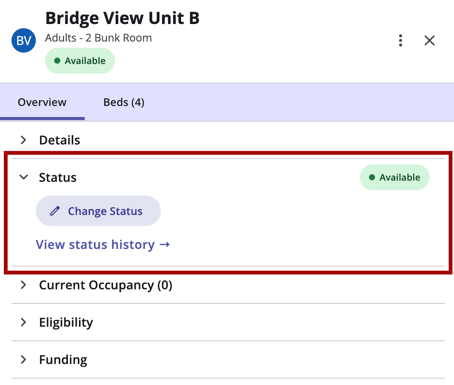
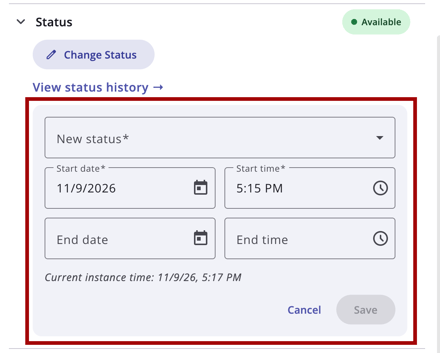
- Select Change Status. A form opens below.
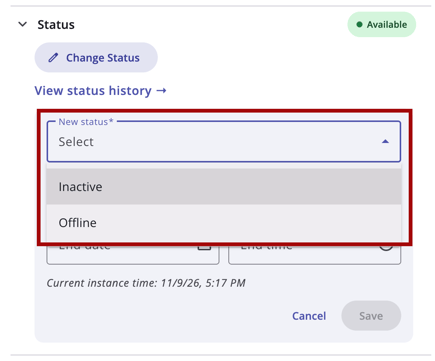
- In New status, select Inactive, Offline, or Active. The list doesn't include the unit's current status.
- Complete the fields for that status.
- Select Save.
The fields work as follows:
- Start date and Start time default to the current instance time, rounded down to 15 minutes. The form also shows Current instance time.
- End date and End time are optional. Active has a start date and time only. You can type a date, or use the date picker.
- The time picker has columns for the hour, the minutes in 5-minute steps, and AM or PM. You can type a time instead.
- Offline adds a required Offline reason and an optional Offline description. The reason starts at Select, and you can't save until you choose one. Other is the only default reason. System Administrators add more in SETUP > FIELD EDITOR, in the offline_reason field.
- Active ends the current Inactive or Offline period.
Notes:
- A bed can be Offline or Active, but not Inactive.
- While a unit is Inactive or Offline, Change Status is disabled for its beds. The page reads "Bed status is set by the unit. To change it, update the unit status (currently Offline)."
- When a unit is Occupied, you can't change its status.
Messages and Blocks
|
Situation |
What Happens |
|
The end is before the start |
"End date cannot be before start date." |
|
The unit is Inactive or Offline |
A note reads "Adding an end date closes this status period." |
|
The current period has no end date |
A message reads "The current Offline status has no end date. Saving will end the Offline status when the Active status begins on [date] at [time]." |
|
The current period is scheduled to end later |
A message asks you to confirm. When you add Active, it reads "The current [Inactive] status was set to end on [10/30/2026]. Saving will end it earlier, on [10/29/2026] at [1:16 PM], when the Active status begins." When you add another status, it reads "The current Offline status was set to end on 10/30/2026. Adding this Inactive status will end it on 10/29/2026 at 01:16 PM instead." |
|
The unit is Occupied |
Change Status is disabled. The page reads "This unit has an active occupant — end the occupancy before changing status." |
|
The unit has a pending occupancy |
A Pending Occupancy Conflict message appears: "This unit has a pending occupancy — a client is scheduled to move in. Cancel or resolve that pending occupancy before changing this unit's status." Select View occupancy details → to review it. Save stays disabled. |
Status History
Select View status history → to see the unit's status periods and occupancies, newest first.
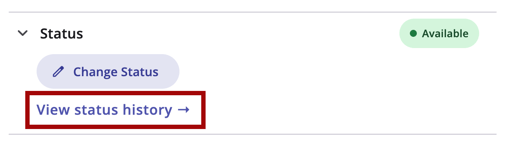
Each row has a colored dot, a status name, an offline reason, and a date range. The date range ends in "Today" while the period is open.
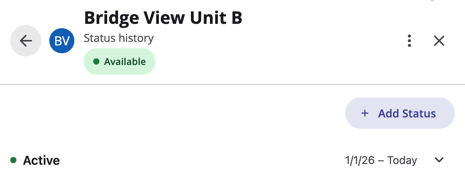
- Expand a row to see Start date, End date, Offline reason, and Offline Notes.
- Select the Edit (pencil) icon to change an Inactive or Offline period. Its tooltip reads "Edit this status period." The same form opens inline. Active periods can't be edited.
- Select + Add Status to add a period. It is disabled for an occupied unit.
- You can't delete a period from the Unit Card. Use the Unit Status page in Inventory (Site) settings.
For automatic Offline statuses, see Automatic Offline Status.
Adding an Overnight Drop-In
If a unit accepts overnight drop-ins, you can add one from the Unit Card without closing it. Individual beds also have the option in their Action Menu.
- Select the Action Menu (three dot) icon on the unit or bed page.
- Select Add Overnight Drop-In. The workflow opens in the side panel.
- Complete each step in the panel.
The steps and fields are the same as when you start from the unit list. See [Inventory Dashboard ]. To end a drop-in and view occupancy records, see Overnight Unit/Bed Drop-Ins.
Adding a Status in Inventory Settings
The Unit Status and Bed Status pages in the Inventory (Site) settings now have an Add New Status button.
- Unit Status: Go to Manage > Sites > Housing Inventory > [site name] > Buildings & Units > [building name] > Units > [unit name] > Unit Status. The button was labeled Add New Status. Active is now an option. The list doesn't offer the unit's current status.
- Bed Status: Go to Manage > Sites > Housing Inventory > [site name] > Buildings & Units > [building name] > Units > [unit name] > Bed List > [bed name] > Bed Status. A bed offers Offline and Active.
- The beds of an Inactive or Offline unit don't have Add New Status, and their statuses can't be changed.
- A new status that starts inside a scheduled Inactive or Offline period ends that period after you confirm. This works the same on the Unit Card. The beds' copies of a unit period end with it.
- Deleting a status period stays on the Unit Status page.
Additional Resources
- Inventory Dashboard (current interface)
- Unit/Bed Status
- Unit Occupancy History
- Adding INVENTORY Photos
- Overnight Unit/Bed Drop-Ins
- Automatic Offline Status
- Rights Glossary for Access Roles
- Inventory Dashboard
Published: 11/10/2026