
This feature is part of the December 2026 Feature Updates. The functionality described in the article will be available on training sites on November 17, 2026, and on production sites on December 1, 2026.
For the current interface article, see INVENTORY Dashboard.
Table of Contents
Overview
The Inventory dashboard shows your housing inventory as a list and on a map. Use it to find units, check availability, edit unit custom fields in bulk, and add overnight drop-ins. When you select a unit, its Unit Card opens. Refer to Inventory Unit Cards for more information.
The dashboard works on desktop and mobile. On mobile, the layout adjusts to fit smaller screens.
Access and Location
Select Inventory in the primary navigation menu.
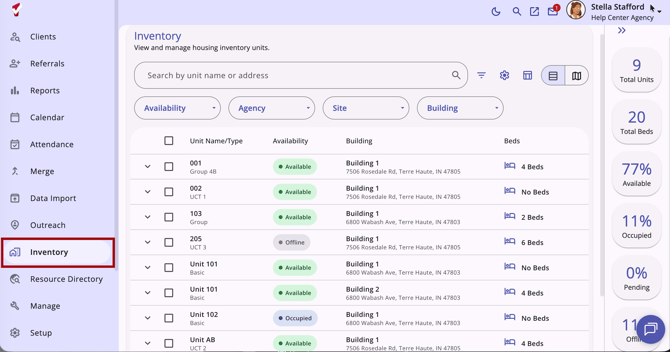
The units you see depend on your Inventory access settings. At a minimum, your Access Role must have the Inventory access right enabled. For full details on access rights and settings that control this page, see Configuring the Inventory Dashboard and Rights Glossary for Access Roles.
Bulk editing and overnight drop-ins require additional access rights. Refer to Bulk Editing Units and Adding an Overnight Drop-In.
Unit List
The Inventory default view is the unit list, which opens as a table, with the map view hidden. The unit list is sorted by unit name and shows 25 units per page by default. Items per page offers 5, 10, 25, and 50.
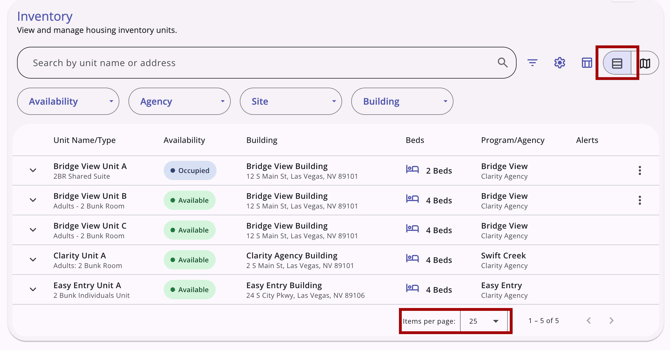
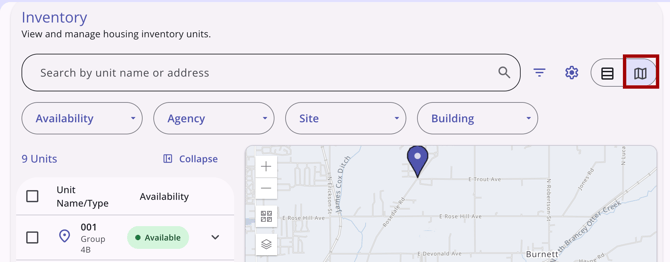
To open the map view, click the Map icon on the right side of the workspace. Jump to the Map View section to learn more.
Columns
The default columns are:
- Unit Name/Type: The unit name, with its Unit Configuration Type below.
- Availability: Available, Occupied, Offline, or Pending Occupancy.
- Building: The building name, with its address below.
- Unit start date
- Program/Agency: The program, with the agency below.
- Beds: "1 Bed," "4 Beds," or "No Beds."
- Alerts: The Public Alerts icon. See Public Alerts.
As with other tables, you can change the columns to fit your preference. Use the column selector to choose which columns are visible. Refer to the Client Record Overview for more details on column selectors.
Select a unit to open its Unit Card.
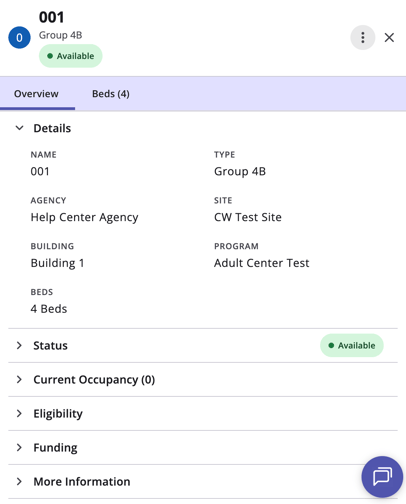
Refer to Inventory Unit Cards for more information.
Public Alerts
When a unit is occupied or has a pending occupancy, and the client has an active Public Alert, an Alert icon appears on the unit's row.
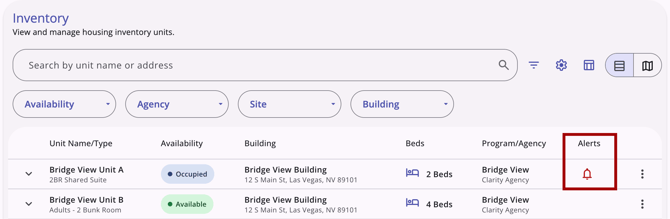
Point at the Alert icon to see the alert details.
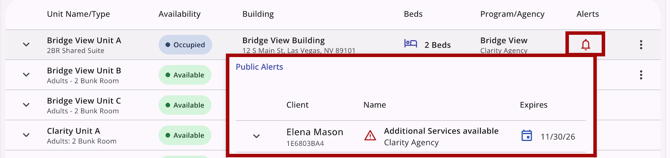
Notes:
- You see the alert in Inventory only if you can see it in the client record.
- If you aren't allowed to see the client's profile, the alert shows "Undisclosed Client."
Search and Filters
Use the search bar and filters to narrow your search for units.
Searching
Type in Search by unit name or address to find units by name or by address. Search works together with the filters.
If no units match, the table reads "No results match your search." and "Try adjusting your search terms or filters." Select Clear search and filters to remove the search text and every filter.
Quick Filters
Four quick filters sit under the search bar: Availability, Agency, Site, and Building.
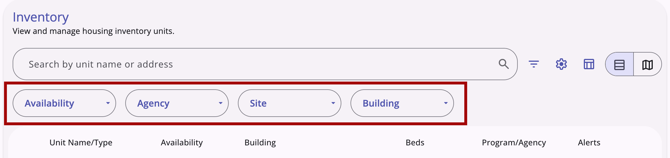
- Each is a multi-select list with its own search box.
- A number badge shows how many values you selected.
- Each applied filter appears in the search bar as a chip, such as "Availability : Available, Occupied." Select the Close (X) icon on a chip to remove that filter.
- The Availability list has an Also show section. Select Inactive to add Inactive units to the list.
The filter lists show only active sites, buildings, Unit Configuration Types, and programs.
Add a Filter
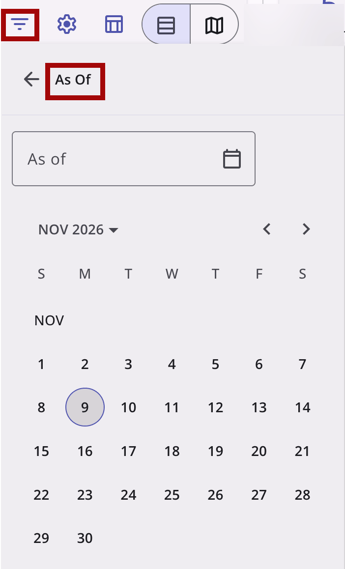
Select Add a filter to open the list of available filters, including inventory custom fields. Each filter opens a second view with a back arrow, the filter's title, a search box, and a list of options.
- Standard Filters: As Of, Configuration, Funding, Program, Program Type, and CoC (Continuum of Care).
- Custom Filters: The custom Housing Inventory fields that your System Administrator has enabled. See Inventory Screens and Introduction to Fields for more information on Housing Inventory Custom fields.
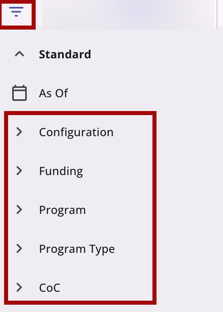
The availability shown in the list, the summary cards, and the map is always the current availability. The exception is the As Of filter. As Of lets you filter by a specific date. It shows availability as of the date you choose. For example, if a unit is occupied until November 6, choosing an As Of date after that shows the unit as Available.
Additional Inventory Settings
Select the Settings (gear) icon to turn the following options on or off.
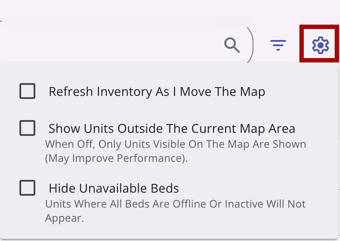
All three are off by default, and your saved choices carry over.
|
Option |
What It Does |
|
Refresh Inventory As I Move The Map |
Updates the list and cards as you move the map. |
|
Show Units Outside The Current Map Area |
"When Off, Only Units Visible On The Map Are Shown (May Improve Performance)." |
|
Hide Unavailable Beds |
"Units Where All Beds Are Offline Or Inactive Will Not Appear." |
Summary Cards
The summary cards sit in a panel on the right, on both the unit list and the map. They show Total Units, Total Beds, and the share of units that are Available, Occupied, Pending, and Offline.
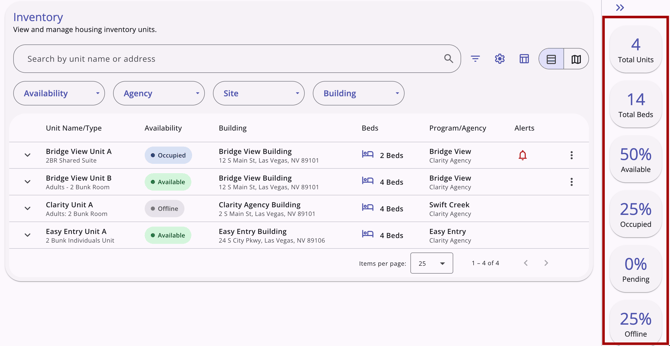
- The cards count every unit that matches your search and filters, across all pages of the list. They recalculate when either changes.
- Percentages are shares of Total Units.
- Inactive units aren't included in the calculations, so when you show them, the four percentages add up to less than 100%.
- Select the double arrow (») icon to hide or show the panel.
On mobile, the summary cards appear below the table.
Map View
Select the Map icon to switch to the map view. The search, filters, and chips stay in place. The list narrows to Unit Name/Type and Availability, and shows the unit count, such as "8 Units." An expanded row shows the unit's details in a compact two-column layout.
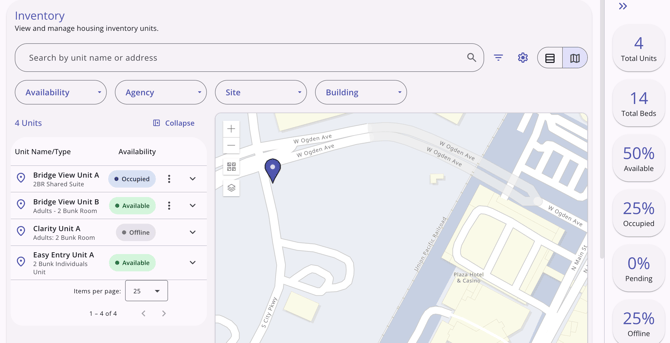
- Point at a row in the list to highlight that unit's marker in the color of its status. A tooltip names the unit and the building.
- Select the Collapse icon to hide the list. Select the double arrow (») icon to hide the cards. The map takes the freed space.
- When several units share one address, they share one marker. Point at the marker to see the building name and how many of its units are available.
- Select the marker to open a list titled "[n] units • [n] available." Each row shows a status dot, the unit name, and the Unit Configuration Type with the status. Select a unit to open its Unit Card.
Bulk Editing Units
Select units in the Inventory list to edit their custom fields together. This works in the list and the map view.
- Select the checkbox beside each unit. The checkbox in the header row selects every unit on the page. Your selections stay when you change the filters or move between pages.
- In the bar above the table, select Edit Selected Unit(s). The bar also shows [n] selected, Select all, and Clear selection.
- In the Edit Unit(s) panel, select the checkbox for each custom field you want to change. Each field starts unselected. Once selected, it shows the current value.
- Enter the new values and select Save. A confirmation message asks you to confirm the number of units to update.
Only custom fields can be updated here.
When you save:
- You can save up to 200 units at once. Above that, you see "At most 200 units can be updated at once."
- If one unit fails, none change. You see "A selected unit could not be saved, so none were changed."
Notes:
- Data Quality Checks don't apply to fields edited from the dashboard.
- A field that is read-only, or calculated, doesn't appear in the panel.
- If no fields are available to edit, the panel reads "Nothing to edit. Unit details will be displayed here when they are available for editing."
Adding an Overnight Drop-In
Units with drop-ins turned on have an Action Menu (three dot) icon at the end of their row. It appears in the unit list view and the map view.

- Select the Action Menu (three dot) icon on the unit's row.
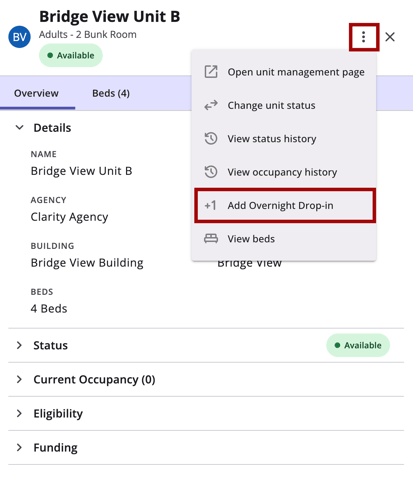
- Select Add Overnight Drop-In. A side panel opens.
- Complete each step in the panel.
The panel has these steps:
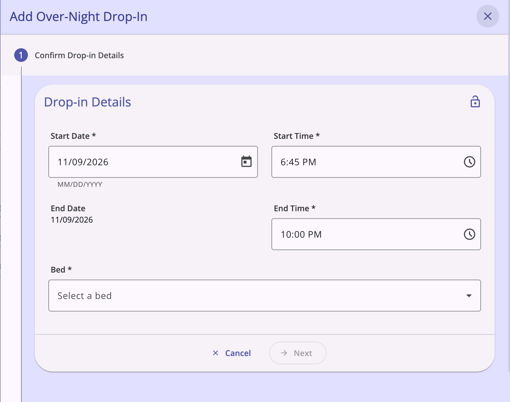
- Confirm Drop-in Details: Type a date in Start Date, or select the calendar. Type a time in Start Time and End Time, or select the clock icon. When the unit has individual beds, Bed lists them. Clarity fills in the End Date: the same day if the stay starts before the unit's drop-in end time, and the next morning otherwise. Next becomes available after you select a bed.
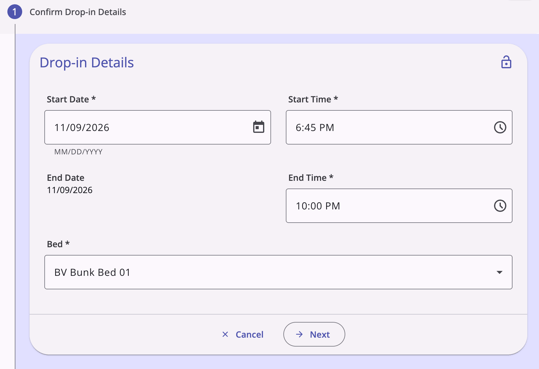
Note: Select the Privacy (lock) icon on Step 1 to make the drop-in private. A modal asks you to confirm: "This drop-in will be marked private and will only be visible to users at the current agency. Please confirm to continue."
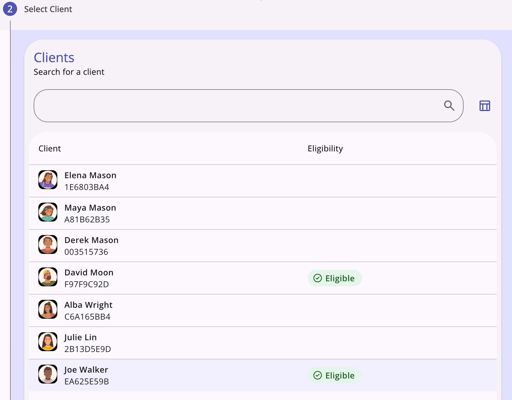
- Select Client: Search for a client or pick from your recent clients. Selecting a client shows whether the client is Eligible for the unit.
- An enrollment step, if the unit requires a program enrollment.
- Completed.
Two staff members can't book the same bed for the same night, so Clarity checks the bed's availability again when you save. If you close the panel with unsaved data, an Unsaved Changes message asks you to select Continue Editing or Discard Changes.
You can also add a drop-in from the unit card.
To end a drop-in and view occupancy records, see Overnight Unit/Bed Drop-Ins.
Additional Resources
- Inventory Dashboard (current interface)
- Configuring the INVENTORY Dashboard
- INVENTORY Screens
- Overnight Unit/Bed Drop-Ins
- Unit/Bed Status
- Rights Glossary for Access Roles
- Inventory Unit Cards
Published: 11/10/2026