Table of Contents
- Custom Schemas
- Uploading a File
- File Validation
- Mapping Source Records
- Importing the File(s)
- Viewing the Import Results
- "99" in CSV and XML Files
- Navigation
Overview
The Data Import Tool (DIT) allows users to import data to Clarity Human Services. To access the Data Import Tool (DIT), your user account must be assigned an Access Role with the Data Import access right enabled.

Accessing the Data Import Tool
To access the DIT to import data, click the Launchpad and click DATA IMPORT.

Importing Data with the DIT
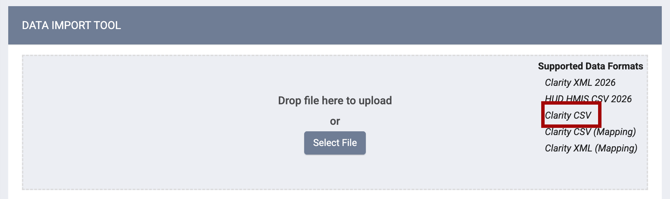
The Data Import Tool (DIT) accepts data in HUD HMIS CSV, Clarity CSV, or Clarity XML format.
File Format
For HUD HMIS CSV file specifications, see the Format Specifications.
For XML files, the Clarity XML Schema is used for files that do not contain custom fields.
Note: Files should be imported from the agency in which they were created.
Clarity CSV
The Clarity CSV provides a CSV-based equivalent to Clarity XML with Clarity-specific data extensions. The release of the Clarity CSV will help you prepare for the sunset of Clarity XML (planned for FY27 / October 2026), driven by HUD's retirement of the HMIS XML Schema for FY26. Clarity XML will continue to be accepted during the transition period.
The DIT accepts Clarity CSV uploads, in addition to the existing Clarity XML and FY26 HMIS CSV uploads. The Clarity CSV is submitted as a separate zip file from the standard FY26 HMIS CSV (the two formats are not combined in a single zip). The standard FY26 HMIS CSV files continue to be submitted as separate zip files. Existing Clarity XML imports are unchanged.
Existing mapping screens work with Clarity CSV and source-to-target mappings, configured via the DIT UI, RESTful DIT API, or Clarity and HMIS Bulk Format Import Tool, apply to Clarity CSV data in the same way they do to Clarity XML data.
Note: A valid Clarity CSV mapping zipfile contains all of the following mapping files, minimally with a header row for each file:
- Export.csv
- Program.csv
- ServiceItem.csv
- Assessment.csv
- Event.csv
- EventLocation.csv
Refer to Clarity CSV Mapping File Example for an example mapping .zip file for the Clarity CSV.
A minimal Clarity CSV file set is:
- ClarityExport.csv (this will not import data, as ClarityExport contains only metadata)
A maximal Clarity CSV file set consists of all of (1 of each):
- ClarityExport.csv
- ClarityClient.csv
- ClarityEnrollment.csv
- ClarityClientAssessment.csv
- ClarityClientService.csv
- ClarityServiceExpense.csv
- ClarityServiceAttendance.csv
The following sample files are available in our Data Import Tool (DIT) Sample Files article:
- Clarity CSV Mapping File Example: Example mapping .zip file for the Clarity CSV.
- Clarity CSV File Set: Example of a Clarity CSV file set.
Minimal Set of HMIS CSV Files Within a Zip File for DIT Import
The following CSV files are required to import client records (and no other data) using the DIT:
-
Client.csv: include the client record(s), as usual, in this file.
-
Enrollment.csv, Exit.csv, and Project.csv: these files must exist at a minimum with the header row, but record data is optional. If enrollment records are also sent, then there is a caveat:
-
If there are records within Enrollment.csv, then the Project.csv file has to have corresponding project records for each project that the enrollment records reference so that the DIT can map the enrollments to Clarity projects.
-
-
Export.csv: include the standard Export.csv record in this file.
A sample file ("Minimal HMIS CSV File (one enrollment record)") is available in our Data Import Tool (DIT) Sample Files article.
Maximal Set of HMIS CSV Files Within a Zip File For DIT Import
The DIT imports everything in the current FY24 HMIS CSV Spec (currently at v1.4 at the time this was published), except the following files, which are completely ignored if transmitted:
-
AssessmentResults.csv
-
CEParticipation.csv
-
EnrollmentCoC.csv
-
Funder.csv
-
HMISParticipation.csv
-
Inventory.csv
-
Organization.csv
-
User.csv
-
CustomClientGender.csv
-
CustomEnrollmentSexualOrientation.csv
Minimal Set of Data Elements Within a Clarity XML File
Clarity XML (which extends HMIS XML) generally has more stringent DIT validation than HMIS CSV (except that CSV currently has stronger date validation). Clarity XML won't validate unless it also contains these top-level elements, with any required sub-elements with the IDs referenced elsewhere in the XML. These are:
-
Organization
-
Project
-
User
A sample file ("Clarity XML Single Client") is available in our Data Import Tool (DIT) Sample Files article.
Maximal Set of Data Elements Within a Clarity XML File
For the subset of FY24 HMIS Data Standard elements in Clarity XML, data element processing in the DIT is the same as for HMIS CSV. That is, maximal for Clarity XML contains everything in the current FY24 HMIS XML Spec, except that the following data elements are not imported if transmitted:
-
AssessmentResults
-
CEParticipation
-
EnrollmentCoC
-
Funder
-
HMISParticipation
-
Inventory
-
Organization
-
User
Existing mapping screens work with Clarity CSV and source-to-target mappings, configured via the DIT UI, RESTful DIT API, or Clarity and HMIS Bulk Format Import Tool, apply to Clarity CSV data in the same way they do to Clarity XML data.
Custom Schemas
Clarity CSV and Clarity XML can be customized in the Schema Management section.


Then you can view or edit a data section within each format.

After clicking edit for a data section, you can view, add, or delete custom fields.

Refer to the Schema Management section of this article for more information.
Clarity XML’s “Add all fields” Feature
After clicking the Edit icon for a specific data section for Clarity XML, in addition to viewing, adding, or deleting custom fields, users can also Add all fields.
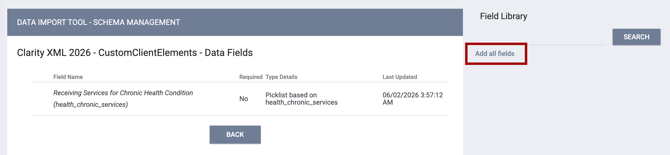
Clicking Add all fields for the CustomClientElements data field adds all client-related fields that are not included in the Clarity XML schema.
Clicking Add all fields for the CustomClientEnrollmentElements data field adds all client enrollment-related fields that are not included in the Clarity XML schema.
Notes:
- The Add all fields functionality only works with Clarity XML.
- Use caution with this setting if you have a large number of custom fields.
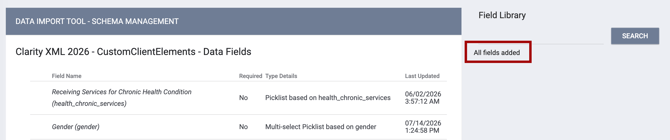
Once the system completes processing and all fields are added, you will see all custom fields in the list and the clickable Add all fields feature will be replaced with an All fields added message.
You can hover to the left of the field to expose then use the Delete (trash can) icon next to individual fields to remove any of the custom fields you just added.

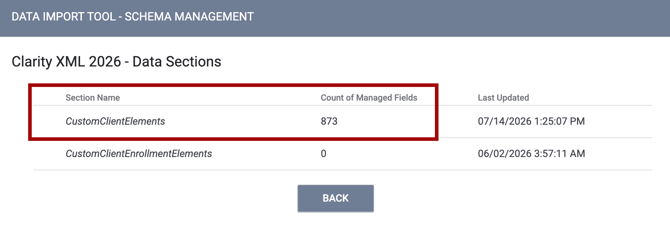
Use the BACK button to return to the Clarity XML Data Sections page.
The Count of Managed Fields column will be updated for that data section.
Once you have managed custom fields for each data section as needed, return to Schema Management and click Publish Schema for Clarity XML.
This will generate the Clarity XML schema.
Uploading a File
Once a file has been added to the DIT queue, the file name and file size will be displayed. Click START UPLOAD to begin the upload process or click CANCEL to remove the file from the queue.

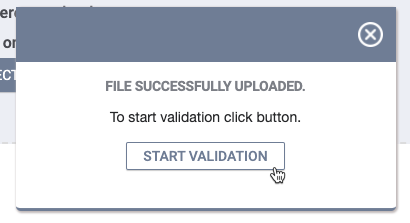
File Validation
Once the file is uploaded from the queue, the next step is validation. During this step, the system ensures the file(s) adhere to data formatting specifications. To begin the validation process, click START VALIDATION.
Once validation is complete, the page displays information about the file(s) and a section to map Program, Service, Coordinated Entry Event, and Assessment data.
Data Analysis
The Data Analysis section displays the total count for each record type in the file(s). Unduplicated Programs, Services, and Assessments appear below.

DIT Validations and Warnings
DIT's validation and warning functionality has been updated so that most validation issues no longer block imports; instead, they are logged as warnings or rejected records. Errors with the file structure do cause validation to stop immediately, and validation will not complete until errors are fixed.
The DIT import validation checks HMIS CSV, Clarity CSV, and Clarity XML for:
- Validation-blocking data structure errors (STRUCTURE_ERROR): import blocking issues such as missed files, wrong file headers, broken archive, etc.
- Data quality issues (WARNING_IMPORT): imported with a logged warning. These include minor data issues, e.g., there are more than 32 characters in CurrentLivingSitID.
- Non-import blocking errors (WARNING_REJECT): issues that prevent the import of a particular record, and that can be ignored (e.g., empty EnrollmentID in IncomeBenefits.csv) are logged, and the record is discarded from import.
- Import-blocking errors (ERROR): problems in the data that prevent import, such as non-unique IDs in files, are logged, and the import is blocked until the issue is resolved. Validation continues, unlike with data structure errors.
Validation Results
All DIT CSV validation results that the user receives are standardized and grouped by Code. Each validation code comprises a unique validation message template.
Specific validation changes
- NULL validator was extracted from string/picklist validators.
- InformationDate validations have been implemented, which result in a WARNING_REJECT code, and the associated record will not be imported.:
-
- if DataCollectionStage = 1, the InformationDate matches the EntryDate of the associated enrollment
- if DataCollectionStage = 3, the InformationDate should match the Exit date
- if DataCollectionStage = 2 or 5, the InformationDate should be between the Entry and Exit date
Note: These result in a warning_reject_particular_record , and the associated record will not be imported.
- Overall validation times can be longer than previously, depending on file size, but the whole file is checked at once. There is no limit to the number of errors, and logs are paginated.
- The Validation warnings are also visible at Import File Details after import.

Note: All DIT CSV validation results receive a standardized validation code. All possible validation codes are listed in a Validation Catalog spreadsheet available to DIT customers. This catalog can assist customers in pre-validating CSV files before attempting to upload them to the DIT. For access to the Validation Catalog, please reach out to the Bitfocus Support Team.
Mapping Source Records
The DIT allows users to map source records from the imported file(s) to existing destination records within Clarity Human Services. Establishing mapping relationships is key to ensuring data quality. You can filter results on the source Organization or Program, if applicable. The available mapping options depend on your agency (or the agency you're switched into).
For each data type, choose the Clarity Human Services Program, Service, Coordinated Entry (CE) Event, or Assessment to map the data to.
Note: If Programs, Services, Coordinated Entry (CE) Events, and Assessments are not mapped here, the associated records will not be included in the import.
Programs
Programs can be imported with the DIT within the Program Mapping interface.
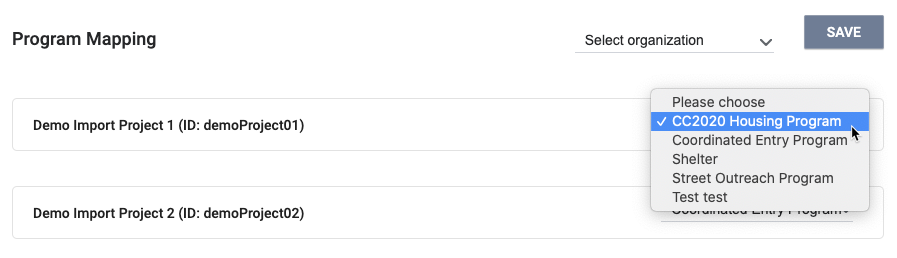
Click the SAVE for each section once you've associated the source data with a Clarity Human Services record.
Note: System Administrators can update private client records through the DIT. However, if a System Administrator does not have Edit access permission enabled, private client records will not be updated using the DIT.
Services
Services can be imported with the DIT within the Service Mapping interface.

Coordinated Entry (CE) Events
Coordinated Entry Events can be imported with the DIT within the Program Event Mapping interface.

The program mapping for the imported event(s) should be selected first. After program mapping, select the Coordinated Entry Event within the applicable program where program_event_category will be imported.
A few caveats to note before importing and mapping the file(s) are listed below.
- Manual CE Event imports are supported.
- CE Events must be set up at the program level prior to mapping/importing data with the DIT for the mapping options to display as intended.
- Imported data will appear as event transactions as opposed to services within Clarity Human Services.
Mapping for LocationCrisisOrPHHousing Values (DIT)
Data Import Tool (DIT) users can successfully import HMIS Data Element 4.20.C “LocationCrisisOrPHHousing” values with CSV, XML, and DIT API. This feature allows DIT users to map from their source system's "referred to" program name to a program in the customer's Clarity instance. Previously, the imported values were set to the value of “other_99.” This resulted in gaps in the client record or Clarity's audit logs, as no events were imported.
Users can upload HMIS Events containing HMIS Data Element 4.20.C “LocationCrisisOrPHHousing,” and can then map which existing Clarity Program that the imported 4.20.C “LocationCrisisOrPHHousing” string corresponds to.
To successfully import these values, the Project Receives CE Referrals setting must be set to Yes in Program Setup to successfully show a mapped Program value in the “Location of Crisis Housing or Permanent Housing Referral” in Event History.

If Project Receives CE Referrals in Program Setup is set to No, the Program name will not appear in the Event history, even when data is imported successfully. Instead, the selection will show as blank or Select.

Assessments
The CSV specifications and XML schema define the structure of assessment records, and this section provides more detail on the specific requirements for importing this data through the DIT.

Data Structure
The HMIS data model separates the assessment record into three parts:
- Assessment
- AssessmentQuestions
- AssessmentResults
There are important notes to consider for the questions and results, detailed below.
AssessmentQuestions
Each AssessmentQuestions record must have values for AssessmentQuestion and AssessmentAnswer. The AssessmentQuestion value should be the Field Data Name from Setup > Field Editor in Clarity Human Services. The value for AssessmentAnswer depends on the type of question. If it is a picklist or checkbox question, the value for AssessmentAnswer should be the numeric code for the picklist value.
AssessmentResults
The AssessmentResults section does allow the HUD data set to include scores for the assessment records, but Clarity Human Services already calculates scores based on the processors that are set up and the questions and answers in the assessment record. The data in the AssessmentResults may be different than the score that would be calculated in Clarity Human Services if the processor is set up differently than the source system. Because of this, the DIT will import the AssessmentQuestions records and rely on the processors set up to calculate the score for the imported assessments. The AssessmentResults values will not be processed or imported.
Choosing the Assessment
While the specifications do allow for the inclusion of assessment records for clients, there is currently not a field available in the specifications to indicate the type of assessment the record is associated with; however, that information is needed in order to know the type of assessment to create for each record, which processors to use for scoring, etc.
An Assessment Mapping section has been added to the DIT to allow a user to select the type of assessment to use when processing each record.

Simply select the type of assessment via the dropdown, and then make sure you save the mapping for the file.
Note: The Data Import Tool (DIT) cannot import "stand-alone" assessments.
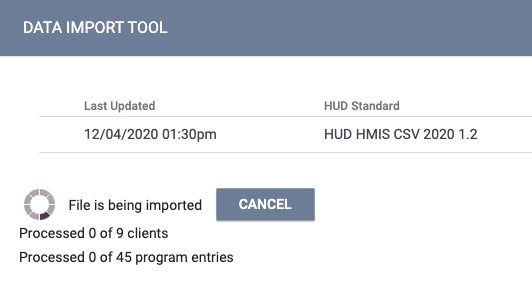
Importing the File(s)
Once the mapping is complete, the data can be imported into Clarity Human Services. Click IMPORT to start the import.

The number of processed records is displayed during the import. Click CANCEL to stop the import at any time.
When the import completes, the import will display as Imported.

Viewing the Import Results
Click SHOW RESULTS at the bottom of the page to see how the data was imported into Clarity Human Services.
The Message column informs you how the DIT handled each record. If an error occurs, details on the error will be displayed, allowing you to resolve the error on a subsequent import attempt.

"99" Value in HMIS Data Elements
When the HMIS Data Dictionary allows the value “99” (Data not collected) as an option for a data element, incoming values of “99” are stored and will not be converted to “null” upon import.
These data elements will be stored as “99”:
- Clients.csv: NameDataQuality, SSNDataQuality, DOBDataQuality
- CurrentLivingSituation.csv: CurrentLivingSituation
- Exit.csv: Destination
A full list of the current FY24 HMIS (as of February 24, 2025) data elements that allow a ‘99’ value in the HMIS Data Dictionary and that this will apply to in Clarity Human Services can be found in this article.
Note: A value of 99 (“Data not collected”) for the following field in a CSV file will be imported as NULL (empty):
- RelationshipToHoh
The following message will be displayed on the Results page: “Fields with 99 value were imported as null <field name>.”
Navigation
You can access the different sections of the Data Import Tool under Navigation.

Home
Files are imported to Clarity Human Services from the Home page.

Rejected Clients Log
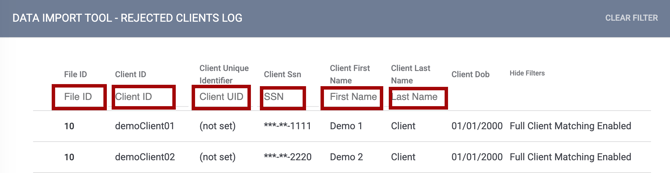
The Rejected Client Log page displays information about client records that were rejected in previous imports.
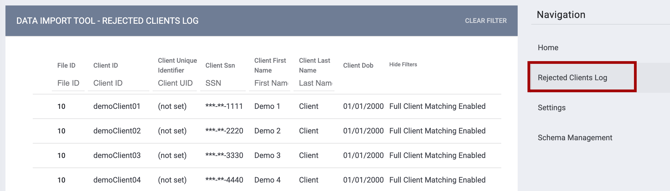
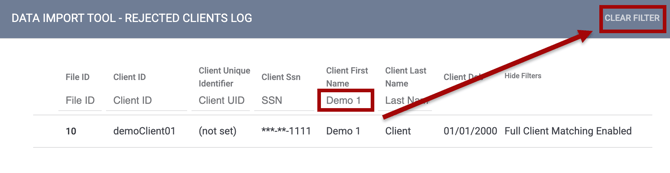
You can filter the list of client records by field.
You can then clear the filter, if needed, by clicking CLEAR FILTER.
You can also click Hide Filters to hide the filters. Then click Show Filters to show them again.

Settings
The Settings page includes the following DIT configuration options: Client Matching, Validation Errors Limit, and Ignore Auxiliary Date DateUpdated.

Client Matching
The Client Matching setting determines if and how the system merges imported client records with existing records in Clarity Human Services. Client matching looks at the following fields in the client record: First Name, Last Name, Date of Birth, and Social Security Number. The Client Matching options are:
- Regular Matching - the system matches imported client records with existing records in the Clarity Human Services. If the system identifies a partial match based on First Name, Last Name, Date of Birth, and Social Security Number, it updates the existing client record with the client data from the imported file. If a match is not made, a new client record will be created with the file's information.
- Full Matching - the system matches imported client records with existing records in the Clarity Human Services. An exact match of First Name, Last Name, Date of Birth, and Social Security Number is required to import client data. If a match is not made, a new client record will not be created with the file's information.
- No Matching - this strategy checks if there is a TargetClientID. If there is a match, the record is updated to the existing matched target Client record. If a TargetClientID is not found, the algorithm stops there and adds a new record, even if a record for the client already exists. This option is typically used when adding client records into a new instance.
- TargetClientID Match Only - this client-matching strategy is available for Clarity CSV. With this match strategy, when a TargetClientID (the 9-character Clarity Unique ID) is present in a Clarity CSV record file, it automatically updates that existing target Client Unique ID if present in the receiving Clarity Human Services system.
For a more detailed explanation of the matching options, see Understanding Client Matching Using the Data Import Tool (DIT).
Validation Errors Limit
This configuration sets a limit on the number of validation errors the system reports during an import. If you're importing a large file, data validation can take an extended amount of time. Typically, when validation errors occur, they are caused by a small number of distinct errors; however, the errors can be repeated several hundred times.
When a limit is set, the validation process stops when the configured number of errors is met, allowing you to resolve those issues throughout the file without waiting for the entire dataset to be validated.
Ignore Auxiliary Date
An Ignore Auxiliary Date DateUpdated toggle is available and is disabled by default. If this toggle is enabled:
- “DateUpdated” will be ignored in auxiliary files such as IncomeBenefits and ExitHousingAssessment to avoid the possibility of those uploaded records being rejected.
- The parent file’s metadata (Enrollment or Exit) will only be checked for being more recent than what is already in Clarity, and all the auxiliary files will be imported or rejected depending on whether the parent file's metadata is more recent than the parent type data that already exists in Clarity. For example, if a parent Enrollment.csv file's DateUpdated metadata is newer than the DateUpdated in Clarity for that same enrollment, the data is imported. Otherwise, the data is logged as not imported.
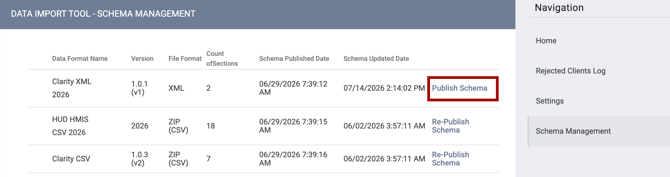
Schema Management
The Schema Management section is a one-stop place to:
- Manage your available Data Formats.
- Review Data Format version and Published/Updated dates.
- Publish or Re-Publish the Schema
- View the Data Format’s Data Sections.
- Edit, view, add, or delete custom fields (Clarity CSV or Clarity XML only).
Managing Data Formats
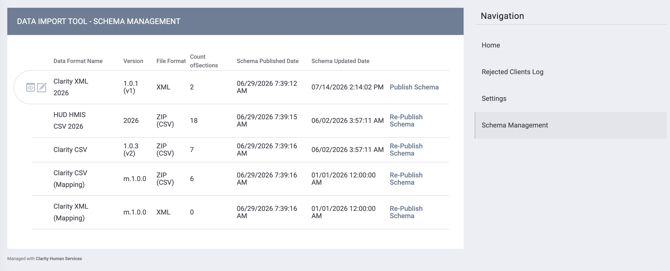
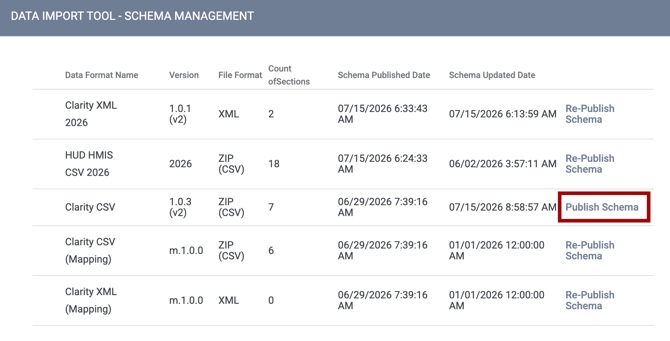
The Schema Management section shows all available Data Formats for the Data Import Tool:
- Clarity XML
- HUD HMIS CSV
- Clarity CSV
The table will show the following columns:
- Data Format Name
- Version
- File Format
- Count of Sections
- Schema Published Date
- Schema Updated Date
There will also be a clickable link to either Publish Schema or Re-Publish Schema.
When you click Publish Schema or Re-Publish Schema, the Version will update.

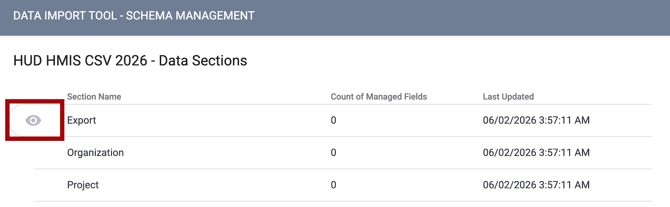
Viewing a Data Format’s Data Sections
Each Data Format will populate a View icon or an Edit icon when you hover to the left of the Data Format.

You can use either icon to open the record and view the Data Sections.
Clarity CSV and Clarity XML formats will have Edit icons available when you hover next to each section to view, add, or delete custom fields. Jump to the Custom Schemas section of this article for more information.
HUD HMIS CSV will only have View icons available.
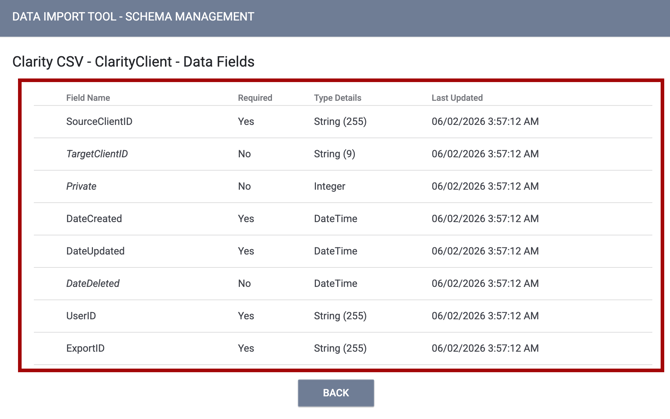
Editing a Data Format’s Data Sections
Clarity CSV and Clarity XML formats will have Edit icons available when you hover next to each section to view, add, or delete custom fields.
To add an individual field to Clarity CSV or Clarity XML, edit the data section, then use the Search feature to find the desired field.
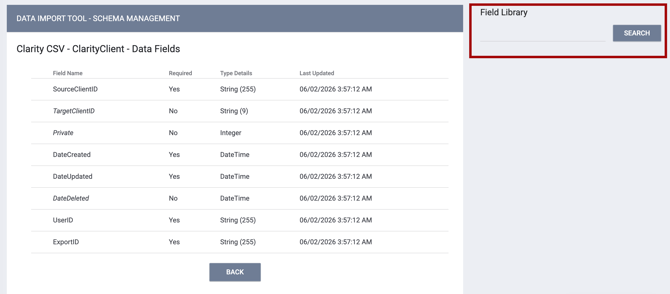
Click Add next to the desired custom field and it will add automatically.

Click the Required icon next to the custom field you have added if you wish it to be a required field for import. Click the icon again if you no longer want it to be required.

Click the Delete icon next the custom field if it was added by mistake or not needed.
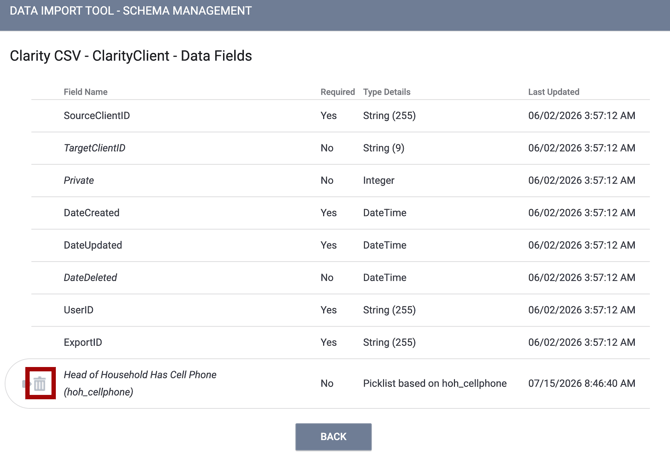
System fields cannot be deleted.
If you add custom fields or delete previously added custom fields, the Count of Managed Fields column will update for that Data Section on the Data Sections page.
 Once you have managed custom fields for each data section as needed, return to the Schema Management page and click Publish Schema.
For information on how to bulk add custom fields for Clarity XML, refer to the Clarity XML Add all fields section of this article.
Updated: 07/15/2026