This article is for the new Clarity interface. Screenshots and descriptions will be updated as features are released. For the current interface article, see How Do I Create a Public Alert?
Table of Contents
Overview
Public Alerts allow users to notify colleagues about important client information by displaying an alert in the client's record.
Note: The ability to view alerts depends on the permissions within the staff member's access role.
Examples of situations in which Public Alerts can be helpful include:
- Locating clients to offer a service or referral ("Please have Jane Doe call our agency for rental assistance")
- Indicating that a housing opportunity is available for a client
- Language access and support by making sure other providers know the client's primary language ("Client speaks Spanish as primary language")
- The client has lost an item, or an item belonging to the client has been found.
Creating and Managing Public Alerts
In the client record navigation menu, click the Alerts tab. On the Public alerts page, users click the Add icon to create a new public alert.

When the user clicks on the Add icon, the Add Alert modal appears on the right side of the screen.

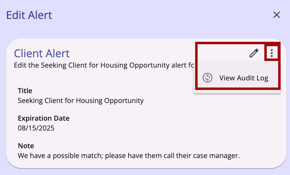
If the user wants to manage an existing Public Alert, they can click the alert to open it, then click the edit pencil.

Depending on the user’s access, they can view, edit, or delete the public alert here.
Column Selector
The Public Alerts page includes a column selector that lets each user customize their view.

Clicking the column selector shows the user the currently selected fields, the available fields to choose, and a section to add fields that collapses on the screen. The Alert Name, Alert Initials, and Agency Name cannot be removed.

Clicking a checkbox next to an Available Field will add the field to the Collapsed Fields section. The user can then drag the field to the Visible Fields section to show it on the screen. Users can also drag a Visible Field to the Collapsed Field section. If a field is removed from Visible Fields or Collapsed Fields, it will not be available on the screen or in the column selector the next time the end user accesses the screen.
Note: The end user can use a different browser to see the default view.
Refer to the Client Record Overview article for more details on column selectors.
Public Alerts on the Client Profile
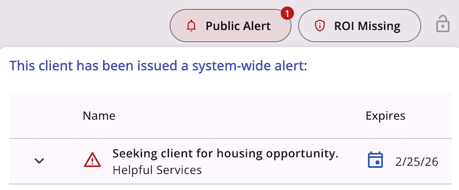
For clients with a public alert, a warning will be visible at the top right of the client record's information bar for users with the appropriate access to view public alerts. There is a count badge to indicate the number of alerts for the client.

When a user with the appropriate permissions to view alerts clicks the Public Alert button, they are taken to the Alerts tab.
If a user hovers over the alert, a list of alerts for the client will be displayed.
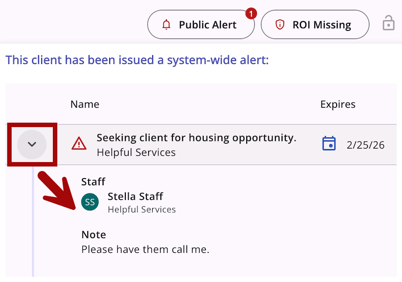
Users can click the drop-down arrow to see additional information about a specific alert.
Audit Log
The "View Audit Log" option can be clicked by a system administrator with audit log access rights on the Edit Alert page. A log of all changes to the client alert is displayed.
Icons & Tooltips
|
Icon |
Icon/Tooltip Name |
Tooltip |
Icon Location |
|
|
Action menu, also known as:
|
"Show more actions" |
All Screens: typically on the far right of a screen or section |
|
|
Add |
“Add” |
All Screens: anywhere the “Add” option occurs |
|
|
Alert/Warning |
(no tooltip) |
Client record Information box: Public Alert pop-up |
|
|
Alerts Tab |
"Alerts" |
Client Navigation Menu: Alerts tab |
|
|
Column Selector |
"Show/hide fields" |
All Screens: typically paired with a search bar |
|
|
Date |
(no tooltip) |
Anywhere a Date appears |
|
|
Delete |
“Delete” |
All Screens: anywhere the “Delete” option occurs |
|
|
Edit |
“Edit” |
All Screens: anywhere the “Edit” option occurs |
|
|
Note | "Note [formatted note text]" |
Alerts tab |
|
Privacy - Private |
Varies depending on screen; example from client profile: “Private Client data is not shared.” |
All Screens within the client record |
|
|
Privacy - Public |
Varies depending on screen; example from client profile: “Public Client data is shared.” |
All Screens within the client record |
|
|
Public Alert | "This client has been issued system-wide alerts: [list of alerts]" |
Client record information box |
|
|
View Audit Log |
(no tooltip) |
Any screen where audit log functionality is available; visibility is dependent on access rights |
Updated: 04/24/2026