Overview
Clarity Human Services offers an access right permission that allows users to record client attendance without accessing the rest of the system. This permission grants access to the Passport tool, which we created for users whose only role is to check clients in to a service.
The Passport tool provides the security of allowing these users to perform this function without seeing any other information in the system and is designed explicitly with congregate shelter environments and associated privacy considerations in mind.
Configuring Passport
To enable Passport for a user:
- Create an Access Role in which the Attendance Standalone Module access right is the only permission enabled for that role. When the Attendance Standalone Module access right is enabled, all other access rights will become disabled and read-only.

- Assign the Access Role to the user.
Note: Users whose main access role is Attendance Standalone Module are not allowed to have additional agency access, except for System Administrator users.
Accessing Passport
Passport is accessed via the instance’s URL with “/passport” added to the end. For example, the Passport address for an instance with an address of https://sample.clarityhs.com would be https://sample.clarityhs.com/passport.
Clicking the Passport URL takes the user to the standard Clarity Human Services login page.
After logging in, the user will see the ATTENDANCE MANAGEMENT TOOL.
Screen Orientation

- Service: The drop-down menu in the upper right corner lists the agency’s attendance-based services.
- Date: Today’s date is displayed on the screen by default, but a calendar icon is available for selecting a different date.
- Unique Identifier: This is where the client’s Unique Identifier will be auto-populated (if using scan cards) or manually entered.
- History of Submissions/Daily Attendance:
- Clients entered during the current session will be displayed in black lettering.
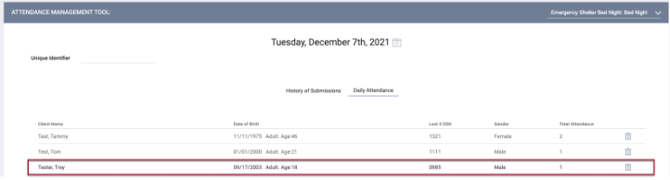
- Clients entered during previous sessions will be displayed in grey lettering.
- The History of Submissions list displays the clients added for the selected service during the current session.
Both the Daily Attendance list and the History of Submissions list are displayed in the order in which they were entered, with the most recent at the bottom.
Recording a Service for a Client
- Select the Service: Click on the drop-down list in the upper right corner of the screen and select the service to record for the client.

Note: The service that appears in this field when you log in is the service that will be recorded for this client unless you make a different selection.
- Select the Date: To record the service for a date other than the date displayed on the screen, click the calendar icon and select the desired date.

- Enter the client’s Unique Identifier:
- Type the number into the field.
OR - Scan the client’s Clarity Human Services Photo ID card.
- Type the number into the field.

Result
After you finish typing/scanning the Unique Identifier, the number will disappear from the Unique Identifier field, and one of the following will happen:
- If the service is successfully recorded:
- You will hear this audio alert.
- The message “processing,” followed by the message “Client <name> is added,” will appear briefly next to the Unique Identifier field, then disappear.
- The Client Name, Date of Birth, Last 4 SSN, Gender, and Total Attendance (the total number of times that service has been recorded for the client) will be added to the Daily Attendance list and the History of Submissions list.

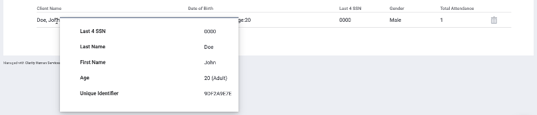
- A pop-up card with the client’s information will appear briefly, then disappear. To view the card again, hover over the client’s name.
- If you attempt to add a “Daily Attendance” service that has already been recorded for that client on that day:
- You will hear this audio alert.
- A message saying “Already exists” will appear briefly, then disappear.
- If you enter a Unique Identifier that does not exist in the system:
- You will hear this audio alert.
- A message saying “Wrong Barcode” will appear briefly, then disappear.
Looking Up Previously Entered Records
To view previously entered records, select the associated service and date, then scroll through the Daily Attendance or History of Submission lists. Remember that the History of Submission list only shows records entered during the current session, which can be very helpful if you are searching for a recently-entered record.
Deleting a Service for a Client
If you realize that you entered a record incorrectly and need to delete it, click the trash can icon for that record.

When the warning appears, click OK.

Updated: 04/03/2026