
Table of Contents
- Unit/Bed Occupancies
- Auto Exit to Permanent Destination
- Automated Removal from the Community Queue
- Audit Log
Video Resources
Click play for a brief overview:
Click through for a hands-on experience:
Getting Started
To exit a client from a program, click on the Programs item on the client navigation menu, click on the program enrollment, and click the Exit within the enrollment.

Exiting a Client
From within the Exit workspace, click the Add (plus) icon. Complete the exit form and then click Save & Next. Click Complete to finish the task.

Notes:
-
If the Head of Household (HoH) leaves the project while other household members remain, you must designate another household member currently participating in the project as the new HoH (retroactively to the beginning of the household's enrollment).
- If a client has no program service activity for a prescribed time period, the client will automatically be exited if Auto Exit Due to Inactivity is enabled for the program.
Signature Fields on the Exit Screen
If a System Administrator has added a core or custom signature field to the exit screen, users can collect a signature on the exit form.
- The field can be signed via a cursor or an electronic signature pad
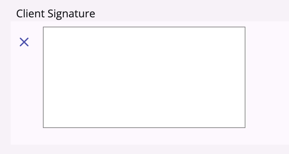
- When the user views the field, there is an empty box for the signature and an X icon visible
- Once a signature is added the Checkmark icon appears and the user can apply the signature by clicking the checkmark icon or reset the signature by clicking the X icon
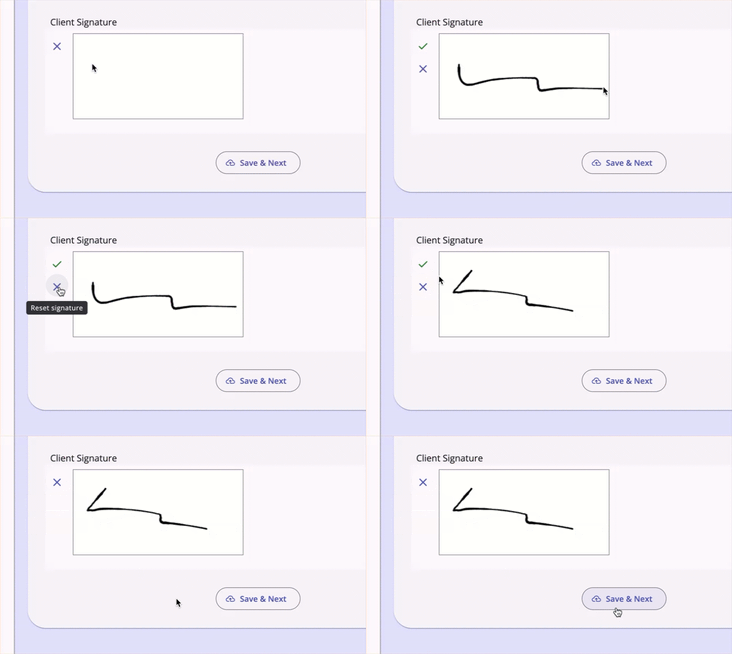
- Tooltips show when the user hovers over the Checkmark icon (Apply signature) and X icon (Reset signature)
- Depending on where the user or client is signing, move to the next field on the screen or click Save & Next to save the screen and move forward in their workflow.
Managing Open Services
Service dates remain within the client's program enrollment timeframe. When exiting a client, users are prompted to review and optionally adjust open and future-dated Services to prevent post-exit overlaps.
Open Services Page in the Exit Modal
If the program has Close Services Upon Exit enabled in the Program Setup, and a user exits a client, an Open Services page appears in the Exit modal when applicable.
- This section appears if there are any Services with an End Date after the Program Exit Date, or any open Services scheduled after the Program Exit Date. Services are listed in descending order by Start Date.
- This section does not appear if no Services extend past the Program Exit Date and no open Services are scheduled after it.
- For group program enrollments, this section appears for each household member with an open Service.
The End All Open Services One Day Prior to the Program Exit Date toggle appears above the list of services on the Open Services page. It is On by default.
- When the toggle is On, open Services are set to end one day prior to the Program Exit Date.
Notes:
Future-dated Services (where both the Start Date and End Date fall after the Program Exit Date) are not affected by this toggle.
Future-Dated Services:
- Appear as read-only in this step.
- Are not impacted by the End all Open Services one day prior to the Program Exit Date toggle.
- Display a red info icon with a tooltip that reads on hover:
- "This future-dated service will be deleted after the client exits the program."
Service List Columns
The columns available for the list of services on the Open Services workspace are:
- Service Name — The service name and program agency.
- Start Date — The original service start date.
- End Date — The original service end date (after the Program Exit Date).
- Populated by default because the End All Open Services One Day Prior to the Program Exit Date toggle is On by default.
- If the End All Open Services One Day Prior to the Program Exit Date toggle is switched Off, dates in this column disappear.
- For future-dated Services, this column remains blank regardless of toggle state.
Completing the Open Services Step
When the End All Open Services One Day Prior to the Program Exit Date toggle stays On, clicking Save & Next completes the Open Services step of the Exit workflow.
When the End All Open Services One Day Prior to the Program Exit Date toggle is Off, clicking Save & Next navigates to a secondary step/form to manually close Services.
- Services with End Dates past the Program Exit Date are listed in read-only format.
- A Date selector appears under each Service to manually set a new End Date.
- Service End Date will show above each Date field
- The calendar is grayed out for dates after the Program Exit Date and before the Service Start Date. Users cannot select grayed-out dates.
- Future-dated Services (where both Start Date and End Datefall after the Program Exit Date) do not appear here and cannot be changed.
- Users can scroll to access all Services if the list exceeds one page.
After setting an updated End Date for all listed Services, clicking Save & Next completes the Open Services step of the Exit form.
If a client is exited from a program with attendance services that extend past the exit date, and a new enrollment in that same program starts before those services end, the system ends the first enrollment’s services on the day before the new enrollment’s services start. Refer to Auto Service Placement and The Attendance Module for details.
Automatic Deletion of Future-Dated Services
Upon program exit, all future-dated Services created by the exited program are automatically deleted.
- A notification appears as soon as the Exit form closes for clients who had future-dated Services added by the program.
- Message: "All future-dated services for this client were automatically removed."
The notification remains on screen until the user clicks Close.
Unsaved Changes Warning
If a user clicks the X in the top-right of the Exit form or clicks outside the Exit form, a warning displays:
"You have unsaved changes that will be lost if you leave this page. Please confirm."
- Cancel: Dismisses the warning and returns to the program Exit form without exiting.
- Confirm: Dismisses the warning and Exit form. No changes made in any step are saved.
Exiting a Client Who Has Aged Into Adulthood
Refer to Adulthood Notifications for details on the banner that appears when you exit a client who turned 18 while enrolled in the program.
Program Restrictions
Users with the appropriate access can add a program restriction for the client or household members during the exit. Refer to Program Restrictions for details.
Exiting a Household
When exiting a household, the option to exit several household members will appear. Click the name of the member(s) you wish to exit. You can select all or just some of the clients to be exited from the enrollment.
Once you click Next, the exit forms for the clients you selected will be displayed in sequence for each household member.

Complete the exit screen and click Save & Next at the bottom of the screen to move to the next client's exit screen record. After you complete all the screens for each household member, click Complete to finish the task.
Unit/Bed Occupancies
Users can review and close open unit/bed Occupancies with default date/time controls tied to the program Exit Date. The system keeps an occupancy that starts on the Program Exit Date and deletes an occupancy that starts after it.
Open Occupancies Step in the Exit Modal
When exiting a client with a current or future occupancy in a Unit or Bed, an Open Occupancies step appears in the Exit workflow.
- The Open Occupancies section appears only if there are current or future occupancies. Occupancies ending before the entered Program Exit Date are not listed. An occupancy that starts on the Program Exit Date appears as a current occupancy.
- For group program enrollments, this section appears for each household member with an open occupancy.
Occupancy List Columns
- Unit/Bed — Unit or Bed name, with Site and Building name beneath (read-only).
- Start Date & Time — When the client began or is scheduled to begin the occupancy (read-only).
- End Date & Time — Two fields: End Date and End Time. For an occupancy that starts on the Program Exit Date, both fields default to the occupancy’s Start Date & Time.
Use Default Exit Date & Time for All Open Occupancies Toggle
This toggle is On by default.
- When the toggle is On, End Date and End Time default to the Program Exit Date minus one day at 12:00 AM for all open occupancies, except an occupancy that starts on the Program Exit Date. That occupancy defaults to its own start date and time.
- When the toggle is Off, the End Date and End Time values are cleared.
- Date — The user can type or select an End Date. The calendar opens on field or calendar icon click. Dates after the Program Exit Date or before the occupancy Start Date are grayed out and not selectable.
- Time — The user can type or select an End Time. A time selector opens on field or clock icon click.
- Valid selections include an End Date equal to the Program Exit Date with an End Time up to 11:45 PM, or any Date before the Program Exit Date.
Night-by-Night Emergency Shelter Programs
For Night-by-Night Emergency Shelter programs, the End Date & Time auto-populates to the Program Exit Date minus one day at 12:00 AM, regardless of toggle state.
Occupancies That Start on the Program Exit Date
An occupancy that starts on the Program Exit Date stays in the client’s record when you save the exit. Clarity Human Services treats the Program Exit Date as a full day, so an occupancy that starts at any time that day is kept.
In the Open Occupancies step, the occupancy appears as a current occupancy. Review its End Date and End Time, then click Save & Next.
- The End Date and End Time default to the occupancy’s start date and time. To end the occupancy later that day, select a later End Time (up to 11:45 PM).
- If you enter an End Date before the occupancy start, a message shows the occupancy’s start date and time. For example: “The End Date cannot be before the Occupancy Start Date (10/08/2026 05:00 PM).”
The table shows what happens for a Program Exit Date.
|
Occupancy |
What Happens When You Save the Exit |
|
Started 10/01/2026 at 9:00 AM, no End Date |
No change. The occupancy ends at the End Date and End Time shown in the Open Occupancies step. |
|
Started 10/05/2026 at 4:45 PM, no End Date entered |
Kept. Ends at its start time (10/05/2026 at 4:45 PM). |
|
Started 10/05/2026 at 5:30 PM, End Time of 6:00 PM entered |
Kept as entered (5:30 PM to 6:00 PM). |
|
Starts 10/06/2026 or later |
Deleted. The stay begins after the exit. |
Future-Dated Occupancies
- Future-Dated Occupancies appear in the Open Occupancies step but are read-only. Users cannot change the end date/time.
- Future-Dated Occupancies are automatically deleted after the Exit is saved.
- A Warning icon displays with a tooltip on hover:
- "This occupancy is scheduled to begin after the entered Project Exit Date, and will be automatically deleted from the client's record when changes are saved."
Completion
Whether accepting defaults (toggle On) or setting values manually (toggle Off), clicking Save & Next completes the Open Occupancies step of the Exit workflow.
Unsaved Changes Warning
If a user clicks the X or outside the workflow, a warning displays:
"You have unsaved changes that will be lost if you leave this page. Please confirm."
- Cancel: Returns the user to the Exit form.
- Confirm: Closes the Exit form and discards all changes.
Auto Exit to Permanent Destination
When Auto Exit to Permanent Destination is configured in Program Setup for Coordinated Entry or Encampment programs, the system automatically creates an exit when a qualifying move-in date or permanent exit destination is saved.
Triggering an Auto Exit
An auto exit for the client and any CE/Encampment program household members occurs under either of the following conditions:
- Move-In Date: A housing Move-In Date is entered on the Head of Household's enrollment screen for any permanent housing program.
- Housed Exit Destination: A permanent housing exit Destination is entered on any program exit screen.
- Deceased Exit Destination: A Deceased is recorded for the exit Destination for any program exit screen.
Exit Field Values
All fields except Exit Date and Destination are stored as Data Not Collected, unless the Program Setup > Exit Screen Fields When Permanent Destination Exit specifies values. In that case, those fields must be populated with the configured values.
Exit Date
- If triggered by Move-In Date: The CE/Encampment Exit Date is the entered Move-In Date.
- If triggered by a housed Exit Destination: The CE/Encampment Exit Date is the exit date entered on the triggering exit.
Exit Destination
- If triggered by a housed Exit Destination: The CE/Encampment Exit Destination matches the triggering exit destination.
- If triggered by Move-In Date in Program Type 9 (PH – Housing Only) or 10 (PH – Housing with Services, no disability required):
- Exit Destination = 435 "Rental by client, with ongoing housing subsidy"
- Subsidy Type = 440 "Other permanent housing dedicated for formerly homeless persons"
- If triggered by Move-In Date in Program Type 3 (PH – Permanent Supportive Housing, disability required):
- Exit Destination = 435 "Rental by client, with ongoing housing subsidy"
- Subsidy Type = 439 "Permanent Supportive Housing"
- If triggered by Move-In Date in Program Type 13 (PH – Rapid Re-Housing):
- Exit Destination = 435 "Rental by client, with ongoing housing subsidy"
- Subsidy Type = 431 "RRH or equivalent subsidy"
User Prompts
When a client exits to a permanent destination, the system displays a pop-up message based on the client's CE enrollment type.
- If all CE enrollments are individual:
"This client has exited to a Permanent Destination and will automatically be exited from the Program." - If at least one CE enrollment is a group:
"This client has exited to a Permanent Destination and will automatically be exited from the Program. Please review other household members as well."
The pop-up includes two buttons:
- Cancel: Dismisses the pop-up without proceeding.
- Confirm: Confirms the auto exit.
Non-trigger Conditions
- If a Move-In Date occurs before the CE/Encampment enrollment Start Date, no exit or pop-up occurs.
- If an exit to a permanent destination occurs before the CE/Encampment enrollment Start Date, no exit or pop-up occurs.
Automated Removal from the Community Queue
When enabled in Community Queue settings, exiting a client to a permanent destination can automatically remove their referral from the Community Queue after user confirmation.
Triggering Automated Removal
When the Automated Removal from the Community Queue setting is enabled, a program exit to a permanent destination automatically updates the related Community Queue referral and removes it from the queue. The following confirmation pop-up displays:
"This client has exited to a Permanent Destination and will automatically be removed from the Community Queue."
- Cancel: Allows the user to select a different exit destination that does not delete the referral in the Community Queue.
- Confirm: Deletes the referral in the Community Queue.
Removal Reasons
- If removed due to Deceased:
- Reason for Removal = Automated Removal
- Sub-reason = Deceased
- If removed due to any other permanent destination:
- Reason for Removal = Automated Removal
- Sub-reason = Housed with Community Inventory
Audit Log
System Administrators with the Audit Log access right can view audit logs throughout the system. Refer to Rights Glossary for Access Roles for details on access rights.
To open the audit log, click the Action Menu (three dots) icon in the upper right of the workspace and select View Audit Log. The audit log shows all changes made to the client's exit data.
Updated: 11/03/2026