Configuring Encampment Programs
This article describes how to configure programs with an Encampment project type to allow users to track intervention efforts.
For details on how to enroll clients into Encampment programs, refer to our Enrolling Clients in Encampment Programs article.
Overview
Encampment programs (Program Type = 500) can be created in either Outreach or in the main Clarity Human Services system. First, however, the associated screens, templates, and Outreach Settings must be configured as described below:
Configuring Screens
When Outreach is enabled for an instance, an Encampment Program toggle appears on the SCREEN EDITOR for Program Setup, Program Enrollment, Program Status, Program Exit, and Program Follow-up screens.
When the Encampment Program toggle is enabled, the screen will be available for use in an encampment template.
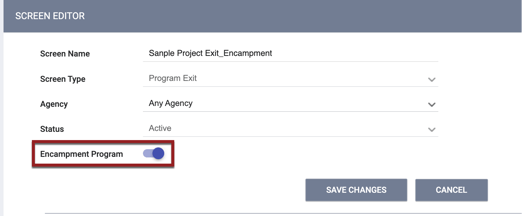
Note: If the Encampment Program toggle was turned ON and then Outreach is disabled for the instance, the Encampment Program toggle will be turned OFF. If Outreach is then enabled again, the system will remember that the toggle had previously been turned ON.
The only fields allowed in screens used in an encampment program template are fields that will automatically cascade and that have Data Quality Check set to “Not Required.”
- When the Encampment Program toggle is enabled for the screen, Data Quality Check and Disable Data Cascade will be read-only within the SCREEN FIELD EDITOR.
- The Start Date and Exit Date fields that need to be within program enrollments will auto-populate based on the date of enrollment and date of exit.
If a user enables Encampment Program for a screen that already includes required fields or fields with Disable Data Cascade turned on, the system displays the following pop-up message: “By enabling the ‘Encampment Program’ setting for this screen, any ‘Required’ or ‘Soft Required’ fields will be set to ‘Not Required’, and any fields with ‘Disable Data Cascade’ enabled will be disabled.”
- The exceptions to this are Project Name, Operating Start Date, and Program Type fields on the Program Setup Screen; the system will not set those fields to “Not Required” or turn off Disable Data Cascade.
Once an encampment screen is created, an ENCAMPMENT PROGRAM label indicates that the Encampment Program toggle is enabled for that screen.
![]()
Administrators can use the system screen titled “Encampment Project Setup'' when setting up an Encampment program, or create a custom Encampment project setup screen. The System screen is only visible when Outreach is enabled for an instance.

The system Encampment Project Setup screen has the same fields as the HUD HMIS Project Setup screen, but the only fields that are required are Project Name, Operating Start Date, and Program Type.
Note: For information on the Encampment Screens that are used in creating an Encampment Profile, which are different than the screens described above, refer to our Introduction to Screens and Screen Types article.
Configuring Encampment Program Templates
Once you have created encampment screens, you can apply those screens to encampment program templates, which can then be used for configuring encampment programs.
On the template setup page, enter a name for the template that represents the type of intervention the program will provide, then turn on the Encampment Program Template toggle that is displayed when Outreach is enabled for an instance.

Note: If the Encampment Program Template toggle was turned ON and then Outreach is disabled for the instance, the Encampment Program Template toggle will be turned OFF. If Outreach is then enabled again, the system will remember that the toggle had previously been turned ON.
Once Encampment Program Template is enabled, the dropdown lists for Program Screen, Enrollment Screen, Case Status Screen, and Exit Screen will contain only the screens that have the Encampment Program toggle enabled as described above. Select the appropriate screen for each.
To include services automatically in the encampment programs that will be created with this template:
- Set Automated Provisioning to “Enabled.”
- Configure the Automated Provisioning sections (SERVICES, DEFAULT GOALS, etc.) as appropriate.
To include eligibility in encampment programs that will be created with this template:
- Set Automated Provisioning to “Enabled.”
- Turn on the Eligibility toggle.
- Configure the PROGRAM ELIGIBILITY section as appropriate.
Once an encampment template is created, it will be listed on the PROGRAM TEMPLATES page with the other program templates, but will have an information icon that says “Encampment Program Template.”
![]()
If a user turns Encampment Program Template ON for an existing program template, the system shows a pop-up saying, “By enabling the ‘Encampment Program' option, all screens assigned to this program template must have ‘Encampment Programs’ enabled on the screen set up. Please update the program template screen assignments to the proper screens.”
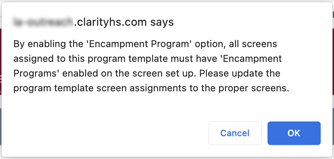
Note: If Outreach is disabled for an instance after an encampment template is created, the Program Screen field will be changed from "Encampment Program Setup" to “HUD HMIS Project Setup.”
Creating an Encampment System Agency
After you have created encampment screens and templates, but before you can create an encampment program, you must first go to SETUP > SETTINGS > Location & Outreach Settings, select the Outreach Setting CoC (or “Default” setting, if utilized), and turn on the Encampment Programs toggle.
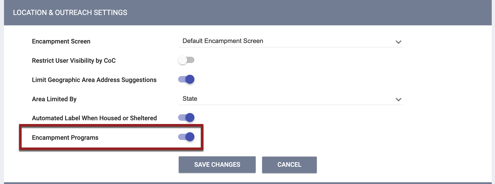
The “Default” Outreach setting applies to any CoCs in the instance that do not have a unique Outreach CoC Setting configured.
The first time Encampment Programs is turned ON, the system creates an Encampment System agency with the following values for the required fields on the CREATE NEW AGENCY page:
| Agency Name |
“<coc_name> Encampment System” This field will be read-only. |
| Agency Type | Common |
| Address/City/State/ County/Zip Code/ Geocode |
These fields will match the System agency’s fields, but are editable. |
| Continuum of Care | This will be the CoC for the associated Location & Outreach setting. For a Default Encampment System, this field will be filled with the first CoC in the list of CoCs associated with the Default setting, but can be changed. |
| Default Profile | [2024] General Intake |
Note: Encampment agencies are “system” agencies that do not count toward an instance’s Agency Seats.
Only one Encampment System agency can be created per Location & Outreach setting that has Encampment Programs enabled. The Encampment System agency will not have a delete icon.
Refer to our System Advanced Options: Location & Outreach Settings article for details on how turning off the Encampment Programs toggle will affect encampment agencies and programs that have been created.
Now that the screens, templates, and Outreach Settings have been configured, Encampment programs can be created within Outreach or within the main Clarity Human Services system.
Creating Encampment Programs within Outreach
Note: The Encampment Programs toggle in the Outreach Setting of the agency the user is switched into must be enabled in order to use the Encampment program functionality within Outreach.
System Admin and Agency Manager users with appropriate access role permission can create Encampment programs using the ENCAMPMENT PROGRAMS tab on that page that users see when they click on an encampment on the Outreach map.
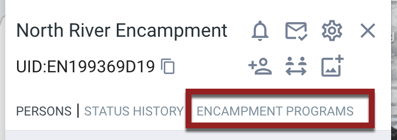
A user’s ability to create these programs depends on the Outreach - Create Programs access role permission.
- If the Outreach - Create Programs access role permission is disabled, the user cannot create a new program from within Outreach.
- If the Outreach - Create Programs access role permission is enabled, users with the Outreach - Create Encampment Program permission can create a new program within Outreach.
The Create Encampment Program section of the ENCAMPMENT PROGRAMS tab includes a Program Template drop-down and an ADD button. The ADD button will be grayed out until a Program Template is selected.
To create an Encampment Program, select one of the Program Templates available to link to that Encampment from the drop-down menu, then click ADD.
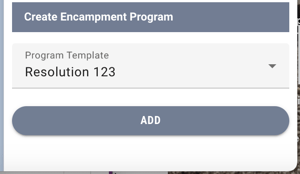
The system creates a new program within the Encampment System agency of the current Outreach Setting that has the following values:
|
Program Name |
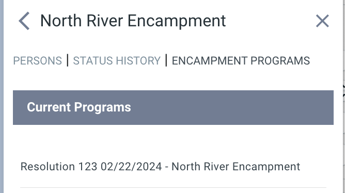
<Program Template Name> <Date Created> - <Encampment Name> (example: “Resolution 123 02/22/2024 - North River Encampment”) |
|
Operating Start |
The date on which the program was created |
|
Program Type |
“Encampment” |
|
Continuum of Care |
The CoC for the Outreach Setting to which the Encampment belongs |
|
Public Listing |
“None” |
In the main Clarity Human Services system, the Assigned Encampment section of the Program Resources sidebar will list the Encampment where the program was added.
In addition, any entities configured through the program template automated provisioning will be assigned to the Encampment program created through Outreach.
Within Outreach, the program will appear in the Current Programs list for that Encampment, and users will be able to enroll that Encampment’s clients in the program as described in our Enrolling Clients in Encampment Programs article.
Creating Encampment Programs within Clarity Human Services
Switch into an Encampment System agency. Then navigate to MANAGE > PROGRAMS and click ADD NEW PROGRAM as you would for any other program.
In the Program Template field, select an encampment template.
Note: If you are switched into an agency other than an Encampment System agency, you will not see any encampment templates in the Program Template field.
The system will then fill the required program setup fields as follows:
| Program Name | "<Program Template Name> <Date Created>" |
| Program Type | “Encampment” |
| Operating Start | Date program created |
| Continuum of Care | Auto-populates based on the associated Location & Outreach setting (if the program is created within the Default Encampment System agency, the Continuum of Care field prefills by all the CoCs that fall under the Default settings). |
| Public Listing | None |
Note: If a non-encampment Program Template is selected, the Program Type field will not display the “Encampment” option.
Assigning an Encampment to the Program
Once an encampment program is saved, an encampment can be assigned to that program. Encampments can be assigned to multiple encampment programs, but each encampment program can only have one assigned encampment.
To assign an encampment to an encampment program, click the Assigned Encampment link in the Program Resources sidebar.

On the ENCAMPMENT page, click ADD ENCAMPMENT.

The ADD ENCAMPMENT pop-up appears, displaying a list of encampments associated with the agency’s Outreach CoC setting. The list includes only encampments that are active during the program's operating dates, including those that existed before the program’s Operating Start Date.

Select an encampment and click ADD. After the encampment is added:
- The Name and Status of the encampment appear on the ENCAMPMENT page.
- The ADD ENCAMPMENT link will not be visible, since the program can only have one assigned encampment at a time.
- The action will be tracked in the Audit Log.

Users will then be able to enroll clients in the encampment program.
Deleting an Encampment Program
If the encampment is deleted from the Assigned Encampment section:
- The following pop-up appears: “An Encampment needs to be assigned to this program in order to accurately function.”
- The ADD ENCAMPMENT link will be visible again.
If any enrollments are associated with an encampment program, that program’s assigned encampment cannot be deleted, even if the encampment is inactive.
A warning banner will be displayed on the Program Setup page for any encampment program that does not have an assigned encampment.
Configuring Auto Exit to Permanent Destination for Encampment Programs
The Auto Exit to Permanent Destination function that is available for Coordinated Entry programs is also available for use by encampment programs. To enable this function, turn on the Auto Exit to Permanent Destination toggle on the encampment program’s setup page.
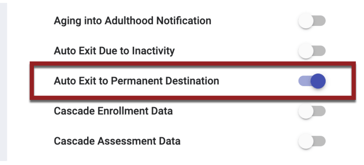
Note: If Auto Exit Due to Inactivity and Auto Exit to Permanent Destination and are both enabled for an encampment program, the system will apply the auto exit that occurs first.
When Auto Exit to Permanent Destination is enabled, the system displays the following pop-up when a user enters a Housing Move-In Date on the enrollment screen for any permanent housing project type or enters a permanent housing Destination on any exit screen for the client:
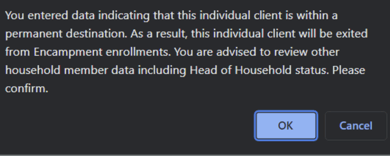
When the user clicks OK to the “please confirm” message, the system automatically records an exit from the encampment program.
The Exit Date, Destination, and Subsidy Type fields in the auto exit record will be filled as follows:
- When a Housing Move-In Date is saved on the client’s enrollment screen for a permanent housing project type:
- Encampment Exit Date will populate with the Housing Move-In Date.
- Encampment Destination will be set to 435 (Rental by client, with ongoing housing subsidy).
- Encampment Subsidy Type will populate as follows:
Permanent Housing Project Type Subsidy Type 9 (PH- Housing Only)
OR
10 (PH – Housing with Services
(no disability required for entry))440 (Other permanent housing dedicated for formerly homeless persons)
3 (PH – Permanent Supportive Housing (disability required for entry)) 439 (Permanent Supportive Housing) 13 (PH – Rapid Re-Housing) 431 (RRH or equivalent subsidy)
- When a permanent housing Destination (3, 410, 411, 19, 20, 421, 422, 423, 24, 426, 28, 31, 33, 34, 435) is saved on any exit screen for the client:
- Encampment Exit Date will populate with the exit date of the triggering exit.
- Encampment Destination will populate with the value for the destination that triggered the exit.
All other fields in the auto exit record will be stored as "Data Not Collected" unless otherwise specified in the Exit Screen Fields When Permanent Destination Exit section that appears in the Program Resources sidebar when Auto Exit to Permanent Destination is enabled.
Note: If either the move-in date or the exit to the permanent destination occurs before the encampment program enrollment starts, the system will not display the “please confirm” pop-up message and the client will not be exited.
The record for the auto exit in the Audit Log will show the name of the user who entered the data that initiated the auto exit, with “(Auto Exit)“ displayed under the user’s name.

The Assigned Staff for the encampment program will receive a notification saying “The following Encampment programs have been automatically exited” that lists the Client Unique Identifier, Program Name, and Start Date.
Searching for Encampment Programs
Users who are switched into an Encampment System agency can search for an Encampment program by selecting the “Encampment” filter on the MANAGE > PROGRAMS page.

Reporting on Encampment Programs
Users can run reports on encampment programs, but those programs will be excluded from the following reports:
- [HSNG-108(-AD)] Housing Census
- [HSNG-200(-AD)] Current Housing Availability
- [HUDX-111(-AD)] HUD CSV / XML Program Data Export
- [HUDX-123-AD] Housing Inventory (HIC) [FY 2023]
- [HUDX-223-AD] System Performance Measures
- [HUDX-224(-AD)] PATH Annual Report [FY 2024]
- [HUDX-225(-AD)] HMIS Data Quality Report [FY 2024]
- [HUDX-227(-AD)] Annual Performance Report [FY 2024]
- [HUDX-228(-AD)] ESG CAPER [FY 2024]
- [HUDX-230-AD] Shelter Count PIT [2024]
- [HUDX-231] LSA Export - Project-Focused LSA [FY 2024]
- [HUDX-235(-AD)] CE APR [FY 2024]
- [HUDX-236] LSA - Project Descriptor HDX Upload Test [FY 2024]
- [OUTS-205(-AD)] Program Recidivism
- [UNIT-102(-AD)] Unit Client Detail - Referral
- [UNIT-103(-AD)] Unit Client Detail - Enrollment
Published: 03/04/2024