Overview
To describe this function, we'll use the terms "constrained field" and "constraining field:"
- A constrained field has a display constraint applied to it. The system will only display the field if the conditions established in Display Constraints are met. You can use any field as a constrained field.
- A constraining field is applied as a Display Constraint to another field. You can use any type of field except for a date field or a geolocation field as a constraining field.
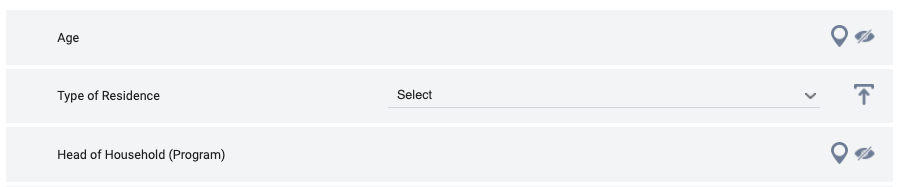
For example, consider a screen with a Type of Residence field and an Age field. If we only want the Type of Residence field to appear if the value for the Age field is greater than 17, we can set up a Display Constraint with Type of Residence as the constrained field and Age as the constraining field.
Adding a Constraint
Note: Make sure you have added both the constraining field and the constrained fields to the screen before adding a constraint.
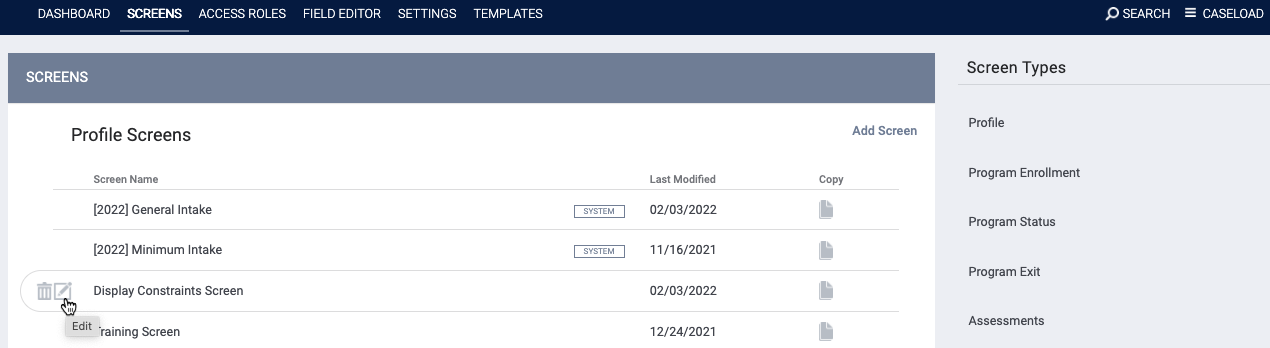
To apply a constraint to a field within a screen, go to SETUP > SCREENS and click the Edit icon for the appropriate screen.
The SCREEN EDITOR page appears.
Locate the field that will be the "constrained field" (i.e., the field that will only be visible if certain conditions are met). Click the Edit icon for that field.
In our example, we select the Type of Residence field.

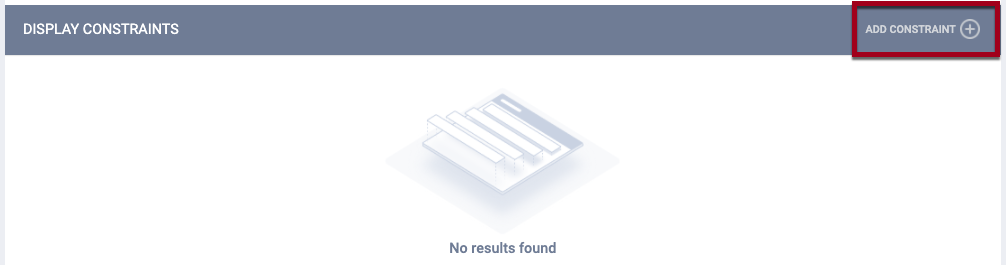
The SCREEN FIELD EDITOR appears. Scroll down to the DISPLAY CONSTRAINTS section. Click ADD CONSTRAINT.
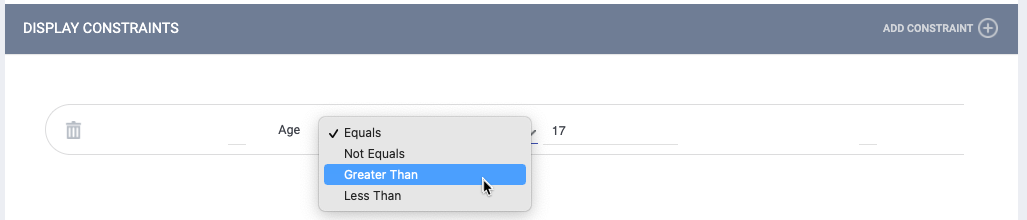
The ADD CONSTRAINT window appears. The drop-down menu lists the available "constraining fields." Select the desired field from the drop-down menu (in this example, Age), then click SAVE.

Note: Date fields and geolocation fields cannot be used as a "constraining field." Fields on your screen with those field types will not appear in the drop-down menu that lists the available "constraining fields" in the ADD CONSTRAINT window.
The constraining field now appears in the DISPLAY CONSTRAINTS section.

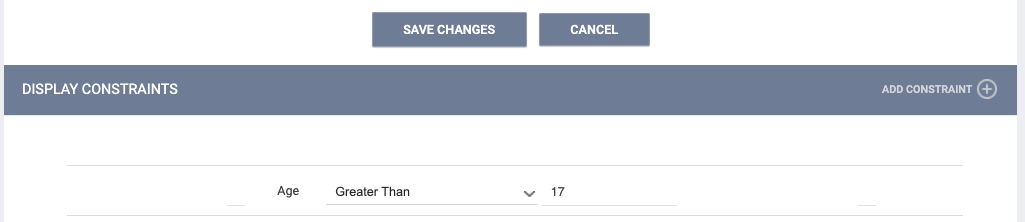
Enter the value (or select the value from the drop-down menu if the constraining field is a Picklist type), then choose the relationship between the constraining field and the value. In our example, we enter "17" for the value and select "Greater Than" for the relationship.
Click SAVE CHANGES to save the Display Constraint.
On the SCREEN EDITOR page for this screen, you will see the icon shown below to indicate that the Type of Residence field has a Display Constraint. The constraint will only apply to this screen.

Multiple Constraints
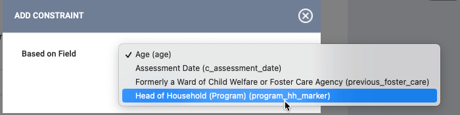
You can add more than one constraint to a field if desired. In our example, if we want the constraint to be that the Type of Residence field is displayed if the client is older than 17 or is the Head of Household, first we would need to make sure that the Head of Household field is included on the SCREEN EDITOR.
Next, click the Edit icon for the Type of Residence field to return to the SCREEN FIELD EDITOR for the Type of Residence field. Click ADD CONSTRAINT.

Select the containing field to add -- in this case, "Head of Household." Click SAVE.
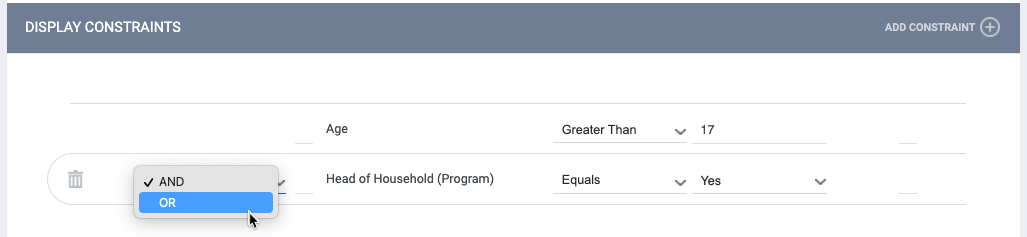
Now that there is more than one constraint, an "AND/OR" drop-down menu appears for the added condition. Select the appropriate option:
- Choose "OR" if you want the field to be displayed when at least one of the constraints is met.
- Choose "AND" if you want the field to be displayed when all constraints are met.
For our example, we select "OR."
Click SAVE CHANGES.
Advanced Logic
If you apply at least three constraints to a field, you can use parentheses (also known as brackets) to designate the relationships between the constraints. This logic operates in the same manner as it does with Assessment Processors.
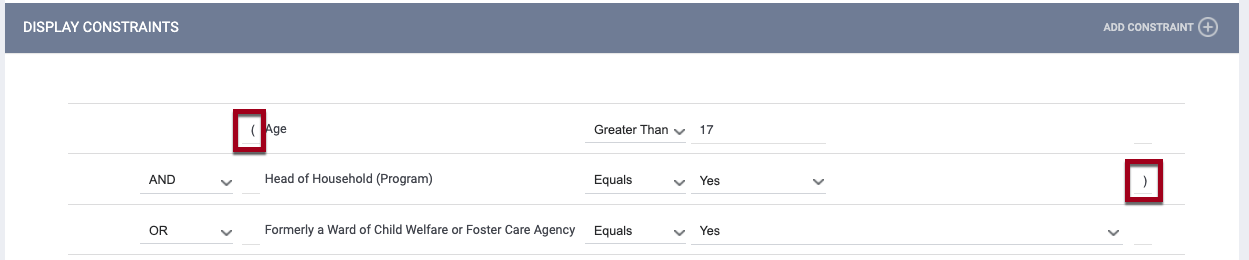
Continuing with our previous example, we see that the field is set up with constraints to display if either:
Age is greater than "17" AND Head of Household equals "Yes"
OR
Formerly a Ward of Child Welfare or Foster Care Agency equals "Yes."
If you click the trash can icon for a component containing a bracket, such as in the image below, you will see a pop-up warning.

The pop-up asks you to review the bracket configuration upon deleting the bracket and any additional brackets on the page to ensure that the logic is still configured correctly.

Warning for Deleting Fields Used as a Display Constraint
If a field is used as a display constraint for another field on the screen, the Trash Can icon will be available to you, but when you click it, the following warning pop-up will appear:

If the field is removed from all display constraints on other fields on the screen, you will be able to delete the field.
Considerations
Unlike a hidden field that can accept and store data even when it isn't displayed, a field that is not visible due to a Display Constraint cannot save data.
Consider the following implications:
- Data entry: if a user enters a value for a constrained field that is currently visible, then later changes the constraining field so that the constrained field is no longer visible, the previously entered data for the constrained field will not be saved.
- Screen design: introducing a new constraint to an existing screen could cause a previously-visible field to disappear from the screen due to the new constraint, resulting in the loss of any saved data from that field.
Note: In some circumstances data can cascade into fields that are marked read-only, regardless of display constraints. If you don’t wish data to cascade, be sure to enable the Disable Data Cascade toggle.
Updated: 12/10/2025