Goal Templates
This article provides details on how to access, create, and manage Goal Templates and Goal Measures.
Overview
Program Goals allow staff members to track whether a client accomplished a goal within an enrollment based on demographic-based, service-based, or time-based data. Before a staff member can add a Program Goal to a client's enrollment, a system administrator must create a Goal Template and enable it for the Program.
Note: Only system administrators can create and edit Goal Templates.
Accessing Goal Templates
To create or modify a Goal Template, click the Launchpad and navigate to SETUP > TEMPLATES > Goal Templates.

Creating New Goal Templates
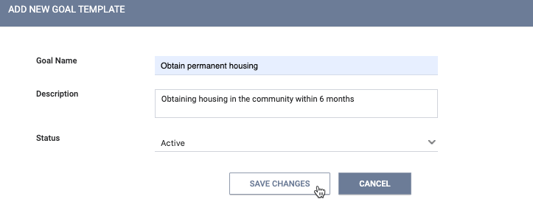
Click CREATE A NEW GOAL TEMPLATE. The ADD A NEW GOAL TEMPLATE pop-up appears.

Enter a name and description for the goal and choose a Status.
- "Active:" the template is available to programs.
- "Inactive:" the template is not available to programs but can be changed to "Active" at any time.
Note: once you click SAVE CHANGES, you must add Measures for the goal to function correctly.
Creating Goal Measures
The accomplishment of a goal is tracked in the client record when the "Measure" criteria are met. Each goal can have multiple Measures.
To add a Measure to a goal, click ADD NEW MEASURE on the EDIT GOAL TEMPLATE page.

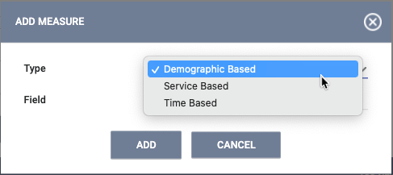
The ADD MEASURE pop-up appears.

Select the Type of Measure to add:
- A Demographic Based Measure uses data entered in a field during a Status Assessment to determine if a client met the goal.
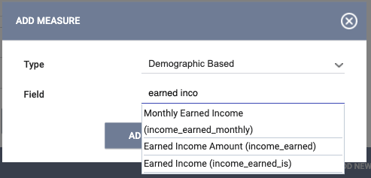
- For example, if we want to set a goal for a client of earning income, we could configure a Demographic Based Measure that looks at the value for the Earned Income field.
- If you select this type of Measure, you will also need to use the Field menu to choose the applicable screen field. As you start typing the name of the field, a list of options will appear. Select the desired field.

- A Service Based Measure looks at whether a specific Category of service item is recorded within an enrollment.
- For example, if we want to set a goal for a client of receiving a credit repair service, we could configure a Service Based Measure that looks at whether a client has received a service with a "Credit Repair" Category.
- A Time Based Measure uses time duration to determine if a client met the goal.
- For example, if we want to set a goal for a client of remaining in a program for at least five days, we could configure a Time Based Measure that looks at the number of days the client has been in the Program.
Click ADD. The Measure will appear in the MEASURE section of the EDIT GOAL TEMPLATE page and will be labeled "M1." Additional Measures will be labeled "M2," "M3," etc.

- For Demographic Based Measures, select or enter a value (depending on the field type, you will need to enter an amount, select from a picklist, or turn a toggle on or off). Then choose whether the response for the selected field is equal to, not equal to, greater than, or less than the designated value.
- In our example, the goal is to obtain earned income, so we configure a Measure that checks to see if the Earned Income toggle is on for the client.

- For Service Based Measures, select a service category from the drop-down menu, then select whether the "Received Category of Service" is equal to or not equal to the selected category.
- For our example, the goal is to receive a credit repair service, so we configure this Measure as "Received Category of Service" equals "Credit Repair."

- For Time Based Measures, enter a number, then select whether the "Time in Days" is equal to, not equal to, greater than, or less than the entered number.
- In our example, we want the client to remain in the Program for at least five days, so we configure this Measure as "Time in Days" is greater than 4 days.

Measure Rules
If you add more than one Measure to the Goal Template, you can use "Measure rules" to designate the relationships between the Measures. Use the drop-down menu between each Measure to select "And" or "Or":
- Choose "Or" if the client must achieve at least one of the Measures to achieve the goal.
- Choose "And" if the client must achieve all of the Measures to achieve the goal.
In the example below, we have configured a Goal Template where both M1 and M2 must be met.

You can enter parentheses (also known as brackets) in the fields to the left and right of each Measure to designate the relationships between multiple Measures.

In the example above, we have created a Goal Template where the client achieves the goal if either:
- Both M1 AND M2 are met
OR
- M3 is met
Click SAVE CHANGES to save the Goal Template.
If you delete a bracket, you will see a pop-up warning asking you to review the bracket configuration to ensure that the logic is still configured correctly.
Updated: 04/24/2025