
Table of Contents
Overview
BYOBI lets you connect your preferred business intelligence tool directly to your Clarity data in Snowflake. This guide walks you through authenticating and configuring three popular tools - Tableau, Microsoft Power BI, and Looker - against your dedicated reader account.
Connecting your account requires one of three authentication methods:
| Method | Notes |
|
Key-Pair (recommended) |
One-time setup; supported by all three tools. |
|
Auth0 |
Users sign in with their own credentials and re-authenticate at regular intervals. Tableau and Looker support Snowflake Auth0; Power BI uses Microsoft Entra 0Auth. |
|
Username & Password |
Best for quick, first-time testing only, as Snowflake is phasing out this method. Please plan to migrate to Key-Pair. |
Heads Up!
Snowflake has announced it will end support for username/password-only authentication. We strongly recommend setting up Key-Pair or 0Auth from the start to avoid disruption.
Before You Begin
To get started, you’ll need:
- Your Bitfocus Snowflake account credentials (username, instance name, warehouse name).
- The BI tool of your choice, installed locally or available in your environment.
- For Tableau Desktop only: ODBC and the Snowflake ODBC driver.
You can find your server URL, instance name, and warehouse name in Snowflake under Account > Account Details.
Creating a Key Pair
Key-pair authentication uses an encrypted private key stored on the machine running your BI tool, paired with a public key registered to your Snowflake user. It's the most secure option and lets your BI tool run scheduled queries without requiring anyone to sign in.
To use key-pair authentication in Snowflake, users must generate a key pair with OpenSSL and run a Snowflake command to associate a user with the private key. The private key then needs to be uploaded to the server for cloud-based BI tools or stored on the user’s local machine for desktop BI tools (Tableau).
Step-by-step instructions to guide you through this process are below.
Step 1: (Windows Only) Install OpenSSL
macOS and Linux machines have OpenSSL preinstalled, so you can skip this step. On Windows, you’ll need to download the installer from Shining Light Productions using that link.
Step 2: Generate your private key
Open a terminal (Terminal on macOS/Linux; PowerShell on Windows) and run:
openssl genrsa 2048 | openssl pkcs8 -topk8 -inform PEM -out rsa_key .p8 -nocrypt
This creates rsa_key.p8 in your current directory.
Store this file somewhere safe - you’ll need it every time you connect.
Step 3: Generate the matching public key
In the terminal window, enter:
openssl rsa -in rsa_key.p8 -pubout -out rsa_key.pubStep 4: Register the public key with Snowflake
Open a Snowflake SQL worksheet and run:
ALTER USER your_username SET RSA_PUBLIC_KEY='MIIBIjANBgkqh...';
Replace your_username with your Snowflake username, and paste in the contents of rsa_key.pub (the full key text between the header and footer lines).
You’re now ready to authenticate any of the three BI tools below using your .p8 private key file.
Key Pair Resources
- Key-pair authentication and key-pair rotation | Snowflake Documentation
- Snowflake | Looker | Google Cloud Documentation
- Key-pair authentication and key-pair rotation | Snowflake Documentation
Tableau Desktop
Prerequisites
Tableau Desktop requires both ODBC and the Snowflake ODBC driver to be installed.
- Install iODBC from iodbc.org/dataspace/iodbc/wiki/iODBC/Downloads.
- Install Snowflake's ODBC driver from Snowflake Developer Resources.
- Open ODBC Administrator, go to the ODBC Drivers tab, and click Add Driver.
- In the dialog:
- Description of the driver:
Snowflake(this is case-sensitive and must be an exact match) - Driver file name (macOS):
/opt/snowflake/snowflakeodbc/lib/universal/libSnowflake.dylib
- Description of the driver:
Connecting
- Open Tableau Desktop. From Connect > To a Server, select Snowflake.
- Enter your connection parameters as follows:
Server:ficsimh-prod_[your-instance name]_reader.snowflakecomputing.com
Role:PUBLIC
Warehouse:READER_WH_[your-instance-name]
Authentication: Choose Username & Password or Key-Pair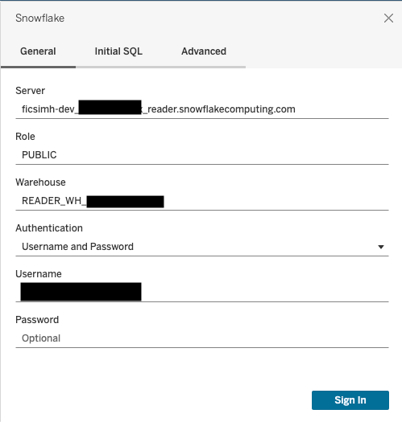
- Enter your connection parameters as follows:
- Provide credentials based on your chosen method:
- Username & Password: enter your Snowflake username and password.
- Sign in using Key Pair: enter your username, then navigate to your
rsa_key.p8private key file.
Once connected, your community's tables will appear in the Tableau interface.
Tableau References
- Key-pair authentication and key-pair rotation | Snowflake Documentation
- Configure Snowflake OAuth for partner applications | Snowflake Documentation
- ODBC Driver - Developer Resources
Microsoft Power BI Desktop
Power BI Desktop does not require any additional drivers.
Connecting
- In Power BI Desktop, click Get Data and select Snowflake as the Data Source.
- Enter your connection details as follows:
FieldValueServer:FICSIMH-PROD_[your-instance-name]_READER.snowflakecomputing.com
Warehouse:[your-warehouse-name] - Click Next and choose your authentication method:
- Username & Password: enter the credentials provided for your Bitfocus Snowflake reader account.
- Key-Pair Authentication: open your
rsa_key.p8file in a plain-text editor (Notepad, VS Code, TextEdit), then copy and paste the entire contents into the key field. - Microsoft Account: Power BI uses Microsoft Entra OAuth rather than Snowflake OAuth. See Configure Microsoft Entra ID for External OAuth for setup details.
Microsoft Power BI References
Looker
Connecting
Create a connection in Looker by following these instructions: Snowflake | Looker | Google Cloud Documentation.
The parameters below should be used when setting up your Snowflake connection in Looker:
- In Looker, navigate to Admin > Connections and click Add Connection.
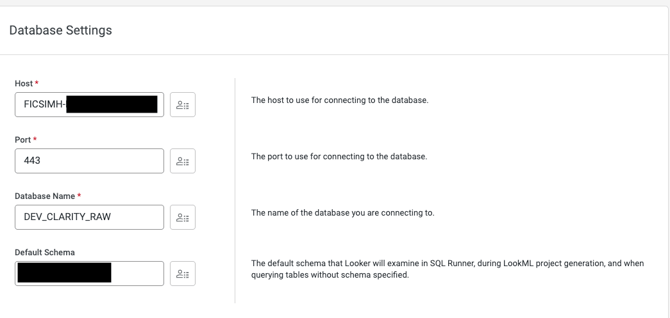
- Enter the parameters:
FieldValueHost:FICSIMH-PROD_[your-instance-name]_READER.snowflakecomputing.com*
*The URL can be found under “Account Details” in Snowflake
Port:443
Database Name:PROD_CLARITY_RAW
Default Schema:[your-instance-name]
Under the Optional Settings section:
Additional JDBC Parameters:warehouse=[your-warehouse-name]
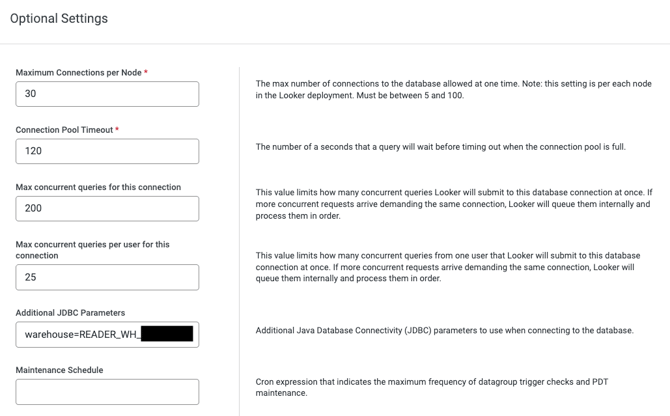
You can find your warehouse name in Snowflake under Compute > Warehouses.
Leave the remaining settings (max connections, query timeout, etc.) at their defaults unless you have a reason to change them. - Choose your authentication method:
- Database Account (Username & Password): enter your admin username and password.
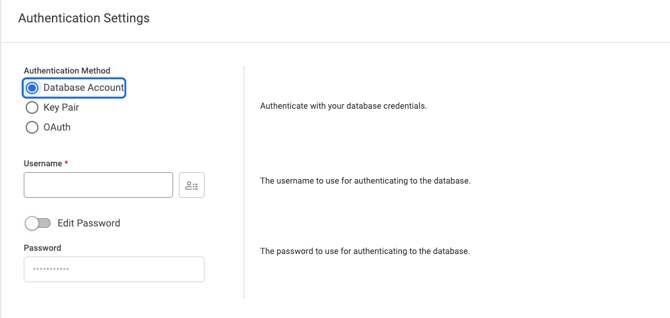
- Key Pair: enter your username and upload your
rsa_key.p8file.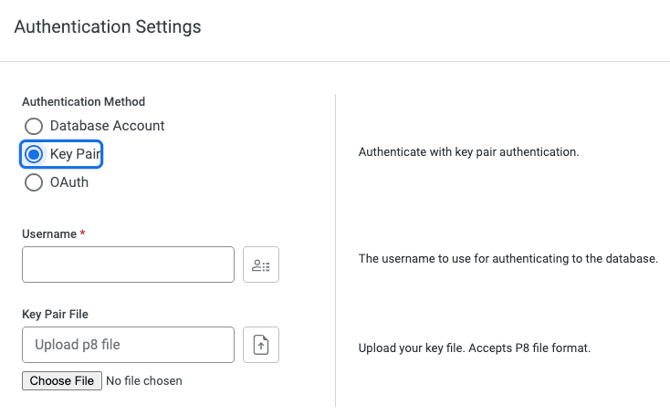
- Database Account (Username & Password): enter your admin username and password.
After setting up a database connection, you will need to set up a data model and explore to be able to query your data. Looker documentation has detailed instructions on creating projects, models, and explores:
- Creating a new LookML project | Looker | Google Cloud Documentation
- Generating a LookML model | Looker | Google Cloud Documentation
- Managing LookML files and folders | Looker | Google Cloud Documentation
- Working with joins in LookML | Looker | Google Cloud Documentation
- Changing the Explore menu and field picker | Looker | Google Cloud Documentation
Looker References
FAQ and other considerations
Tableau says it can’t find the driver for Snowflake. Where is it?
Double-check that the driver is named Snowflake in ODBC Administrator with a capital S. Tableau requires that the driver name is an exact match and the field is case-sensitive.
My BI tool says that it can’t find the server.
Verify that you’re using the correct URL. You can confirm it in Snowflake under Account Details > Account/Server URL. Don't include https:// or trailing slashes.
The URL can be found in your Snowflake account under “Account Details” as “Account/Server URL.
Key-pair authentication fails with an "invalid private key" error.
Make sure you're pointing to the .p8 private key file (not .pub), and that the public key was registered to the same Snowflake user you're connecting as. The ALTER USER … SET RSA_PUBLIC_KEY statement should use the contents of rsa_key.pub, with the header and footer lines stripped.
Why am I being asked to use an authenticator app for login MFA?
Snowflake only accepts authenticator apps for MFA and doesn't support phone number verification.
Clarity and Snowflake both use Auth0 for login, but they enforce different MFA requirements - so even if you've set up a phone number as your MFA method for Clarity, you'll need to add an authenticator app to sign in to Snowflake.
My queries are slow or timing out.
Check that your reader warehouse (READER_WH_[your-instance-name]) is sized appropriately and isn't suspended. Warehouses auto-resume on first query but may add a few seconds of latency.
Need Help?
If you require additional support or run into a problem this guide doesn’t cover, please contact the Support Team at support@bitfocus.com and make sure to include the following:
- The BI tool and version you’re using.
- The authentication method you’ve selected.
- The exact error message (a screenshot is ideal).
- Your Clarity instance name.
Updated: 08/12/2026